2.
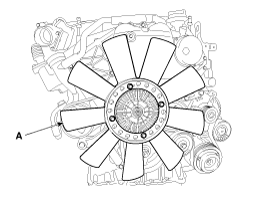
Remove the cooling fan (A).
Use fender covers to avoid damaging painted surfaces.
To avoid damage, unplug the wiring connectors carefully while holding the connector portion.
Mark all wiring and hoses to avoid misconnection.
Drain the engine oil and coolant. (Refer to Lubrication system and Cooling system in this group)
Remove the cooling fan (A).
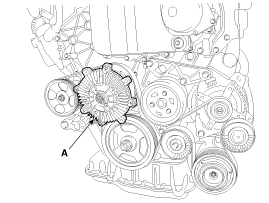
Remove the cooling fan clutch (A).
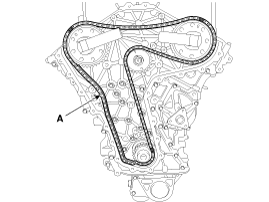
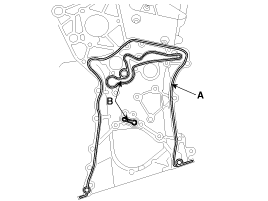
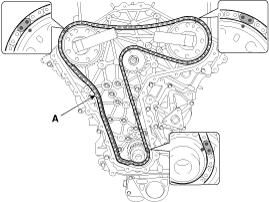
Compressing the tensioner (A) with a wrench in a left hand by turning it clockwise, start removing the drive belt (B) from the water pump side idler.
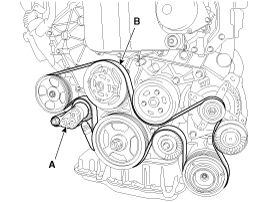
Conform to what is described above because tension of the belt in this engine is higher than ones of other engines for preventing a slip.
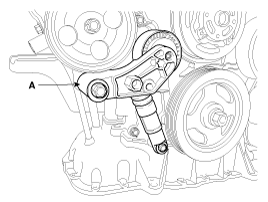
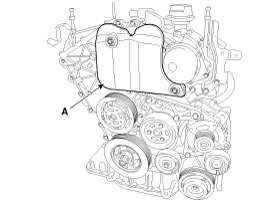
Remove the drive belt tensioner (A).
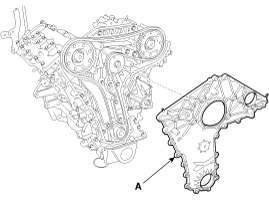
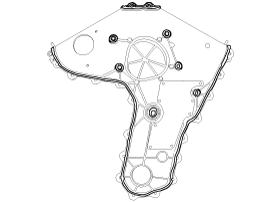
Remove the front cover (A).
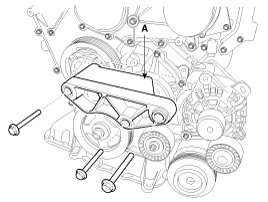
Remove the power steering pump (A) and bracket (B).

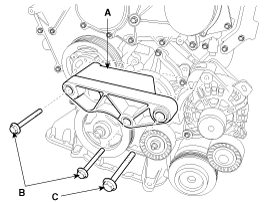
Remove the alternator bracket (A).
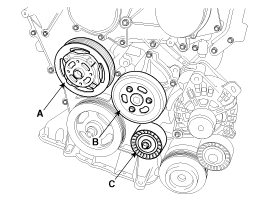
Remove the fan pulley assembly (A), water pump pulley (B) and Idler (C).
Remove the vacuum pump (A).
Remove the oil pan. (Refer to Lubrication system in this group)
Remove the crankshaft pulley (A) with its washer (B) and mounting bolt (C).
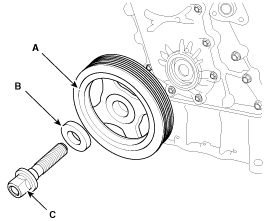
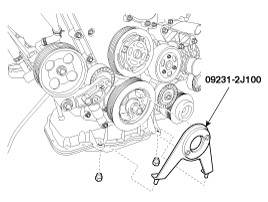
Use the SST (09231-2J100) to fix the crankshaft when remove the crankshaft pulley bolt.
Remove the LH/RH chain caps (A).
Remove the front chain cover (A).
Remove the hydraulic tensioner (A) and the tensioner lever (B).

Remove the timing chain guides (A).
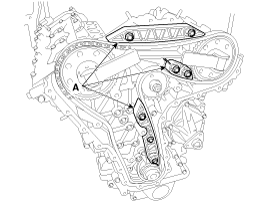
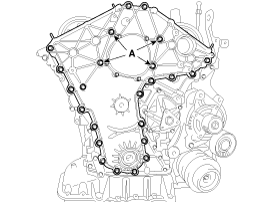
Remove the timing chain (A).
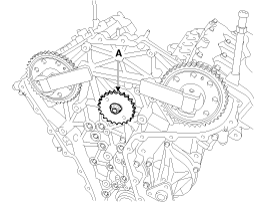
Remove the high pressure fuel pump sprocket (A).
Remove the upper head seal.
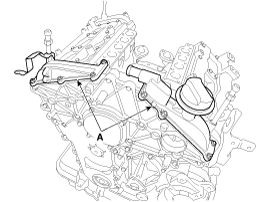
Remove the water pump (A) with its gasket.
Remove the high pressure pump. (Refer to FL group)
Remove the camshaft and the cylinder head assembly. (Refer to Cylinder head assembly in this group)
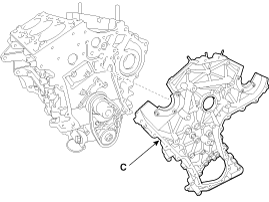
Remove the chain case assembly (A).

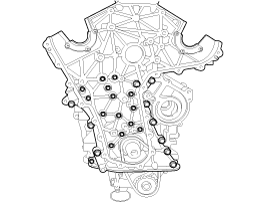
Applying sealant (A) on the groove and checking the O-rings (B) seated firmly, install the chain case assembly (C) within 5 minutes.
Standard liquid gasket : LOCTITE 5900H, THREE BOND 1217H
Check that the mating surfaces are clean and dry before applying liquid gasket.
Assemble the timing chain case in 5 minutes after applying the liquid gasket.
Apply liquid gasket in a 2.5mm(0.0984in.) wide bead without stopping.
Tighten the chain case mounting bolts with the specified torque.
Tightening torque
M6×16(15EA) :
13.7 ~ 15.7N.m (1.4 ~ 1.6kgf.m, 10.1 ~ 11.6lb-ft)
M8×35(10EA) :
19.6 ~ 25.5N.m (2.0 ~ 2.6kgf.m, 14.5 ~ 18.8lb-ft)
Install the water pump (A) with a new gasket.
Tightening torque :
9.8 ~ 11.8N.m (1.0 ~ 1.2kgf.m, 7.2 ~ 8.7lb-ft)
Install the high pressure pump. (Refer to FL group)
Install the camshaft and the cylinder head assembly. (Refer to Cylinder head assembly in this group)
Applying sealant, install the upper head seal. (Refer to Cylinder head assembly in this group)
Install the high pressure fuel pump sprocket.
Tightening torque :
64.7 ~ 74.5N.m (6.6 ~ 7.6kgf.m, 47.7 ~ 55.0lb-ft)
Fix the camshaft system by using the SST(09231-3A000).
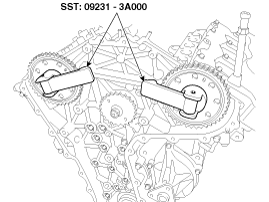
Install the timing chain (A), aligning the timing marks on the camshaft sprocket and the crankshaft sprocket.
Install the timing chain guides (A).
Tightening torque :
7.8 ~ 11.8N.m (0.8 ~ 1.2kgf.m, 5.8 ~ 8.7lb-ft)
If you have difficulty in installing of the lower chain guide, turn the drive plate or move the SST a little bit.
Install the tensioner lever (B).
Tightening torque :
19.6 ~ 23.5N.m (2.0 ~ 2.4kgf.m, 14.5 ~ 17.4lb-ft)
Install the hydraulic tensioner (A).
Tightening torque :
39.2 ~ 49.0Nm (4.0 ~ 5.0kgf.m, 28.9 ~ 36.2lb-ft)
Confirm that the timing marks are on the right position and remove the SST(09351-3A000).
Applying sealant on the front chain cover sealing surface, install the front chain cover (A) within a 5 minutes.
Standard liquid gasket : LOCTITE 5900H, THREE BOND 1217H
Check that the mating surfaces are clean and dry before applying liquid gasket.
Assemble the timing chain cover in 5 minutes after applying the liquid gasket.
Apply liquid gasket in a 2.5mm(0.0984in.) wide bead without stopping.
Tighten the front chain cover mounting bolts.
Tightening torque
Bolts A (4EA):
19.6 ~ 25.5N.m (2.0 ~ 2.6kgf.m, 14.5 ~ 18.8lb-ft)
Other bolts (20EA):
7.8 ~ 11.8N.m (0.8 ~ 1.2kgf.m, 5.8 ~ 8.7lb-ft)
Applying sealant on the groove of the chain caps (A), install the caps within a 5 minutes.
Tightening torque :
7.8 ~ 11.8N.m (0.8 ~ 1.2kgf.m, 5.8 ~ 8.7lb-ft)
Install it after removing sealant from the camshaft bearing ladders.
Install the crankshaft pulley (A) with its washer (B) and tighten the mounting bolt (C).
Tightening torque :
186.3 ~ 205.9Nm (19.0 ~ 21.0kgf.m, 137.4 ~ 151.8lb-ft) + 58° ~ 62°
Use the SST (09231-2J100) to fix the crankshaft when install the crankshaft pulley bolt.
Install the oil pan. (Refer to Lubrication system in this group)
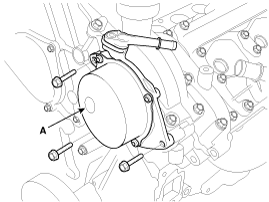
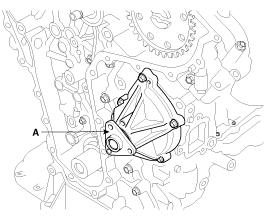
Install the vacuum pump (A).
Check O-ring damage and, apply oil before assemble.
Apply sealant thread part of bolts.
Align the nod of the pump.
Tightening torque :
7.8 ~ 11.8N.m (0.8 ~ 1.2kgf.m, 5.8 ~ 8.7lb-ft)
Install the fan pulley assembly (A), water pump pulley (B) and Idler (C).
Tightening torque
A : 63.7 ~ 73.5N.m (6.5 ~ 7.5kgf.m, 47.0 ~ 54.2lb-ft)
B : 9.8 ~ 11.8N.m (1.0 ~ 1.2kgf.m, 7.2 ~ 8.7lb-ft)
C : 34.3 ~ 44.1N.m (3.5 ~ 4.5kgf.m, 25.3 ~ 32.5lb-ft)
Install the alternator bracket (A).
Tightening torque
B : 42.2 ~ 53.9N.m (4.3 ~ 5.5kgf.m, 31.1 ~ 39.8lb-ft)
C : 33.3 ~ 41.2N.m (3.4 ~ 4.2kgf.m, 24.6 ~ 30.4lb-ft)
Install the bracket (B) and the power steering pump(A).
Tightening torque :
19.6 ~ 26.5N.m (2.0 ~ 2.7kgf.m, 14.5 ~ 19.5lb-ft)
Install the front cover (A).
Tightening torque :
7.8 ~ 11.8N.m (0.8 ~ 1.2kgf.m, 5.8 ~ 8.7lb-ft)
Install the drive belt tensioner (A).

Compressing the tensioner (A) with a wrench in a left hand by turning it clockwise, put on the drive belt (B) lastly with the water pump side idler.
Conform to what is described above because tension of the belt in this engine is higher than ones of other engines for preventing a slip.
Install the cooling fan clutch (A).
Tightening torque :
9.8 ~ 11.8N.m (1.0 ~ 1.2kgf.m, 7.2 ~ 8.7lb-ft)
Install the cooling fan (A).
Tightening torque :
9.8 ~ 11.8N.m (1.0 ~ 1.2kgf.m, 7.2 ~ 8.7lb-ft)
Install the other parts, and then refill engine with engine oil and coolant. (Refer to Lubrication system and Cooling system in this group)
