6.
Disconnect the inhibitor switch connector (A).
Thoroughly check connectors for looseness, poor connection, bending, corrosion, contamination, deterioration, or damage.
Disconnect the Inhibitor swtich connector.
Ignition KEY "ON"" & Engine "OFF".
Measure voltge between supplied power and ground at inhibitor circuit.
Specification : Approx. 12V
Connect the Inhibitor switch connector.
Ignition KEY "ON" & Engine "OFF".
Measure voltages between each terminal and chassis ground during shift lever changed "P, R, N, D".
Specification : See below "Signal Code Table"
| P | P-R | R | R-N | N | N-D | D |
Signal "1" | 12V | 12V | 0 | 0 | 0 | 0 | 0 |
Signal "2" | 0 | 12V | 12V | 12V | 0 | 0 | 0 |
Signal "3" | 0 | 0 | 0 | 12V | 12V | 12V | 0 |
Signal "4" | 0 | 0 | 0 | 0 | 0 | 12V | 12V |
Make sure vehicle does not roll before setting room side shift lever and T/M side manual control lever to "N" position.
Disconnect the negative (-) battery cable.
Remove the air cleaner assembly and air duct.
<a href="content.asp?vehicletype=Passenger&mfrcode=KM&area=KME&langcode=ENG&modelid=JD12&modelyr=2013&mmctype=en&mmcid=348&group=SHOP&pdftype=&cat1=2013+%3E+D+1%2E6+TCI%2DU2&ec=&firstnodedesc=Engine+Mechanical+System&sitinfolist=12%5E1235%5E12350100%5Enone%5E801%5E1%5EENG%5EKM%5EJD12%5E2013%5Een%5E348%5Enone%5Enone%5Enone%5ESHOP%5E%24" target="_blank">(Refer to Engine Mechanical System - "Air cleaner")</a>
Remove the air cleaner assembly.
<a href="content.asp?vehicletype=Passenger&mfrcode=KM&area=KME&langcode=ENG&modelid=JD12&modelyr=2013&mmctype=en&mmcid=348&group=SHOP&pdftype=&cat1=2013+%3E+D+1%2E6+TCI%2DU2&ec=&firstnodedesc=Engine+Mechanical+System&sitinfolist=12%5E1235%5E12350100%5Enone%5E801%5E1%5EENG%5EKM%5EJD12%5E2013%5Een%5E348%5Enone%5Enone%5Enone%5ESHOP%5E%24" target="_blank">(Refer to Engine Mechanical System - "Air cleaner")</a>
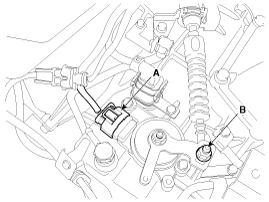
Remove the shift cable mounting nut (B).
Tightening torque:
9.8 ~ 13.7 N.m (1.0 ~ 1.4 kgf.m, 7.2 ~ 10.1 lb-ft)
Disconnect the inhibitor switch connector (A).
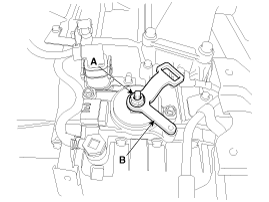
Remove the manual control lever (B) and the washer after removing a nut (A).
When installing, affix the manual control lever and the inhibitor switch with Ø5mm (0.1969in.). Then tighten the inhibitor assembly mounting bolts.
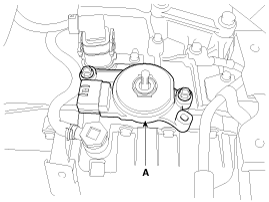
Remove the inhibitor assembly (A) after removing the bolts (2ea).
Tightening torque:
9.8 ~ 11.8 N.m (1.0 ~ 1.2 kgf.m, 7.2 ~ 8.7 lb-ft)
When installing, tighten the inhibitor assembly mounting bolt lightly, so that necessary adjustments can be made. Tighten to specifications.
Install in the reverse order of removal.
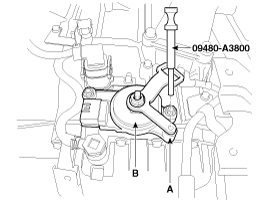
Using a SST(09480-A3800), fix the inhibitor manual control lever in the N jig hole (A) when you assemble the inhibitor (B).
Adjust the shift cable after you install the inhibitor switch.
(Refer to Automatic Transaxle Control System - "Shift lever")
