3.
Remove the battery negative (-) cable after removing the bolts.
Disconnect the battery negative (-) cable.
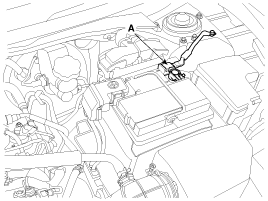
Disconnect the battery sensor connector (A).
Remove the battery negative (-) cable after removing the bolts.
Install in the reverse order of removal.
Battery sensor cable mounting bolt:
29.4 ~ 31.4 N.m (3.0 ~ 3.2 kgf.m, 21.7 ~ 23.1 lb-ft)
Battery (-) terminal l tightening nut:
3.9 ~ 5.9 N.m (0.4 ~ 0.6 kgf.m, 2.9 ~ 4.3 lb-ft)
For the vehicle equipped with a battery sensor, be careful not to damage the battery sensor when the battery is replaced or recharged.
When replacing the battery, it should be same one (type, capacity and brand) that is originally installed on your vehicle. If a battery of a different type is replaced, the battery sensor may recognize the battery to be abnormal.
When installing the ground cable on the negative post of battery, tighten the clamp with specified torque. An excessive tightening torque can damage the PCB internal circuit and the battery terminal .
When recharging the battery, ground the negative terminal of the booster battery to the vehicle body.
After reconnecting the battery negative cable, AMS function does not operates until the system is stabilized, about 4 hours. If disconnecting the negative (-) battery cable from the battery during repair work for the vehicle equipped with AMS function, Battery sensor recalibration procedure should be performed after finishing the repair work.
Turn the Iginition switch ON and OFF.
Park the vehicle for about 4 hours with the hood and all doors closed.
