Bleeding Air in Low Pressure Fuel Circuit
1.

Press the priming pump (A) about 50 times.

2.

Open the air bleeding hall after removing the bolt (B) for bleeding using a screwdriver.

3.

After install the screw, press the priming pump (A) again about 15 times.

4.

Open the air bleeding hall after removing the bolt (B) for bleeding using a screwdriver.

5.

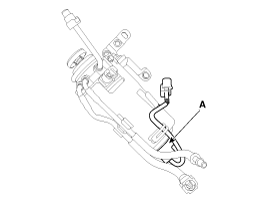
After install the screw, press the priming pump (A) again about 5 times.
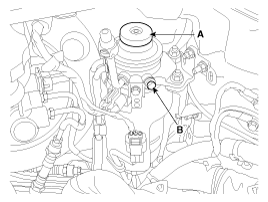
note

The number of pressing the priming pump is an estimated number.

If you work this procedure actually, you should press the priming pump until it gets stiff.

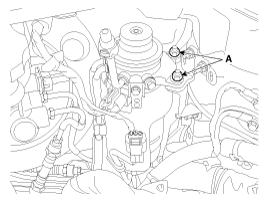
After removing or replacing the part below, bleed air in low pressure fuel circuit.

-

Fuel Tank

-

Fuel Sender

-

Fuel Filter

-

High Pressure Fuel Pump

-

Low Pressure Fuel Lines
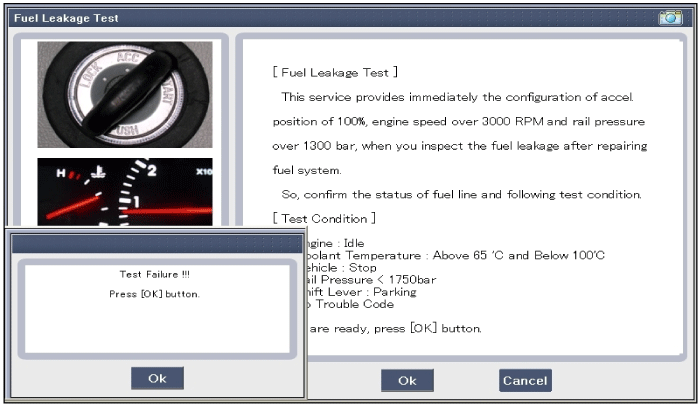
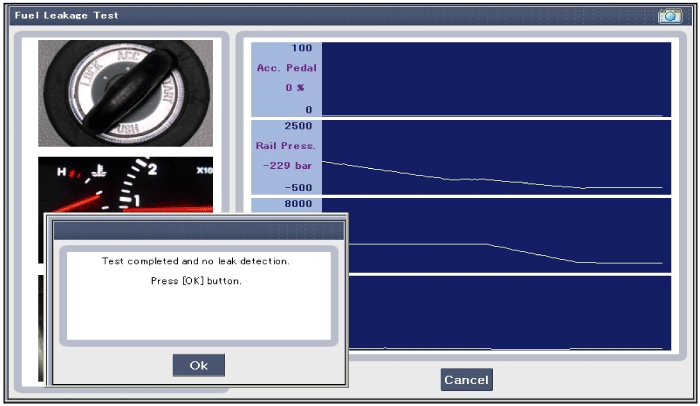
caution

If you try bleeding air just once, air is not bleeded perfectly.You should try bleeding air over 2 times.

Draining Water from the Fuel Filter

The fuel filter for diesel enging plays and important role of separating water from fuel and accumulating the water in its bottom. If water accumulates in the fuel filter, the warning light comes on when the ignition switch is in the ON position.

caution

If the water accumulated in the fuel filter is not drained at proper times, damages to the major parts such as the fuel system can be caused by water permeation in the fuel filter.

6.

Place a water trap under the fuel filter.

7.

Remove the air cleaner assembly.

<a href="content.asp?vehicletype=Passenger&mfrcode=KM&area=KME&langcode=ENG&modelid=JD12&modelyr=2013&mmctype=en&mmcid=349&group=SHOP&pdftype=&cat1=2013+%3E+D+1%2E4+TCI%2DU2&ec=&firstnodedesc=Engine+Mechanical+System&sitinfolist=12%5E1235%5E12350100%5Enone%5E801%5E1%5EENG%5EKM%5EJD12%5E2013%5Een%5E348%5Enone%5Enone%5Enone%5ESHOP%5E%24" target="_blank">(Refer to Engine Mechanical System - "Air Cleaner")</a>

8.

Remove the battery.

<a href="content.asp?vehicletype=Passenger&mfrcode=KM&area=KME&langcode=ENG&modelid=JD12&modelyr=2013&mmctype=en&mmcid=349&group=SHOP&pdftype=&cat1=2013+%3E+D+1%2E4+TCI%2DU2&ec=&firstnodedesc=Engine+Electrical+System&sitinfolist=11%5E1125%5E11250200%5Enone%5E801%5E1%5EENG%5EKM%5EJD12%5E2013%5Een%5E348%5Enone%5Enone%5Enone%5ESHOP%5E%2411%5E1125%5E11250200%5Enone%5E801%5E4%5EENG%5EKM%5EJD12%5E2013%5Een%5E348%5Enone%5Enone%5Enone%5ESHOP%5E%2411%5E1125%5E11250200%5Enone%5E801%5E3%5EENG%5EKM%5EJD12%5E2013%5Een%5E348%5Enone%5Enone%5Enone%5ESHOP%5E%24" target="_blank">(Refer to Engine Electrical System - "Battery")</a>

9.

Remove the ECM.

(Refer to Engine Control System - "ECM")

10.

Remove the fuel filter installation nut (A).

11.

Loosen the drain plug (A) and drain water after raising the fuel filter not to disconnect the fuel tube line.

12.

After water is drained, securely tighten the drain plug.

13.

After starting the engine, check to make certain the fuel filter warning light is off.

note

If the engine dosen't start, perform bleeding air in low pressure fuel circuit procedure.

(Refer to Fuel Delivery System - "Bleeding Air in Low Pressure Fuel Circuit")

Fuel Leakage Test

After removing or replacing fuel system below, must perform fuel leakage test procedure.

-

Fuel tank

-

Fuel sender

-

Fuel filter

-

High pressure fuel pump

-

Injector

-

Common rail

-

Low pressure fuel line

14.

Turn ignition switch OFF.

15.

Connect a GDS to Data Link Connector (DLC).

16.

Turn ignition switch ON.

17.

Select "Vehicle, Model year, Engine, System".

18.

Select "Vehicle S/W Management".

19.

Select "Fuel leakage test".

20.

Perform the procedure in accordance with the message.

Яндекс.Метрика