Inspect the CVVT for smooth rotation.
Clamp the camshaft using a vise. Be careful not to damage the cam lobes and journals in the vise.
Check that the CVVT is locked by turning it clockwise or counterclockwise. It must not rotate.
Intake CVVT : Seal one of the two advance holes in the camshaft journal with tape.
Exhaust CVVT : Seal one of the two retard holes in the camshaft journal with tape.
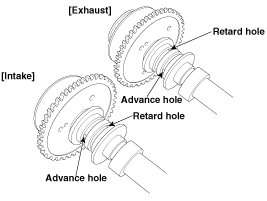
Intake CVVT : Apply approx. 150 kPa (1.5 kgf/㎠, 21 psi ) of compressed air into the unsealed advance hole to release the lock.
Exhaust CVVT : Apply approx. 150 kPa (1.5 kgf/㎠, 21 psi ) of compressed air into the unsealed retard hole to release the lock.
Cover the oil paths with a piece of cloth when applying compressed air to prevent oil from spraying.
Intake CVVT : With compressed air applied, rotate the CVVT into the advance direction (counterclockwise) within its phasing range and check that the CVVT turns smoothly.
Exhaust CVVT : With compressed air applied, rotate the CVVT into the retard direction (clockwise) and check that the CVVT turns smoothly.
CVVT phasing range
Intake : 25˚±1˚ (from the most retarded position to the most advanced position)
Exhaust : 20˚±1˚ (from the most advanced position to the most retarded position)
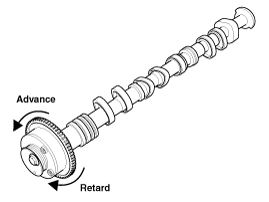
Intake CVVT : Rotate the CVVT into the most retarded position (clockwise) and then check that the CVVT is locked.
Exhaust CVVT : Rotate the CVVT into the most advanced position (counterclockwise) and then check that the CVVT is locked.
