2.
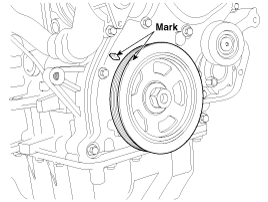
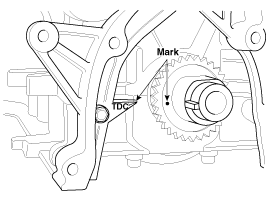
Turn the crankshaft pulley, and align its groove with timing mark "T" of the timing chain cover. (No.1 cylinder compression TDC position)
Remove the high pressure pump.
<a href="content.asp?vehicletype=Passenger&mfrcode=KM&area=KME&langcode=ENG&modelid=JD12&modelyr=2013&mmctype=en&mmcid=349&group=SHOP&pdftype=&cat1=2013+%3E+D+1%2E4+TCI%2DU2&firstnodedesc=Fuel+System&sitinfolist=14%5E1490%5E14902200%5Enone%5E801%5E1%5EENG%5EKM%5EJD12%5E2013%5Een%5E349%5Enone%5Enone%5Enone%5ESHOP%5E%2414%5E1490%5E14902200%5Enone%5E801%5E8%5EENG%5EKM%5EJD12%5E2013%5Een%5E349%5Enone%5Enone%5Enone%5ESHOP%5E%2414%5E1490%5E14902200%5Enone%5E801%5E6%5EENG%5EKM%5EJD12%5E2013%5Een%5E349%5Enone%5Enone%5Enone%5ESHOP%5E%24" target="_blank">(U-II 1.4L : Refer to Fuel System – “High Pressure Pump”)</a>
<a href="content.asp?vehicletype=Passenger&mfrcode=KM&area=KME&langcode=ENG&modelid=JD12&modelyr=2013&mmctype=en&mmcid=348&group=SHOP&pdftype=&cat1=2013+%3E+D+1%2E6+TCI%2DU2&firstnodedesc=Fuel+System&sitinfolist=14%5E1490%5E14902200%5Enone%5E801%5E1%5EENG%5EKM%5EJD12%5E2013%5Een%5E348%5Enone%5Enone%5Enone%5ESHOP%5E%2414%5E1490%5E14902200%5Enone%5E801%5E8%5EENG%5EKM%5EJD12%5E2013%5Een%5E348%5Enone%5Enone%5Enone%5ESHOP%5E%24" target="_blank">(U-II 1.6L : Refer to Fuel System – “High Pressure Pump”)</a>
Turn the crankshaft pulley, and align its groove with timing mark "T" of the timing chain cover. (No.1 cylinder compression TDC position)
Remove the timing chain cover.
(Refer to Timing System – “Timing Chain Cover”)
Remove the oil level gauge guide.
(Refer to Lubrication system – “Oil Level Gauge & Pipe”)
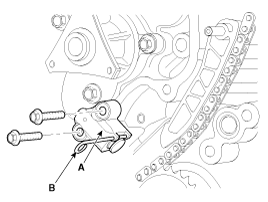
Remove the timing chain "C" auto tensioner (A).
Before removing auto-tensioner, install a set pin (B) (2.5 mm steel wire) after compressing the tensioner.
Remove the timing chain "C" lever (A) and the timing chain guide "1" (B).
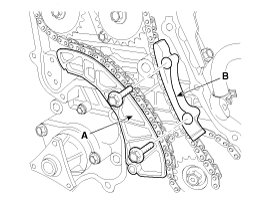
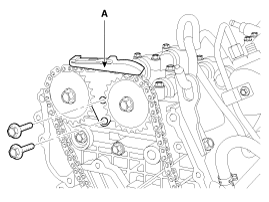
Remove the timing chain guide "2" (A).
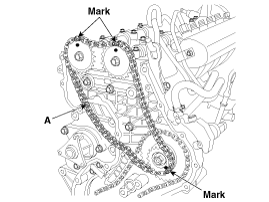
Remove the timing chain "C" (A).
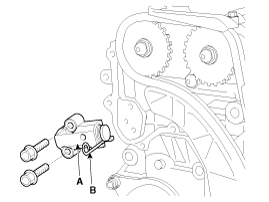
Remove the timing chain "A" auto tensioner (A).
Before removing auto-tensioner, install a set pin (B) (2.5 mm steel wire) after compressing the tensioner.
Remove timing chain "A" lever (A) and the timing chain guide "1" (B).
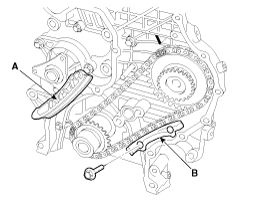
Remove the timing chain "A" (A)with high pressure pump sprocket (B) and crankshaft sprocket (C).
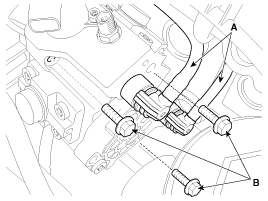
Remove the water pump.
(Refer to Cooling System – “Water Pump”)
Take off the hook of the engine support fixture from the front engine hanger.
Set the jack to the bed plate.
Take off the hook of the engine support fixture from the front engine hanger.
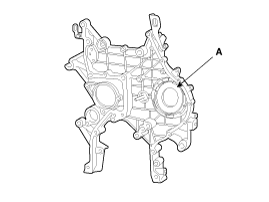
Remove the timing chain case (A).
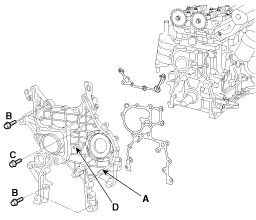
Install the timing chain case (A) with new gasket.
Tightening torque
Bolt (B) :
24.5 ~ 30.4N.m (2.5 ~ 3.1kgf.m, 18.1 ~ 22.4lb-ft)
Bolt (C) :
18.6 ~ 27.5N.m (1.9 ~ 2.8kgf.m, 13.7 ~ 20.3lb-ft)
Bolt (D) :
25.5 ~ 34.3N.m (2.6 ~ 3.5kgf.m, 18.8 ~ 25.3lb-ft)
Be careful not to press gasket protruded from lower face of chain case and bedplate after assembling lower gasket.
Replace the hook of the engine support fixture to the front engine hanger.
Replace the hook of the engine support fixture to the front engine hanger.
Remove the jack from the bed plate.
Install the water pump.
(Refer to Cooling System – “Water Pump”)
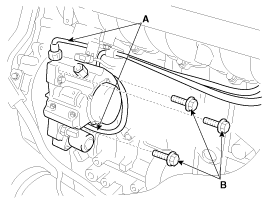
Install the high pressure fuel pump bolts (B) and connect the fuel tubes (A).
Tightening torque :
19.6 ~ 25.5N.m (2.0 ~ 2.6kgf.m, 14.5 ~ 18.8lb-ft)
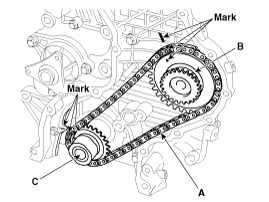
Set the key of crankshaft sprocket to be aligned with the timing mark of timing chain case. As a result of this, place the piston on No.1 cylinder at the top dead center on compression stroke.
After install timing chain "A" with high pressure pump sprocket (B) equipped at the crankshaft sprocket (C), and then install high pressure pump sprocket at the high pressure pump shaft.
Apply engine oil to radial face (A) of chain case before assembling high pressure pump sprocket.
The timing mark of high pressure pump sprocket should be aligned with timing mark on the timing chain case.
The timing mark of each sprocket should be matched with timing mark (color link) of timing chain at installing timing chain as shown below installation.
Pretighten the high pressure fuel pump sprocket nut.
Install timing chain "A" lever (A) and the timing chain guide "1" (B).
Tightening torque :
9.8 ~ 11.8N.m (1.0 ~ 1.2kgf.m, 7.2 ~ 8.7lb-ft)
Install the timing chain "A" auto tensioner (A) and then remove set pin (B).
Tightening torque :
9.8 ~ 11.8N.m (1.0 ~ 1.2kgf.m, 7.2 ~ 8.7lb-ft)
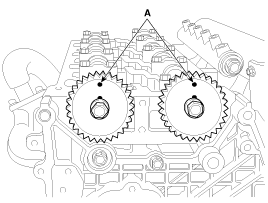
Align the timing mark (A) of camshaft sprocket on the vertical center line of crankshaft.
Install the timing chain "C" (A) as following procedure.
High pressure pump sprocket → LH camshaft sprocket → RH camshaft sprocket
The timing mark of each sprockets should be matched with timing mark (color link) of timing chain at installing timing chain as shown below illustration.
Install the timing chain guide "2" (A).
Tightening torque :
9.8 ~ 13.7N.m (1.0 ~ 1.4kgf.m, 7.2 ~ 10.1lb-ft)
Install the timing chain "C" lever (A) and the timing chain guide "1" (B).
Tightening torque :
9.8 ~ 11.8N.m (1.0 ~ 1.2kgf.m, 7.2 ~ 8.7lb-ft)
Install the timing chain "C" auto tensioner (A) and then remove set pin (B).
Tightening torque :
9.8 ~ 11.8N.m (1.0 ~ 1.2kgf.m, 7.2 ~ 8.7lb-ft)
Tighten the high pressure pump sprocket nut (A) at specified tightening torque.
Tightening torque :
64.7 ~ 74.5N.m (6.6 ~ 7.6kgf.m, 47.7 ~ 55.0lb-ft)
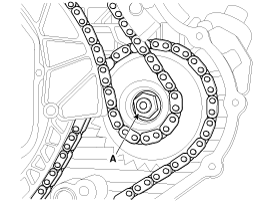
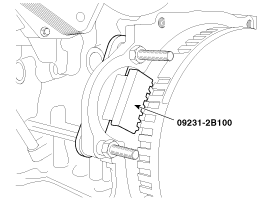
Use the SST(ring gear stopper, 09231-2B100)(A) to tighten the high pressure pump sprocket nut.
Install the oil level gauge guide.
(Refer to Lubrication system – “Oil Level Gauge & Pipe”)
Install the timing chain cover.
(Refer to Timing System – “Timing Chain Cover”)
Refill engine oil.
Clean the battery posts and cable terminals with sandpaper.
Assemble and then apply grease to prevent corrosion.
Inspect for fuel leakage.
After assembling the fuel line, turn on the ignition switch (do not operate the starter) so that the fuel pump runs for approximately two seconds and fuel line pressurizes.
Repeat this operation two or three times, then check for fuel leakage at any point in the fuel lines.
Refill radiator and reservoir tank with engine coolant.
Bleed air from the cooling system.
Start engine and let it run until it warms up. (Until the radiator fan operates 3 or 4 times.)
Turn Off the engine and let it cool down. Check the level in the radiator, add coolant if needed. This will allow trapped air to be removed from the cooling system.
Put radiator cap on tightly, then run the engine again and check for leaks.
