8.
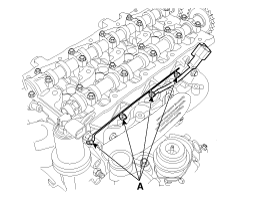
Remove the glow plug (A).
Remove the cylinder head cover.
(Refer to Cylinder Head Assembly – “Cylinder Head Cover”)
Remove the timing chain.
(Refer to Timing System – “Timing Chain”)
Remove the exhaust manifold.
(Refer to Intake And Exhaust System - "Exhaust Manifold")
Remove the intake manifold.
(Refer to Intake And Exhaust System - "Intake Manifold")
Remove the common rail.
<a href="content.asp?vehicletype=Passenger&mfrcode=KM&area=KME&langcode=ENG&modelid=JD12&modelyr=2013&mmctype=en&mmcid=349&group=SHOP&pdftype=&cat1=2013+%3E+D+1%2E4+TCI%2DU2&firstnodedesc=Fuel+System&sitinfolist=14%5E1490%5E14902000%5Enone%5E801%5E1%5EENG%5EKM%5EJD12%5E2013%5Een%5E349%5Enone%5Enone%5Enone%5ESHOP%5E%2414%5E1490%5E14902000%5Enone%5E801%5E8%5EENG%5EKM%5EJD12%5E2013%5Een%5E349%5Enone%5Enone%5Enone%5ESHOP%5E%24" target="_blank">(U-II 1.4L : Refer to Fuel System – “Common Rail”)</a>
<a href="content.asp?vehicletype=Passenger&mfrcode=KM&area=KME&langcode=ENG&modelid=JD12&modelyr=2013&mmctype=en&mmcid=348&group=SHOP&pdftype=&cat1=2013+%3E+D+1%2E6+TCI%2DU2&firstnodedesc=Fuel+System&sitinfolist=14%5E1490%5E14902000%5Enone%5E801%5E1%5EENG%5EKM%5EJD12%5E2013%5Een%5E348%5Enone%5Enone%5Enone%5ESHOP%5E%2414%5E1490%5E14902000%5Enone%5E801%5E8%5EENG%5EKM%5EJD12%5E2013%5Een%5E348%5Enone%5Enone%5Enone%5ESHOP%5E%24" target="_blank">(U-II 1.6L : Refer to Fuel System – “Common Rail”)</a>
Remove the thermostat housing.
(Refer to Cooling System – “Thermostat”)
Remove the EGR cooler.
(Refer to Cooling System – “EGR cooler”)
Remove the glow plug (A).
Remove the camshaft.
(Refer to Cylinder Head Assembly – “Camshaft”)
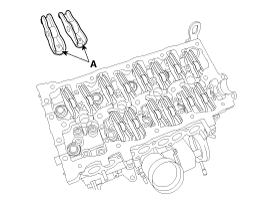
Remove the cam follower (A).
Remove the HLA(Hydraulic Lash Adjust).

Remove the cylinder head bolts, then remove the cylinder head.
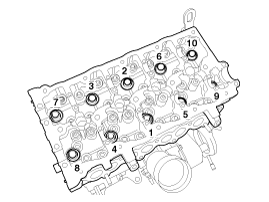
Using bit socket (12PT), uniformly loosen and remove the 10 cylinder head bolts, in several passes, in the sequence shown. Remove the 10 cylinder head bolts.
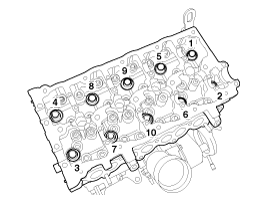
Head warpage or cracking could result from removing bolts in an incorrect order.
Lift the cylinder head (A) from the dowels on the cylinder block and replace the cylinder head on wooden blocks on a bench.
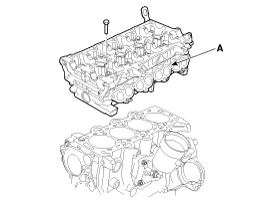
Be careful not to damage the contact surfaces of the cylinder head and cylinder block.
Remove the cylinder head gasket.
(Refer to Cylinder Head Assembly – “Cylinder Head Gasket”)
Remove the valves.
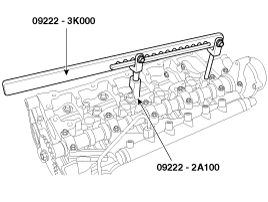
Using the SST (09222-3K000, 09222-2A100) (A), compress the valve spring and remove the retainer lock.
Remove the spring retainer.
Remove the valve spring.
Remove the valve.
Using a needle-nose pliers, remove the stem oil seal.
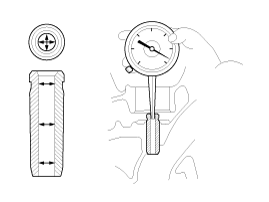
Inspect for flatness.
Using a precision straight edge and feeler gauge, measure the surface the contacting the cylinder block and the manifolds for warpage.
Flatness of cylinder head gasket surface :
Less than 0.05mm (0.0020in) for all
Less than 0.03mm (0.0012in) for each cylinder
Less than 0.012mm (0.00047in) for 50mm (1.9685in.) x 50mm (1.9685in.)
Flatness of manifold mating surface :
Less than 0.025mm (0.0010in) for width
Less than 0.160mm (0.0063in) for length
Less than 0.013mm (0.00051in) for 50mm (1.9685in.) x 50mm (1.9685in.)
Inspect for cracks.
Check the intake ports, exhaust ports and cylinder block surface for cracks. If cracked, replace the cylinder head.
Inspect the valve stems and valve guides.
Using a caliper gauge, measure the inner diameter of valve guide.
Valve guide inner diameter :
Intake : 5.500 ~ 5.512mm (0.2165 ~ 0.2170in)
Exhaust : 5.500 ~ 5.512mm (0.2165 ~ 0.2170in)
Using a micrometer, measure the outer diameter of valve stem.
Valve stem outer diameter
Intake : 5.455 ~ 5.470mm (0.2148 ~ 0.2154in)
Exhaust : 5.435 ~ 5.450mm (0.2140 ~ 0.2146in)
Subtract the valve stem outer diameter measurement from the valve guide inner diameter measurement.
Valve stem- to-guide clearance
Intake : 0.030 ~ 0.057mm (0.0012 ~ 0.0022in)
Exhaust : 0.050 ~ 0.077mm (0.0020 ~ 0.0030in)
If the clearance is greater than specification, replace the valve and valve guide.
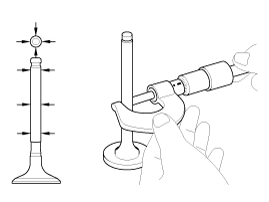
Inspect the valves.
Check the valve is ground to the correct valve face angle.
Check that the surface of valve for wear.
If the valve face is worn, replace the valve.
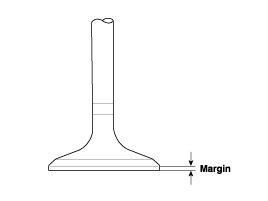
Check the valve head margin thickness. If the margin thickness is less than specification, replace the valve.
Margin
Intake : 1.1mm (0.0433in)
Exhaust : 1.2mm (0.0472in)
Check the valve length.
Length
Intake : 93.0mm (3.6614in)
Exhaust : 93.7mm (3.6890in)
Check the surface of valve stem tip for wear.
If the valve stem tip is worn, replace the valve.
Inspect the valve seats.
Check the valve seat for evidence of overheating and improper contact with the valve face. If the valve seat is worn, replace the cylinder head.
Check the valve guide for wear. If the valve guide is worn, replace the cylinder head.
Inspect the valve springs.
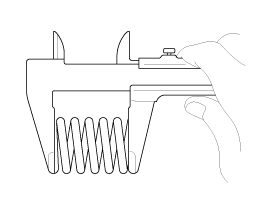
Using a steel square, measure the out-of-square of valve spring.
Using a vernier calipers, measure the free length of valve spring.
Valve spring
Standard
Free height : 44.9mm (1.7677in)
Load : 17.8±0.9kg/32.0mm(175±9N/1.2598in)
26.7~29.0kg/23.8mm (262.3~284.4N/0.937in)
Out of square : Less than 1.5°
If the loads is not as specified, replace the valve spring.
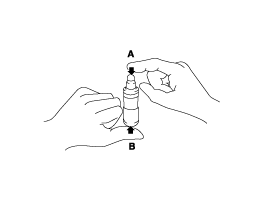
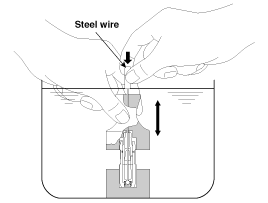
With the HLA filled with engine oil, hold A and press B by hand.
If B moves, replace the HLA.
Problem | Possible cause | Action |
1. Temporary noise when starting a cold engine | Normal | This noise will disappear after the oil in the engine reaches the normal pressure. |
2. Continuous noise when the engine is started after parking more than 48 hours. | Oil leakage of the high pressure chamber on the HLA, allowing air to get in. | Noise will disappear within 15 minutes when engine runs at 2000-3000 rpm. If it doesn’t disappear, refer to step 7 below. |
3. Continuous noise when the engine is first started after rebuilding cylinder head. | Insufficient oil in cylinder head oil gallery. | |
4. Continuous noise when the engine is started after excessively cranking the engine by the starter motor or band. | Oil leakage of the high-pressure chamber in the HLA, allowing air to get in. Insufficient oil in the HLA. | |
5. Continuous noise when the engine is running after changing the HLA. | caution Do not run engine at a speed higher than 3000 rpm, as this may damage the HLA. | |
6. Continuous noise during idle after high engine speed. | Engine oil level too high or too low. | Check oil level. Drain or add oil as necessary. |
Excessive amount of air in the oil at high engine speed. | Check oil supply system. | |
Deteriorated oil. | Check oil quality. If deteriorated, replace with specified type. | |
7. Noise continues for more than 15 minutes. | Low oil pressure. | Check oil pressure and oil supply system of each part of engine. |
Faulty HLA. | Remove the cylinder head cover and press HLA down by hand. If it moves, replace the HLA. |
Thoroughly clean all parts to be assembled.
Before installing the parts, apply fresh engine oil to all sliding and rotating surface.
Replace oil seals with new ones.
Install the valves.
Using the SST (09222-2A000) (A), push in a new stem oil seal.
Do not reuse old valve stem oil seals.
Incorrect installation of the seal could result in oil leakage past the valve guides.

Install the valve, valve spring and spring retainer.
Place the valve springs so that the side coated with enamel faces toward the valve spring retainer and then installs the retainer.
Using the SST(09222-2A100, 09222-3K000) (A), compress the spring and install the retainer locks.
After installing the valves, ensure that the retainer locks are correctly in place before releasing the valve spring compressor.
Lightly tap the end of each valve stem two or three times with the wooden handle of a hammer to ensure proper seating of the valve and retainer lock.
Thoroughly clean all parts to be assembled.
Always use a new cylinder head and manifold gasket.
Always use a new cylinder head bolt.
The cylinder head gasket is a metal gasket. Take care not to bend it.
Rotate the crankshaft, set the No.1 piston at TDC.
Install the cylinder head gasket.
(Refer to Cylinder Head Assembly – “Cylinder Head Gasket”)
Place the cylinder head (A) quietly in order not to damage the gasket with the bottom part of the end.
Install the cylinder head bolts.
Do not apply engine oil on the cylinder head bolts.
Using the SST (09221-4A000), install and tighten the 10 cylinder head bolts, in several passes, in the sequence shown.
Tightening torque :
47.1~51.0Nm (4.8~5.2kgf.m, 34.7~37.6lb-ft) + (88~92°) + (118~122°)
Do not reuse the cylinder head bolts.
Install the HLA (Hydraulic Lash Adjust) (A).
Until installing HLA shall be held upright so that diesel oil in HLA should not spill and assured that dust does not adhere to HLA.
HLA should be inserted carefully to the cylinder head not to spill engine oil.
If engine oil has spilled out of the lash adjuster, HLA bleeding should be performed according to the below procedure.
HLA bleeding procedure
Stroke the lash adjuster in engine oil by pushing its cap 4 to 5 times while pushing the ball down slightly using a hard steel wire. Be careful not to give the ball a hard push because the ball weighs just several grams.
If installing with engine oil spilling out of the lash adjuster and air in it, it might make an abnormal noise.
Install the cam follower (A).
Install the glow plug (A) and glow plug plate.
Tightening torque
Glow plug :
15 ~ 20N.m (1.5 ~ 2.0kgf.m, 11 ~ 14lb-ft)
Plate nut :
0.8~1.5N.m (0.08 ~ 0.15kgf.m, 0.6 ~ 1.1lb-ft)
Install in the other parts reverse order of removal.
Refill engine with engine oil.
Refill a radiator and a reservoir tank with engine coolant.
Clean battery posts and cable terminals and assemble.
Inspect for fuel leakage.
After assembling the fuel line, turn on the ignition switch (do not operate the starter) so that the fuel pump runs for approximately two seconds and fuel line pressurizes.
Repeat this operation two or three times, then check for fuel leakage at any point in the fuel line.
Bleed air from the cooling system.
Start engine and let it run until it warms up (until the radiator fan operates 3 or 4 times).
Turn off the engine. Check the level in the radiator, add coolant if needed. This will allow trapped air to be removed from the cooling system.
Put radiator cap on tightly, then run the engine again and check for leaks.
