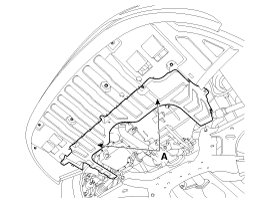
Remove the under covers (A).
Tightening torque:
3.9 ~ 5.9 N.m (0.4 ~ 0.6 kgf.m, 2.9 ~ 4.3 lb-ft)

Turn ignition switch OFF and disconnect the negative (-) battery cable.
Remove the under covers (A).
Tightening torque:
3.9 ~ 5.9 N.m (0.4 ~ 0.6 kgf.m, 2.9 ~ 4.3 lb-ft)

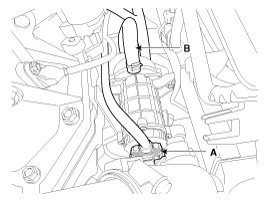
Disconnect the vacuum pump connector (A).

Disconnect the vacuum hose (B).
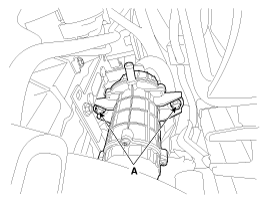
Loosen the vacuum pump bracket bolts (A), and then remove vacuum pump and bracket.
Tightening torque:
6 ~ 8 N.m (0.61 ~ 0.82 kgf.m, 4.4 ~ 5.9 lb-ft)

Check the brake warning lamp in the IGN ON position.
Brake warning lamp is ON as below conditions.
Brake warning lamp is ON as below conditions.
Low brake fluid level warning
Low brake vacuum pressure warning
Vacuum pump is abnormal condition
Vacuum pump CAN communication is abnormal condition
Check that the brake warning lamp is ON after the release the parking brake with a sufficient brake fluid level.
If the brake warning lamp is ON, check the below points.
Is the brake warning lamp ON within 5 seconds after IGN ON?
 | ▶ Reinstall the vacuum pump connector after removing it. And if the brake warning lamp is ON within 5 seconds after IGN ON, replace the vacuum pump. |
 | ▶ Check the 2). |
Is the brake warning lamp ON within 45~55 seconds?
 | ▶ Brake vacuum switch is normal condition. |
 | ▶ Check the 3). |
Is the brake warning lamp ON within 15~30 seconds after removing the vacuum hose from the brake booster?
 | ▶ Replace the vacuum pump |
 | ▶ Vacuum pump is normal condition |
Installation is the reverse of removal.
Tighten the vacuum pump mounting bolts to the specified torque.