5.
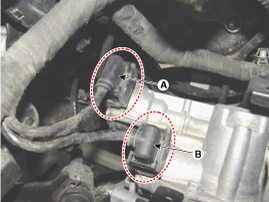
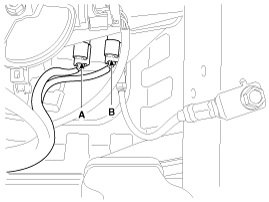
Disconnect the shift actuator connector (A) and select actuator connector (B). Then remove the wire fixing clip.
Remove the engine cover.
<a href="content.asp?vehicletype=Passenger&mfrcode=KM&area=KME&langcode=ENG&modelid=JD12&modelyr=2013&mmctype=en&mmcid=88&group=SHOP&pdftype=&cat1=2013+%3E+G+1%2E6+GDI&ec=&firstnodedesc=Engine+Mechanical+System&sitinfolist=12%5E1215%5E12150110%5Enone%5E801%5E1%5EENG%5EKM%5EJD12%5E2013%5Een%5E88%5Enone%5Enone%5Enone%5ESHOP%5E%24" target="_blank"> (Refer to Engine Mechanical System - "Engine cover")</a>
Remove the air cleaner assembly and air duct.
<a href="content.asp?vehicletype=Passenger&mfrcode=KM&area=KME&langcode=ENG&modelid=JD12&modelyr=2013&mmctype=en&mmcid=88&group=SHOP&pdftype=&cat1=2013+%3E+G+1%2E6+GDI&ec=&firstnodedesc=Engine+Mechanical+System&sitinfolist=12%5E1235%5E12350100%5Enone%5E801%5E1%5EENG%5EKM%5EJD12%5E2013%5Een%5E88%5Enone%5Enone%5Enone%5ESHOP%5E%24" target="_blank">(Refer to Engine Mechanical System - "Air cleaner")</a>
Remove the battery and battery tray.
<a href="content.asp?vehicletype=Passenger&mfrcode=KM&area=KME&langcode=ENG&modelid=JD12&modelyr=2013&mmctype=en&mmcid=88&group=SHOP&pdftype=&cat1=2013+%3E+G+1%2E6+GDI&ec=&firstnodedesc=Engine+Electrical+System&sitinfolist=11%5E1125%5E11250200%5Enone%5E801%5E1%5EENG%5EKM%5EJD12%5E2013%5Een%5E88%5Enone%5Enone%5Enone%5ESHOP%5E%2411%5E1125%5E11250200%5Enone%5E801%5E8%5EENG%5EKM%5EJD12%5E2013%5Een%5E88%5Enone%5Enone%5Enone%5ESHOP%5E%2411%5E1125%5E11250200%5Enone%5E801%5E4%5EENG%5EKM%5EJD12%5E2013%5Een%5E88%5Enone%5Enone%5Enone%5ESHOP%5E%2411%5E1125%5E11250200%5Enone%5E801%5E3%5EENG%5EKM%5EJD12%5E2013%5Een%5E88%5Enone%5Enone%5Enone%5ESHOP%5E%24" target="_blank">(Refer to Engine Electrical System - "Battery")</a>
Remove the ECM.
<a href="content.asp?vehicletype=Passenger&mfrcode=KM&area=KME&langcode=ENG&modelid=JD12&modelyr=2013&mmctype=en&mmcid=88&group=SHOP&pdftype=&cat1=2013+%3E+G+1%2E6+GDI&ec=&firstnodedesc=Fuel+System&sitinfolist=14%5E1420%5E14200100%5Enone%5E801%5E1%5EENG%5EKM%5EJD12%5E2013%5Een%5E88%5Enone%5Enone%5Enone%5ESHOP%5E%2414%5E1420%5E14200100%5Enone%5E801%5E8%5EENG%5EKM%5EJD12%5E2013%5Een%5E88%5Enone%5Enone%5Enone%5ESHOP%5E%2414%5E1420%5E14200100%5Enone%5E801%5E4%5EENG%5EKM%5EJD12%5E2013%5Een%5E88%5Enone%5Enone%5Enone%5ESHOP%5E%24" target="_blank">(Refer to Fuel System - "Engine Control Module (ECM)")</a>
Disconnect the shift actuator connector (A) and select actuator connector (B). Then remove the wire fixing clip.
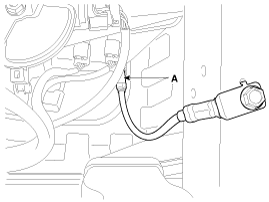
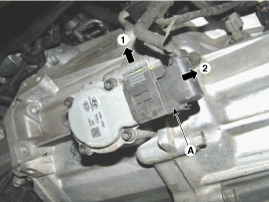
Disconnect the odd clutch actuator motor connector (A), and then remove the wire fixing clip.
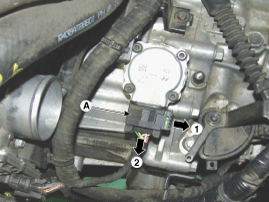
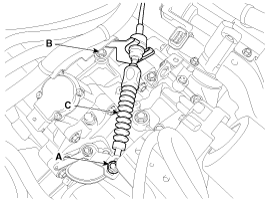
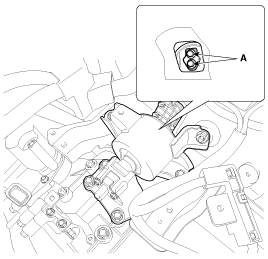
Disconnect the inhibitor switch connector (A).
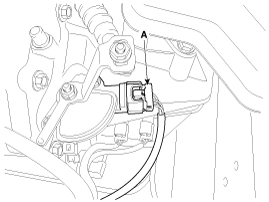
Remove the bolt (A), and then disconnect the ground wire.
Disconnect the input shaft speed sensor 2 (A) and input shaft speed sensor 1 (B) connectors.
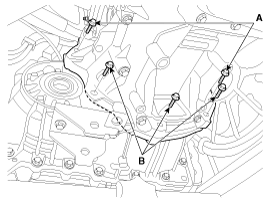
Remove the nut (A) and bolt (B). Then remove the shift cable (C).
Tightening torque:
(A) 8.8 ~ 13.7 N.m (0.9 ~ 1.4 kgf.m, 6.5 ~ 10.1 lb-ft)
(B) 19.6 ~ 26.5 N.m (2.0 ~ 2.7 kgf.m, 14.4 ~ 19.5 lb-ft)
Remove the Dual Clutch Transmission(DCT) upper mounting bolts (A: 2ea, B: 2ea).
Tightening torque:
(A,B) 42.2 ~ 53.9 N.m (4.3 ~ 5.5 kgf.m, 31.1 ~ 39.8 lb-ft)
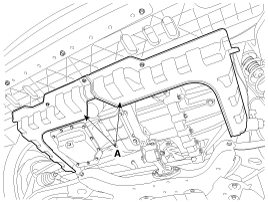
Remove the cowl top cover.
<a href="content.asp?vehicletype=Passenger&mfrcode=KM&area=KME&langcode=ENG&modelid=JD12&modelyr=2013&mmctype=bd&mmcid=4&group=SHOP&pdftype=&cat1=2013+%3E+G+1%2E6+GDI&ec=&firstnodedesc=Body+%28Interior+and+Exterior%29&sitinfolist=91%5E9147%5E91470010%5Enone%5E801%5E6%5EENG%5EKM%5EJD12%5E2013%5Ebd%5E4%5Enone%5Enone%5Enone%5ESHOP%5E%24" target="_blank">(Refer to Body - "Cowl Top Cover")</a>
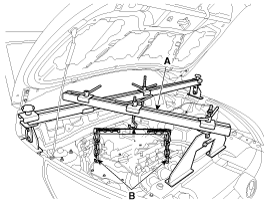
Assemble the engine support fixture.
(Refer to Special Service Tools - "Engine support fixture assembly drawing")
Install the engine support fixture special tool(A) on the engine room.
Hang the ring (B) on the engine hanger, support the engine.
To prevent slip, the support supports the body securely.
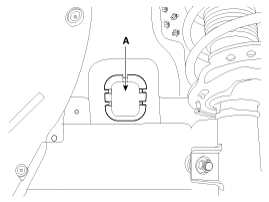
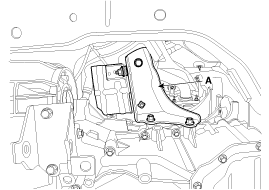
Remove the mounting cover (A).
Support the Dual Clutch Transmission(DCT) on the lower section, and remove the DCT support bracket mounting bolt (A).
Tightening torque:
88.3 ~ 107.9 N.m (9.0 ~ 11.0 kgf.m, 65.1 ~ 79.6 lb-ft)
Loosen the mounting bolt and then remove the Dual Clutch Transmission(DCT) support bracket (A).
Tightening torque:
58.8 ~ 78.5 N.m (6.0 ~ 8.0 kgf.m, 43.4 ~ 57.9 lb-ft)
Remove the under cover (A).
Under cover tightening torque:
6.9 ~ 10.8 N.m (0.7 ~ 1.1 kgf.m, 5.1 ~ 8.0 lb-ft)
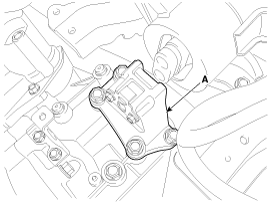
Disconnect the even clutch actuator motor connector (A).
Remove the drive shaft.
<a href="content.asp?vehicletype=Passenger&mfrcode=KM&area=KME&langcode=ENG&modelid=JD12&modelyr=2013&mmctype=ds&mmcid=1&group=SHOP&pdftype=&cat1=2013+%3E+G+1%2E6+GDI&ec=&firstnodedesc=Driveshaft+and+axle&sitinfolist=31%5E3105%5E31050100%5Enone%5E801%5E6%5EENG%5EKM%5EJD12%5E2013%5Eds%5E1%5Enone%5Enone%5Enone%5ESHOP%5E%24" target="_blank">(Refer to Driveshaft and Axle - "Front Driveshaft")</a>
Loosen the mounting bolt and then remove the bracket (A).

Remove the drive shaft cover (A).
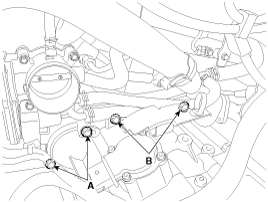
Support the Dual Clutch Transmission (DCT) with only a jack, and then loosen the mounting bolts (A: 2, B: 3).
Then lower the jack slowly, and remove the Dual Clutch Transmission (DCT) assembly.
Tightening torque:
(A,B) 42.2 ~ 53.9 N.m (4.3 ~ 5.5 kgf.m, 31.1 ~ 39.8 lb-ft)