Has any problems been found?
 | ▶ Repair as necessary and then go to "Verification of Vehicle Repair" procedure. |
 | ▶ Go to "Timing Inspection" procedure. |
Refer to "Shop Manual" and viasullay and/or physically inspect following conditions;
- Vacuum hoses for splits, kinks and improper connections.
- Positive crankcase ventilation valve for improper installation, damaged o-rings and malfunction.
- Good ECM/PCM ground connections.
- Contamination, deterioration, poor connection or damaged MAP Sensor and ECT Sensor harness.
Has any problems been found?
 | ▶ Repair as necessary and then go to "Verification of Vehicle Repair" procedure. |
 | ▶ Go to "Timing Inspection" procedure. |
Ignition switch "OFF"
Connect VMI to GDS and set up an oscilloscope as follow (4-channel);
Channel A (+) : Pin No. 2 (Signal) terminal of CMPS - Exhaust (CMPS harness connector)
Channel A (-) : Pin No. 3 (Signal) terminal of CMPS - Intake (CMPS harness connector)
Channel B (+) : Pin No. 3 (Signal) terminal of CKPS (CKPS Harness connector)
Channel B (-) : Not used
Ignition switch "ON" & Engine "ON"
Specification : Refer to Figure below
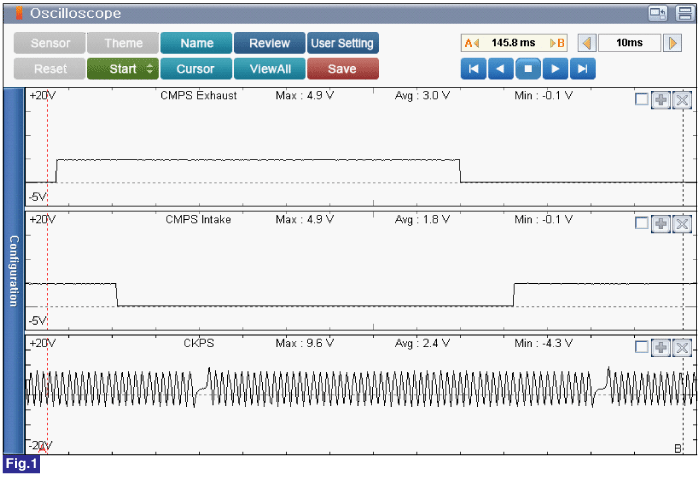
Fig.1) Normal signal waveform of CKPS and CMPS-Intake at engine idle.
Is the measured value within specification?
 | ▶ Go to "Ignition System Inspection" procedure. |
 | ▶ Replace or repair as necessary and then go to "Verification of Vehicle Repair" procedure. |
Refer to "Shop Manual" and viasullay and/or physically inspect following conditions;
- Damage, cracks, carbon and flashover.
- Poor connection or damaged harness.
Measure the primary coil resistance between terminals (+) and (-).
Specification : Approx. 0.74Ω ± 10%
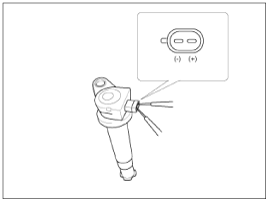
Has any problems been found?
 | ▶ Replace or repair as necessary and then go to "Verification of Vehicle Repair" procedure. |
 | ▶ Go to "Spark Plug Inspection" procedure. |
Refer to "Shop Manual" and viasullay and/or physically inspect following conditions;
- Damaged insulation, worn electrodes, oil or fuel fouled, loose terminals and cracks.
Measure the electrode gap.
Specification : Approx. 0.9 - 1.0(0.0354 - 0.0394 in.)
Measure the insulation resistance with an multimeter.
Specification : Approx. 10 MΩ or more
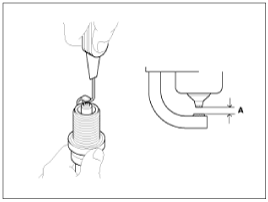
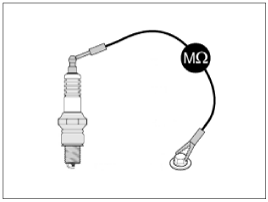
Has any problems been found?
 | ▶ Replace or repair as necessary and then go to "Verification of Vehicle Repair" procedure. |
 | ▶ Go to "Fuel System Inspection" procedure. |
Refer to "Shop Manual" and release the residual pressure in fuel line.
When removing the fuel pump relay, A Diagnostic Trouble Code(DTC) may occur. Delete the code with the GDS after completion of "Release Residual Pressure in Fuel Line" work.
Install the Special Service Tool(SST).
Disconnect the fuel feed tube from the high pressure fuel pump.
There may be some residual pressure even after "Release Residual Pressure in Fuel Line" work. Therefore, cover the hose connection with a shop towel to prevent residual fuel from spilling out before disconnecting any fuel connection.
Install the Special service tool for measuring the fuel pressure in between the fuel feed tube and the high pressure fuel pump(Refer to figure below).
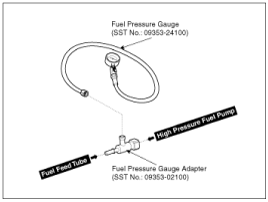
Inspect fuel leakage on connections among the fuel feed tube, the high pressure fuel pump, and the SST components with Ignition "ON".
Measure Fuel Pressure.
Start the engine and measure the fuel pressure at idle.
Specification : Fuel Pressure - 323 - 363 kPa(3.29 - 3.7kgf/cm2 / 46.8 - 52.6 psi)
If the fuel pressure differs from the standard value, repair or replace the related parts(refer to the table below).
Fuel Pressure | Casue | Related Parts |
Too Low | Fuel Filter Clogged | Fuel Filter |
Fuel Leakage | Fuel Pressure Regulator | |
Too High | Fuel Pressure Regulator Stuck | Fuel Pressure Regulator |
Stop the engine, and then check for the change in the fuel pressure gauge reading.
Standard Value : The gauge reading should hold for about 5 minutes after the engine stops
If the gauge reading is not held, repair or replace the related parts(refer to table below).
Fuel Pressure (After Engine Stops) | Casue | Related Parts |
Fuel Pressure Drops Slowly | Leakage on injectors | Injectors |
Fuel Pressure Drops Immediately | Check valve of fuel pump stuck open | Fuel Pump |
Ignition "OFF"
Is fuel pressure value within specification?
 | ▶ Go to "Engine Compression Test" procedure. |
 | ▶ Repair as necessary and then go to "Verification of Vehicle Repair" procedure. |
Warm up the engine to normal operating temperature.
Remove the fuel pump fuse(20A).
Wait until the engine stopped.
Remove the ignition coils and spark plugs.
Crank the engine to remove any foreign material in the cylinders.
Put a compression pressure gauge into spark plug hole.
Check compression pressure at each cylinder.
Specification :
Compression pressure approx. 199 psi (1,373 kPa)
Minimum pressure approx. 178 psi (1,226 kPa)
Difference between each cylinder approx. 14 psi (98 kPa) or less
Is compression pressure for each cylinder displayed within specifications?
 | ▶ Verify if the engine has excessive coolant consumption. If yes, check for damaged inlet water passage, engine block, cylinder head or head gasket. Repair or replace as necessary and go to "Verification of Vehicle Repair" procedure. |
 | ▶ If the cylinder compression in 1 or more cylinders is low, pour a small amount of engine oil into the cylinder through the spark plug hole and repeat compression test for cylinders with low compression pressure. - If adding oil helps the compression, it is likely that the piston rings and/or cylinder bore are worn or damaged. - If pressure stays low, a valve may be sticking or seating is improper, or there may be leakage past the gasket. Repair or replace as necessary and go to "Verification of Vehicle Repair" procedure. |