Has a problem been found?
 | ▶ Repair as necessary and go to "Verification of vehicle Repair" procedure. |
 | ▶ Go to "CAN Communication Line Inspection" procedure. |
Many malfunctions in the electrical system are caused by poor harness and terminals. Faults can also be caused by interference from other electrical systems, and mechanical or chemical damage.
Thoroughly check connectors for looseness, poor connection, bending, corrosion, contamination, deterioration, or damage.
Has a problem been found?
 | ▶ Repair as necessary and go to "Verification of vehicle Repair" procedure. |
 | ▶ Go to "CAN Communication Line Inspection" procedure. |
When measureing resistance, it is generally necessary to disconnect the circuit being tested from the power supply before hand. The vehicle's battery should therefore be disconnected and wait about four minutes to allow all capacitors in the system to discharge.
Inspection procedure for resistance test:
The CAN bus must be disconnected from the power supply
The measurement is taken between the CAN High and CAN Low leads
The measurement recorded may differ from the specified levels by a few ohms
Ignition "OFF" and disconnect the battery and wait about four minutes.
Make sure all modules are properly connected.
Measure resistance between Pin No. 3 (C-CAN High) and Pin No. 11 (C-CAN Low) terminal of Data Link Connector(DLC).
Specification : Approx. 60 Ω
Is measured value within specification?
 | ▶ Check each module connectors for looseness, poor connection, bending, corrosion, contamination, deterioration, or damage. Repair or replace as necessary and then go to "Verification of Vehicle Repair" procedure. |
 | ▶ If the measured value is out of specification, go to "CAN resistor inspection" procedure. ※ If the measured value is approx. 0Ω, then check for short CAN communication line. ※ If the measured value is approx. 120Ω, then check for open CAN commuication line of control module with resistor. |
Ignition switch "OFF"
Disconnect battery (-) cable.
Refer to "Shop Manual" and disconnect ECM/PCM and BCM connector.
Measure the resistance between Pin No. 41 (C-CAN High) and Pin No. 29 (C-CAN Low) terminal of ECM/PCM.
Measure the resistance between Pin No. 16 (C-CAN High) and Pin No. 17 (C-CAN Low) terminal of BCM.
Specification : Approx. 120 Ω
Is the measured value within specification?
 | ▶ Go to "CAN Signal Inspection" procedure. |
 | ▶ Carefully re-do this troubleshooting guide steps. ▶ If no problems were found with the circuits or connectors, replace ECM/PCM or BCM and then go to "Verification of Vehicle Repair" procedure. |
Ignition switch "OFF"
Connect VMI to GDS and launch the oscilloscope (2 Channel):
Channel A (+) : Pin No. 3 (C-CAN High) terminal (Data Link Connector)
Channel A (-) : Ground
Channel B (+) : Pin No. 11 (C-CAN Low) terminal (Data Link Connector)
Channel B (-) : Ground
Ignition switch "ON"
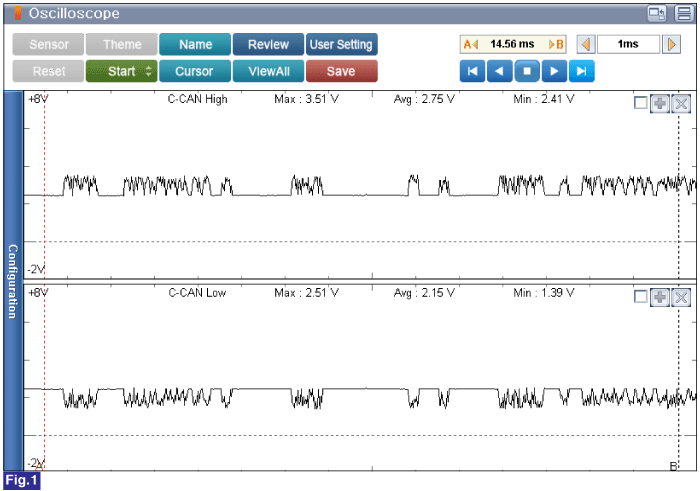
Specification : C-CAN High voltage - Approx. 2.8V / C-CAN Low voltage - Approx. 2.2V (Average)

Fig.1) Normal C-CAN signal waveform
Is the measured value withins specification?
 | ▶ Fault might be intermittent and caused either by poor contact in connectors or wiring harness, or it has been repaired and control module memory is not cleared yet. Thoroughly check terminal of battery, all connectors ( and connections) for looseness, bending, corrosion, contamination, deterioration, and/or damage. ▶ Repair or replace as necessary and then go to "Verification of Vehicle Repair" procedure. |
 | ▶ Repair open or short in C-CAN communication line and then, go to "Verification of Vehicle Repair" procedure. ▶ If no problems were found with the circuits or connectors, replace ECM and then go to "Verification of Vehicle Repair" procedure. |