Has any problems been found?
 | ▶ Repair as necessary and then go to "Verification of Vehicle Repair" procedure. |
 | ▶ Go to "EVAP System Inspection" procedure. |
Refer to "Shop Manual" and viasullay and/or physically inspect following conditions;
- Vacuum hoses for splits, kinks and improper connections.
- Throttle Body Gasket.
- Gasket between Intake Manifold and Cylinder head.
- Seals between Intake Manifold and Fuel Injectors.
- Exhaust system between O2 sensor and the Three way catalyst for air leakage.
- Air Cleaner filter element for excessive dirt or for any foreign objects.
- Throttle body inlet for damage or for any foreign objects.
- Throttle bore and throttle plate for chocking and for any foreign objects.
- Restricted exhaust system.
Has any problems been found?
 | ▶ Repair as necessary and then go to "Verification of Vehicle Repair" procedure. |
 | ▶ Go to "EVAP System Inspection" procedure. |
Refer to "Shop Manual" and viasullay and/or physically inspect following conditions;
- Check EVAP canister for fuel saturation. If the EVAP canister is full of fuel, inspect EVAP and fuel system.
- Remove the manifold side vacuum hose from the EVAP canister purge valve.
- Using a hand vacuum pump, apply specified vacuum to the manifold side of the valve.
Has any problems been found?
 | ▶ Repair as necessary and then go to "Verification of Vehicle Repair" procedure. |
 | ▶ Go to "Fuel System Inspection" procedure. |
Refer to "Shop Manual" and release the residual pressure in fuel line.
When removing the fuel pump relay, A Diagnostic Trouble Code(DTC) may occur. Delete the code with the GDS after completion of "Release Residual Pressure in Fuel Line" work.
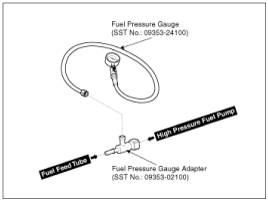
Install the Special Service Tool(SST).
Disconnect the fuel feed tube from the high pressure fuel pump.
There may be some residual pressure even after "Release Residual Pressure in Fuel Line" work. Therefore, cover the hose connection with a shop towel to prevent residual fuel from spilling out before disconnecting any fuel connection.
Install the Special service tool for measuring the fuel pressure in btween the fuel feed tube and the high pressure fuel pump(Refer to figure below).

Inspect fuel leakage on connections among the fuel feed tube, the high pressure fuel pump, and the SST components with Ignition "ON".
Measure Fuel Pressure.
Start the engine and measure the fuel pressure at idle.
Specification : Fuel Pressure - 445 ~ 455 kPa(4.5 ~4.6kgf/cm2 / 64.5~ 66.0 psi)
If the fuel pressure differs from the standard value, repair or replace the related parts(refer to the table below).
Fuel Pressure | Casue | Related Parts |
Too Low | Fuel Filter Clogged | Fuel Filter |
Fuel Leakage | Fuel Pressure Regulator | |
Too High | Fuel Pressure Regulator Stuck | Fuel Pressure Regulator |
Stop the engine, and then check for the change in the fuel pressure gauge reading.
Standard Value : The gauge reading should hold for about 5 minutes after the engine stops
If the gauge reading is not held, repair or replace the related parts(refer to table below).
Fuel Pressure (After Engine Stops) | Casue | Related Parts |
Fuel Pressure Drops Slowly | Leakage on injectors | Injectors |
Fuel Pressure Drops Immediately | Check valve of fuel pump stuck open | Fuel Pump |
Ignition "OFF"
Is fuel pressure value within specification?
 | ▶ Go to "Wiring Inspection" procedure. |
 | ▶ Repair as necessary and then go to "Verification of Vehicle Repair" procedure. |
Ignition switch "OFF"
Disconnect battery (-) cable.
Refer to "Shop Manual" and disconnect Injector connector.
Measure the resistance between Pin No. 1 (Control) terminal and Pin No. 2 (Power) terminal of Injector.
Specification : Approx. 13.8 - 15.2Ω at 20℃(68℉)
Is the measured value within specification?
 | ▶ Carefully re-do this troubleshooting guide steps. ▶ If the diagnostics have been performed correctly with no failure found, replace the ECM/PCM and then go to "Verification of Vehicle Repair" procedure. caution When replacing the ECM/PCM, the vehicle equipped with the immobilizer must be performed procedure as below.[In the case of installing used ECM/PCM] 1) Perform "ECM Neutral mode" procedure with GDS. (Refer to "Immobilizer" in BE group) 2) After finishing "ECM Neutral mode", perform "Key teaching" procedure with GDS. (Refer to "Immobilizer" in BE group) [In the case of installing new ECM/PCM] Perform "Key teaching" procedure with GDS. (Refer to "Immobilizer" in BE group) caution When replacing the ECM/PCM, the vehicle equipped with the smart key system (Button start) must be performed procedure as below. [In the case of installing used ECM/PCM] 1) Perform "ECM Neutral mode" procedure with GDS. (Refer to "Smart key" in BE group) 2) After finishing "ECM Neutral mode", insert the key (or press the start button) and turn it to the IGN ON and OFF position. Then the ECM/PCM learns the smart key information automatically. [In the case of installing new ECM/PCM] Insert the key (or press the start button) and turn it to the IGN ON and OFF position. Then the ECM/PCM learns the smart key information automatically. |
 | ▶ Carefully re-do this troubleshooting guide steps. ▶ If no problems were found with the circuits or connectors, replace the Injector and then go to "Verification of Vehicle Repair" procedure. |
- Install the component with the specified torques.
- Note that internal damage may occur when the component is dropped or mis- treated.