Ignition switch "OFF"
Disconnect battery (-) cable.
Refer to "Shop Manual" and disconnect Intake OCV connector.
Measure the resistance between Pin No. 2 (Power) terminal and Pin No. 1 (Control) terminal of Intake OCV component.
Specification : Approx. 6.9 - 7.9Ω at 20℃(68℉)
Is the measured value within specification?
![]() | ▶ Go to "Intake OCV Actuation Test" procedure. |
![]() | ▶ Carefully re-do this troubleshooting guide steps. ▶ If problem still occurs, replace Intake OCV and then go to "Verification of Vehicle Repair" procedure. |
- Install the component with the specified torques.
- Note that internal damage may occur when the component is dropped or mis- treated.
- Apply engine oil to the valve O-ring before re-installing.
Connect GDS to Data Link Connector(DLC).
Ignition switch "ON" & Engine "ON"
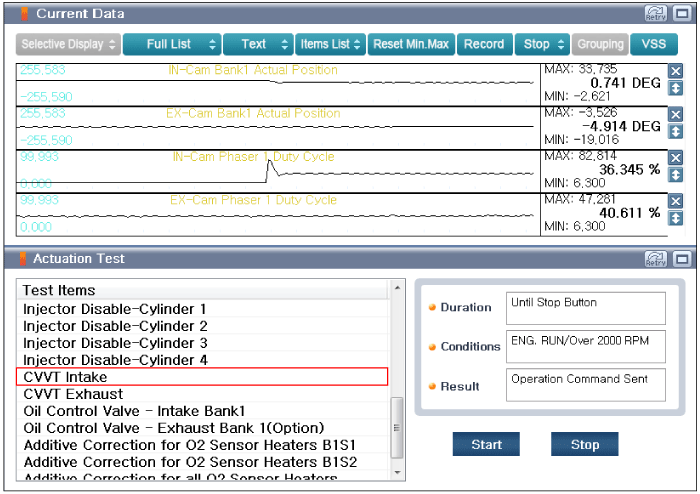
Perform "CVVT Intake" in "Actuation Test" with GDS.
Monitor "IN-Cam Phaser 1 Duty Cycle" parameter in "Current Data" with GDS.
Specification : Refer to Figure below (Also, operating sound(Clicking sound) is heard)
Is the parameter displayed within specification?
![]() | ▶ Go to "Intake CVVT Assembly Inspection" procedure. |
![]() | ▶ Carefully re-do this troubleshooting guide steps. ▶ If problem still occurs, replace Intake OCV and then go to "Verification of Vehicle Repair" procedure. |
- Install the component with the specified torques.
- Note that internal damage may occur when the component is dropped or mis- treated.
- Apply engine oil to the valve O-ring before re-installing.
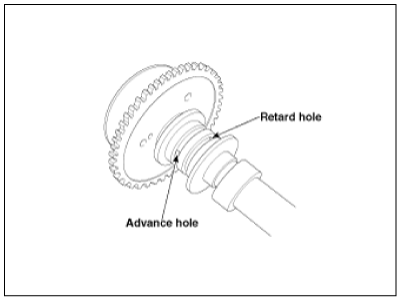
Refer to "Shop Manual" and remove Intake CVVT Assembly.
Check if Intake Cam-phaser is locked.
There are 2 oil holes on the cam journal. Upper hole is for advance and the lower hole is for retard.
Apply masking tape to all oil path holes except the advance hole("B") shows in figure below.
To release the CVVT Lock pin, wrap some tape around the tip of an air pressure adapter and apply low air pressure(Approx. 21 psi(1.5 kg/cm2) to the exposed camshaft port. Wrap a shop towel or rag around the CVVT because residual oil may leak out of the unit when applying air pressure.
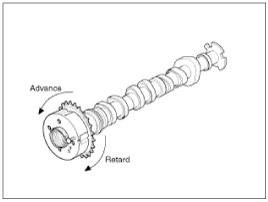
With low air pressure applied, turn the CVVT to the "Advanced" direction as showed in figure below.
If too much air leaks when applying the low air pressure, the CVVT lock pin may not release and the CVVT may not turn.
Allow the CVVT assembly to move in the "Advance" and "Retard" direction to ensure there is no binding and that it moves freely.
Turn the CVVT by hand and make sure it locks in the maximum "Retard" position.
Does Intake CVVT Assembly operates properly?
![]() | ▶ Go to "Timing Chain Installation Check" procedure. |
![]() | ▶ Carefully re-do this troubleshooting guide steps. ▶ If problem still occurs, replace Intake CVVT Assebmly and then go to "Verification of Vehicle Repair" procedure. |
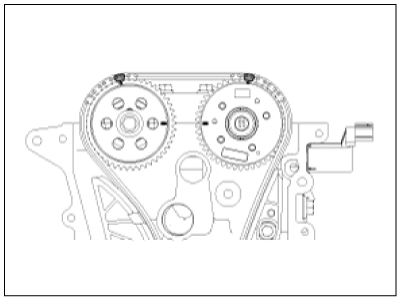
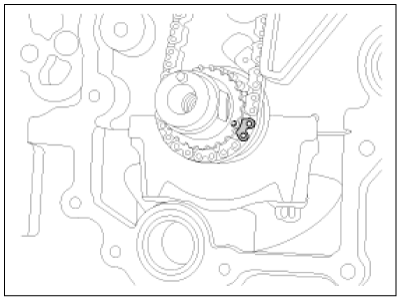
Refer to "Shop Manual" and inspect proper installation of timing chain and alignment of camshaft and crankshaft.
Has any problems been found?
![]() | ▶ Refer to "Shop Manual" and re-align the timing chain. ▶ Repair or replace as necessary and then go to "Verification of Vehicle Repair" procedure. |
![]() | ▶ Carefully re-do this troubleshooting guide steps. ▶ If problem still occurs, replace ECM/PCM and then go to "Verification of Vehicle Repair" procedure. |
When replacing the ECM/PCM, the vehicle equipped with the immobilizer must be performed procedure as below.[In the case of installing used ECM/PCM]
1) Perform "ECM Neutral mode" procedure with GDS. (Refer to "Immobilizer" in BE group)
2) After finishing "ECM Neutral mode", perform "Key teaching" procedure with GDS. (Refer to "Immobilizer" in BE group)
[In the case of installing new ECM/PCM]
Perform "Key teaching" procedure with GDS. (Refer to "Immobilizer" in BE group)
When replacing the ECM/PCM, the vehicle equipped with the smart key system (Button start) must be performed procedure as below.
[In the case of installing used ECM/PCM]
1) Perform "ECM Neutral mode" procedure with GDS. (Refer to "Smart key" in BE group)
2) After finishing "ECM Neutral mode", insert the key (or press the start button) and turn it to the IGN ON and OFF position. Then the ECM/PCM learns the smart key information automatically
[In the case of installing new ECM/PCM]
Insert the key (or press the start button) and turn it to the IGN ON and OFF position. Then the ECM/PCM learns the smart key information automatically.