4.
Remove the wiring harness bracket installation bolt (B).
Turn the ignition switch OFF and disconnect the battery negative (-) cable.
Release the residual pressure in fuel line. (Refer to Fuel Delivery System - “Release Residual Pressure in Fuel Line” )
When removing the fuel pump relay, a Diagnostic Trouble Code (DTC) may occur. Delete the code with the GDS after completion of “Release Residual Pressure in Fuel Line” work.
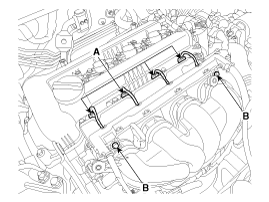
Disconnect the injector connector (A).
Remove the wiring harness bracket installation bolt (B).
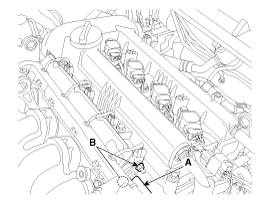
Remove the installation nut (B), and then disconnect the fuel feed tube (A).
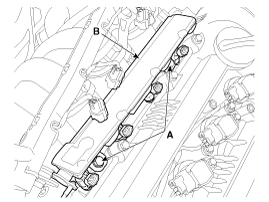
Remove the installation bolt (A), and then remove the delivery pipe & injector assembly (B) from the engine
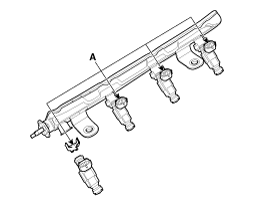
Remove the fixing clip (A), and then separate the injector from the delivery pipe.
Install the component with the specified torques.
Note that internal damage may occur when the component is dropped. In this case, use it after inspecting
Apply the engine oil to the injector O-ring.
Inspect the injector O-ring when installing.
Installation is reverse of removal.
Delivery pipe installation bolt:
19.6 ~ 24.5 N.m (2.0 ~ 2.5 kgf.m, 14.5 ~ 18.1 lb-ft)
Delivery pipe installation nut (↔ Fuel feed tube):
3.9 ~ 5.9 N.m (0.4 ~ 0.6 kgf.m, 2.9 ~ 4.3 lb-ft)
Common Rail Fuel Injection System operates with extremely high pressure (approximately 1,600bar), so never perform any work on injection system with engine running or within 30 seconds after the engine stops.
Keep cleanly the parts and the working area.
Pay attention to a foreign substance.
Just before installing injector, tube or hose, remove the protect-cap attached on them.
Do not remove injector except for special case.
When installing Injector
- Wash the contact area of the injector and replace the O-ring with a new one.
- Spread oil on the injector O-ring.
- To protect damage caused by shock, vertically insert the injector into the cylinder head.
When installing High Pressure Fuel Pipe
- Do not use again the used high pressure fuel pipe.
- Install the flange nut correctly.
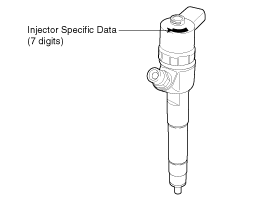
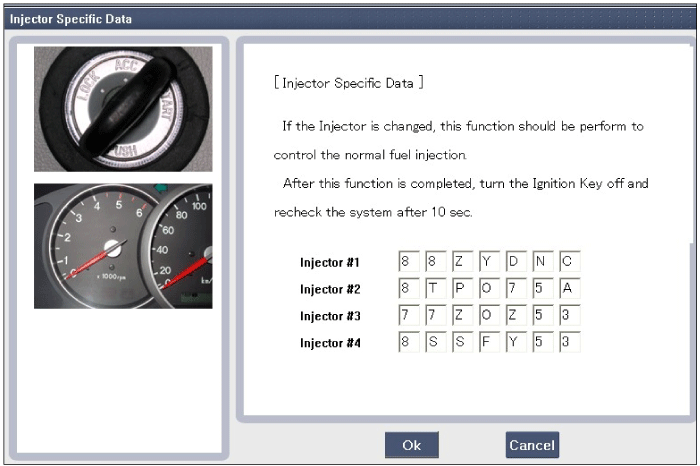
After replacing injector, MUST input the injector specific data (7 digits) of each cylinder into ECM with scan tool.
Remove the injector (Refer to "Removal" procedure).
Install the injector (Refer to "Installation" procedure).
Perform "Injector Specific Data Input" procedure (Refer to "Injector Specific Data Input" procedure).
After replacing injector, MUST input the injector specific data (7 digit) of each cylinder into ECM with scan tool.
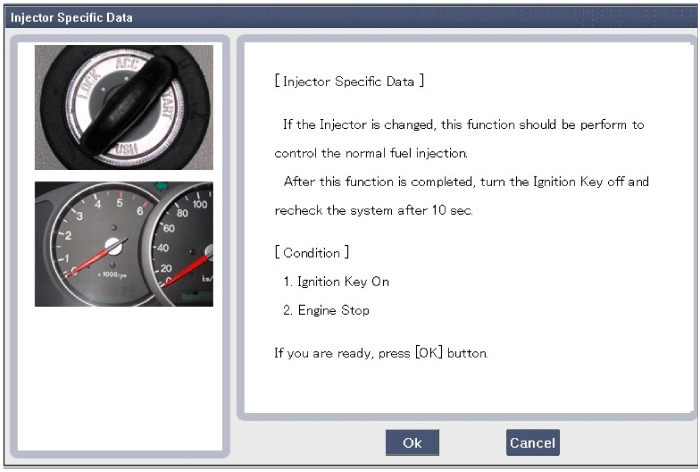
Turn ignition switch OFF.
Connect a GDS to Data Link Connector (DLC).
Turn ignition switch ON.
Select "Vehicle, Model year, Engine, System".
Select "Vehicle S/W Management".
Select "injector Specific Data".
Perform the procedure in accordance with the message.
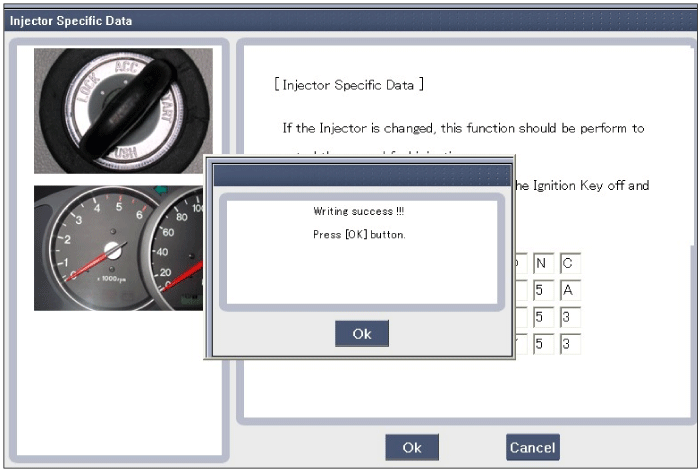
After selecting "OK" on the "Writing success" message, turn ignition switch OFF.
In about 10 seconds, turn ignition switch ON and recheck the injector specific data memorized in the ECM.
In case of failure, input the injector specific data (7 digits) into ECM again.
Turn ignition switch OFF.
Disconnect injector connector.
Measure resistance between injector terminals 1 and 2.
Check that the resistance is within the specification.
Specification: Refer to “Specification”
