4.
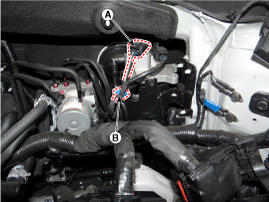
Disconnect the water sensor connector (A) and the heater connector (B).
Turn ignition switch OFF and disconnect the negative (-) battery terminal.
Remove the air cleaner assembly.
(Refer to "Engine and transaxle assembly in EM group.)
Remove the battery and ECM.
(Refer to "Charging system" in EE group.)
Disconnect the water sensor connector (A) and the heater connector (B).
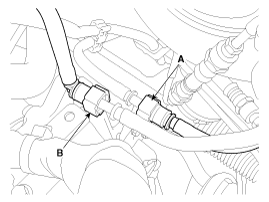
Disconnect the fuel inlet tube (A) quick-connector and the fuel outlet tube (B) quick-connector.
Remove the fuel filter assembly (B) after loosening the mounting nuts (A).

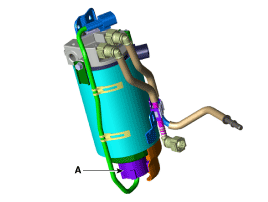
Remove the water sensor (A).
Remove the fuel filter assembly from the bracket after removing the bracket nuts (A), replace it with a new one, and then install the fuel filter assembly in accordance with reverse of above steps.

When replacing the fuel filter, must replace the O-ring.
Bleed air in low pressure fuel circuit.
(Refer to "Bleeding air in low pressure fuel circuit").
Start the engine and check that there is any leak on the low pressure fuel circuit including the fuel filter.
Installation is reverse of removal.
After removing or replacing the part below, bleed air in low pressure fuel circuit.
(Refer to Fuel Delivery System - "Bleeding air in low pressure fuel circuit")
Fuel Tank
Low Pressure Fuel Pump
Fuel Pump Motor
Fuel Sender
Fuel Filter
Fuel Heater
Water Sensor
Fuel Line
High Pressure Fuel Pump
Common Rail
Fuel filter mounting nut (on the bracket):
9.8 ~ 12.8 N.m (1.0 ~ 1.3 kgf.m, 7.2 ~ 9.4 lb-ft)
Fuel filter bracket mounting nut (on the vehicle):
3.9 ~ 5.9 N.m (0.4 ~ 0.6 kgf.m, 2.9 ~ 4.3 lb-ft)
