3.
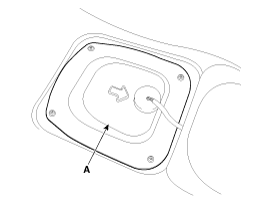
Remove the service cover (A).
Turn ignition switch OFF and disconnect the negative (-) battery cable.
Remove or fold the rear seat cushion.
Remove the service cover (A).
Disconnect the fuel sender connector (A).
Disconnect the fuel feed tube quick-connector (B) and the fuel return tube quick-connector (C).
Unscrew the fuel sender installation bolts (D), and then remove the fuel sender from the fuel tank.

Install in the reverse order of removal.
Fuel pump plate cover mounting bolt:
2.0 ~ 2.9 N.m (0.2 ~ 0.3 kgf.m, 1.4 ~ 2.2 lb-ft)
After removing or replacing the following parts, bleed air in low pressure fuel circuit.
(Refer to Fuel Delivery System - "Air bleeding in low pressure fuel circuit")
Fuel Tank
Low Pressure Fuel Pump
Fuel Pump Motor
Fuel Sender
Fuel Filter
Fuel Heater
Water Sensor
Fuel Line
High Pressure Fuel Pump
Common Rail
Turn the ignition switch OFF, and then remove battery (-) cable.
Remove the fuel pump assembly.
Using an ohmmeter, measure the resistance between terminals 1 and 3 of sender connector (A) at each float level.
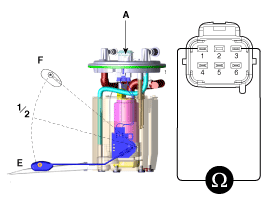
Pin No. | Description |
1 | Fuel sender signal (+) |
2 | - |
3 | Fuel sender ground (-) |
4 | - |
5 | Fuel pump motor (+) |
6 | Fuel pump motor (-) |
Also, check that the resistance changes smoothly when the float moves from "E" to "F".
Position | Resistance(Ω) | Capacity (L) |
E | 197 ~ 203 | 3.0 |
1/2 | 64.2 ~ 68.2 | 26.0 |
F | 6 ~ 10 | 51.9 |
Turn the ignition switch OFF, and then remove battery (-) terminals.
Remove the fuel pump assembly.
Check motor operation by fuel pump connector (A) connecting power (No.4) and ground (No.5).
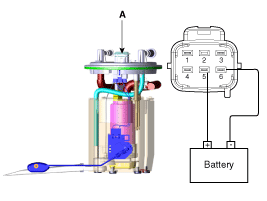
Pin No. | Description |
1 | Fuel sender signal (+) |
2 | - |
3 | Fuel sender ground (-) |
4 | - |
5 | Fuel pump motor (+) |
6 | Fuel pump motor (-) |
