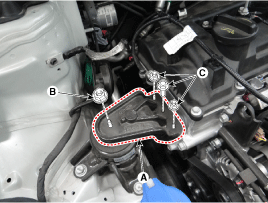
Engine removal is not required for this procedure.
Use fender covers to avoid damaging painted surfaces.
To avoid damage, unplug the wiring connectors carefully while holding the connector portion.
Mark all wiring and hoses to avoid misconnection.
Remove the engine cover.
(Refer to Engine And Transaxle Assembly - "Engine Cover")
Disconnect the battery negative terminal.
Remove the RH side front wheel.
(Refer to Suspesnsion System - "Wheel")
Remove the engine room front under cover and RH side cover.
(Refer to Engine and Transaxle Assembly - "Engine Room Under Cover")
Remove the drive belt.
(Refer to Drive Belt System - "Drive Belt")
Remove the alternator.
(Refer to Engine Electrical System - "Alternator")
Remove the idler.
(Refer to Drive Belt System - "Idler")
Remove the water pump.
(Refer to Cooling System - "Water Pump")
Remove the crankshaft damper pulley.
(Refer to Drive Belt System - "Crankshaft Damper Pulley")
Remove the cylinder head cover.
(Refer to Cylinder Head Assembly - "Cylinder Head Cover")
Install the jack to the edge of upper oil pan to support the engine.
Insert the rubber block between jack and oil pan.
Disconnect the engine ground cable (A) and then remove the engine mounting support bracket (B).
Tightening torque
Ground cable :
10.8 ~ 13.7 N.m (1.1 ~ 1.4 kgf.m, 8.0 ~ 10.1 lb-ft)
Nut (C) :
88.2 ~ 107.8 N.m (9.0 ~ 11.0 kgf.m, 65.1 ~ 79.5 lb-ft)
Bolt (D) and nuts (E) :
58.8 ~ 73.5 N.m (6.0 ~ 7.5 kgf.m, 43.3 ~ 54.2 lb-ft)
Remove the timing chain cover (A).
Be careful not to damage the contact surfaces of cylinder block, cylinder head and timing chain cover.