3.
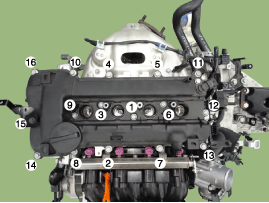
Disconnect the wiring connectors and harness clamps and remove the connector brackets around the cylinder head cover.
Use fender covers to avoid damaging painted surfaces.
To avoid damage, unplug the wiring connectors carefully while holding the connector portion.
Mark all wiring and hoses to avoid misconnection.
Turn the crankshaft pulley so that the No.1 piston is at top dead center.
Disconnect the battery negative terminal.
Remove the engine cover.
(Refer to Engine And Transaxle Assembly - "Engine Cover")
Disconnect the wiring connectors and harness clamps and remove the connector brackets around the cylinder head cover.
Remove the air cleaner assembly.
(Refer to Intake And Exhasut System - "Air Cleaner")
Remove the ignition coils.
(Refer to Engine Electrical System - “Ignition Coil”)
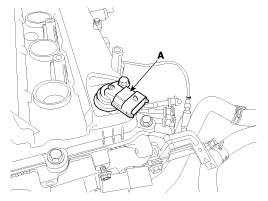
Remove the exhaust CMPS (Camshaft Position Sensor) (A).
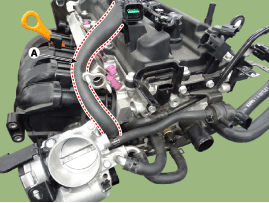
Disconnect the positive crankcase ventilation (PCV) hose (A).
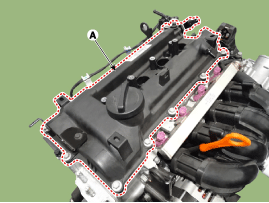
Remove the cylinder head cover (A).
Install the cylinder head cover.
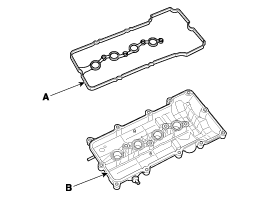
Install new cylinder head cover gasket (A) on the cylinder head cover (B).
Do not reuse the cylinder head cover gasket.
The hardening sealant located on the upper area between timing chain cover and cylinder head should be removed before assembling cylinder head cover.
After applying sealant (MS721-40AA), it should be assembled within 5 minutes.
Bead width : 2.0 ~ 3.0 mm (0.08 ~ 0.12 in.)
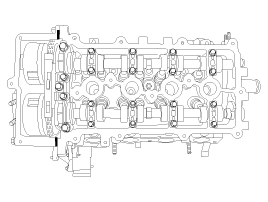
Install the cylinder head cover bolts as following method with two steps.
Tightening torque :
Step 1 : 3.9 ~ 5.9 N.m (0.4 ~ 0.6 kgf.m, 2.9 ~ 4.3 lb-ft)
Step 2 : 7.8 ~ 9.8 N.m (0.8 ~ 1.0 kgf.m, 5.8 ~ 7.2 lb-ft)
Install the other parts in the reverse order of removal.
