Use fender covers to avoid damaging painted surfaces.
To avoid damaging the cylinder head, wait until the engine coolant temperature drops below normal temperature (20°C [68°F]) before removing it.
When handling a metal gasket, be careful not to fold the gasket or damage the contacting surface of the gasket.
To avoid damage, unplug the wiring connectors carefully while holding the connector portion.
Mark all wiring and hoses to avoid misconnection.
Turn the crankshaft damper pulley so that the piston of No. 1 cylinder is at TDC (top dead center) on compression stroke.
Remove the engine and transaxle assembly.
(Refer to Engine And Transmission Assembly - "Engine And Transaxle Assembly")
Remove the transaxle assembly from the engine assembly.
(Refer to Manual Transaxle System - "Manual Transaxle")
Remove the flywheel.
(Refer to Cylinder Block Assembly - "Flywheel")
Remove the rear oil seal.
(Refer to Cylinder Block Assembly - "Rear Oil Seal")
Install the engine assembly to engine stand for disassembly.
Remove the cylinder head cover.
(Refer to Cylinder Head Assembly - “Cylinder Head Cover”)
Remove the thermostat housing.
(Refer to Cooling System - “Thermostat”)
Remove the timing chain.
(Refer to Timing System - “Timing Chain”)
Remove the intake manifold.
(Refer to Intake And Exhaust System - "Intake Manifold")
Remove the exhaust manifold.
(Refer to Intake And Exhaust System - "Exhaust Manifold")
Remove the cylinder head.
(Refer to Cylinder Head Assembly - “Cylinder Head”)
Remove the oil pan and the oil screen.
(Refer to Lubrication System - “Oil pan”)
Remove the ladder frame.
(Refer to Cylinder Block - “Cylinder Block”)
Check the connecting rod side clearance.
Check the connecting rod bearing cap oil clearance.
Remove the piston and connecting rod assemblies.
Using a ridge reamer, remove all the carbon from the top of the cylinder.
Remove the connecting rod caps (A).
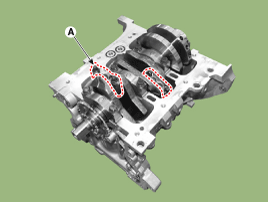
Mark the connecting rod caps for reassembly in the original position and direction.
Push the piston, connecting rod assembly and upper bearing through the top of the cylinder block.
Keep the connecting rod ands cap with their bearings assembled together.
Arrange the piston and connecting rod assemblies in the correct order.
Mark the piston and connecting rod assemblies for reassembly in the original position.
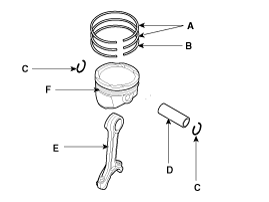
Check for fit between piston and piston pin.
Try to move the piston back and forth on the piston pin. If any movement is felt, replace the piston and pin as a set.
Disassemble the piston rings.
Using a piston ring expander, remove the 2 compression rings (A).
Remove the oil ring and coil spring (B) by hand.
Do not apply excessive force when removing the oil ring from the piston as it may break the oil ring.
Arrange the piston rings in the correct order only.
Disassemble the connecting rod from the piston.
Remove the snap ring (C) from the piston.
Using a press, remove the piston pin (D) from the piston.
Disassemble the piston (F) and connecting rod (E).