5.
Engine start. And check the signal waveforms.
Specification : CKPS & CMPS(Exhaust side) syncronization - There are about 16~17 teeth between the CKPS missing tooth and CMPS signal.
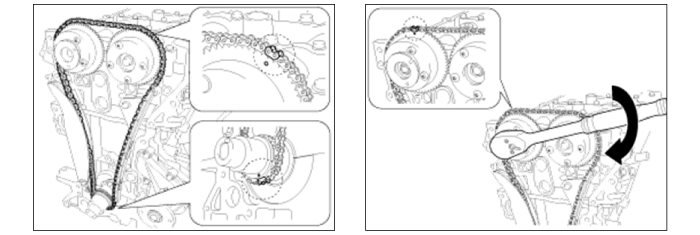
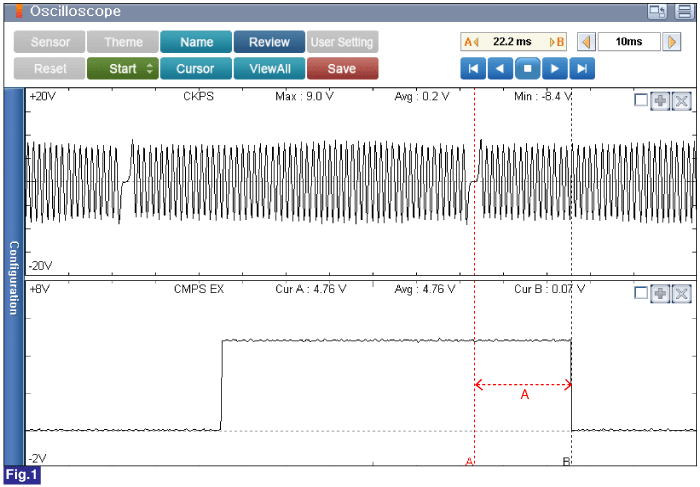
Fig.1) Alignment of Camshafts and Crankshaft
IG "OFF".
Select "Oscilloscope" in the menu.
Connect Channel A positive probe to Pin No.2 (Signal B) and Channel A negative probe to Pin No.1 (Signal A) on the CKPS connector.
Connect Channel B to Pin No.2(Signal) terminal of CMPS-EX harness connector and chassis ground.
Engine start. And check the signal waveforms.
Specification : CKPS & CMPS(Exhaust side) syncronization - There are about 16~17 teeth between the CKPS missing tooth and CMPS signal.
Fig.1) Alignment of Camshafts and Crankshaft
Check operation of OCV.
Connect GDS to Data Link Connector(DLC).
IG KEY "ON" & ENG "OFF".
Perform "Actuation Test" for OCV-IN.
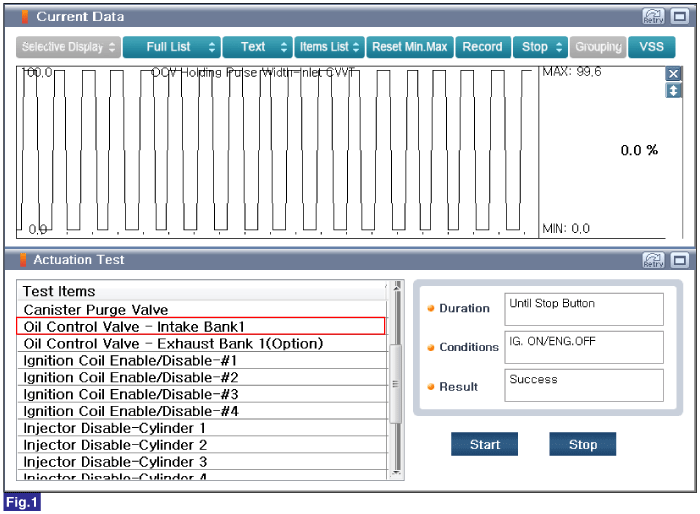
Fig.1) Refer to Figure below (Also, operating sound(Clicking sound) is heard)
Has a problem been found?
 | ▶ Go to next step as below. |
 | ▶ Go to "Check CVVT(Continuously Variable Valve Timing) Assembly" procedure. |
Check resistance of OCV.
Ignition "OFF".
Disconnect intake OCV connector.
Measure resistance between power and control terminals of OCV. (Component Side)
Specification : Approx. 9.9±0.5Ω at 20℃(68℉)
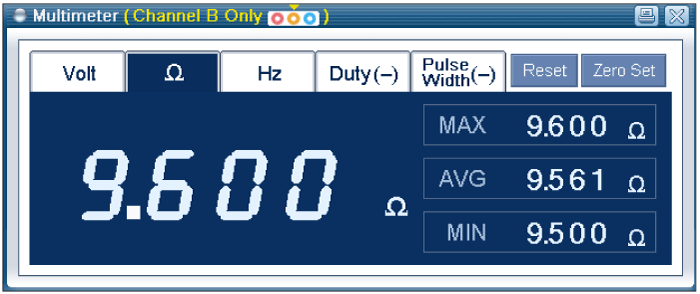
Is resistance within the specification ?
| ▶ Go to next step as below. |
| ▶ Replace OCV and then go to "Verification of Vehicle Repair" procedure. |
Perform "Actuation Test" for OCV-IN.
Fig.1) Refer to Figure below (Also, operating sound(Clicking sound) is heard)
Has a problem been found?
| ▶ Go to next step as below. |
| ▶ Go to "Check CVVT(Continuously Variable Valve Timing) Assembly" procedure. |
Remove the CVVT assembly. Refer to "Removal Procedure" in Workshop Manual.
Check that the CVVT assembly is locked.
The one of the 2 holes on the cam journal is for advances(upper) and the rest is for retards(lower). Apply masking tape to all oil path holes except the one advance hole("B") indicated by the arrow as shown in the figure.
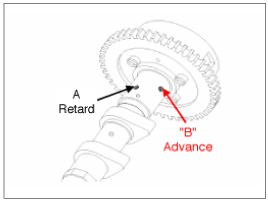
To release the CVVT lock pin, wrap some tape around the tip of an air pressure adapter and apply low air pressure of approx. 150kPa(1.5kg/㎠, 21 psi) to the exposed camshaft port. Wrap a shop towel or rag around the CVVT because residual oil may leak out of the unit when applying air pressure
With low air pressure applied, turn the CVVT to the ADVANCE direction as indicated in the figure.
If too much air leaks when applying the low air pressure, the CVVT lock pin may not release and the CVVT may not turn.
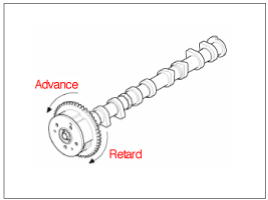
Allow the CVVT assembly to move in the ADVANCE and DELAY directions to ensure there is no binding and that it moves freely.(Movable smoothly in the range about 20˚)
Turn the CVVT by hand and make sure it locks in the maximum delay angle position.
Is CVVT assembly working properly?
| ▶ Fault is intermittent caused by poor contact in the sensor’s and/or ECM/PCM’s connector or was repaired and ECM/PCM memory was not cleared. Thoroughly check connectors for looseness, poor connection, bending, corrosion, contamination, deterioration, or damage. Repair or replace as necessary and go to "Verification of vehicle Repair" procedure. |
| ▶ If no problems were found with the circuits or connectors, Replace the CVVT. |
