2.
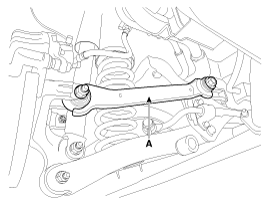
Remove the rear upper arm (A).
Remove the rear wheel & tire.
Tightening torque:
88.3 ~ 107.9 N.m(9.0 ~11.0 kgf.m, 65.1 ~79.6 lb-ft)
Remove the rear upper arm (A).
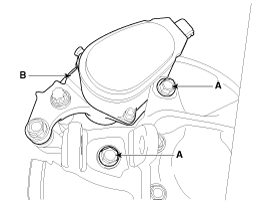
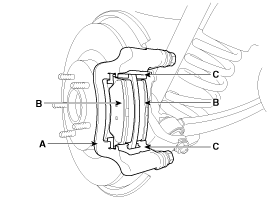
Loosen the hose eyebolt (C) and caliper mounting bolts (B), then remove the rear caliper assembly (A).
Tightening torque:
Brake hose to caliper (C):
24.5 ~ 29.4 N.m (2.5 ~ 3.0 kgf.m, 18.1 ~ 21.7 lb-ft)
Caliper assembly to carrier (B):
63.7 ~ 73.5 N.m (6.5 ~ 7.5 kgf.m, 47.0 ~ 54.2 lb-ft)
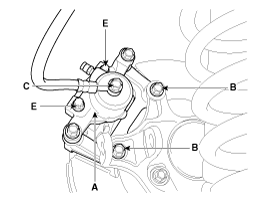
Do not loosen the bolts (E) instead of guide rod bolt.
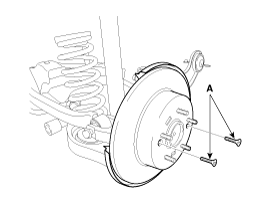
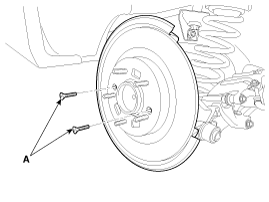
Remove the rear brake disc by loosening the screws (A).
Remove the rear wheel & tire.
Tightening torque:
88.3 ~ 107.9 N.m (9.0 ~ 11.0 kgf.m, 65.1 ~ 79.6 lb-ft)
Release the parking brake.
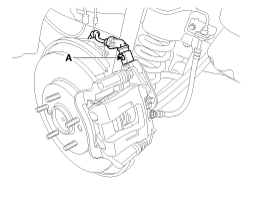
Disconnect the EPB actuator connector (A).
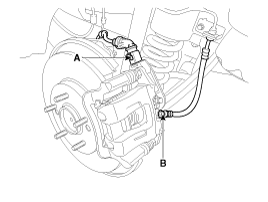
Disconnect the brake hose from the brake caliper by loosening the bolt (B).
Remove the rear upper arm (A).

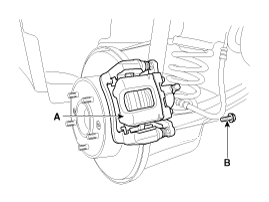
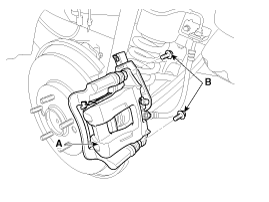
Loosen the caliper mounting bolts (A) and then remove the rear caliper assembly (B).
Tightening torque:
49.0 ~ 58.8 N.m (5.0 ~ 6.0 kgf.m, 36.2 ~ 43.4 lb-ft)
Remove the rear brake disc by loosening the screws (A).
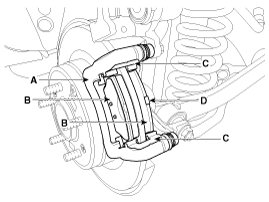
Loosen the guide rod bolt (B) and pivot the caliper (A) up out of the way.
Tightening torque:
21.6 ~ 31.4 N.m (2.2 ~ 3.2 kgf.m, 15.9 ~ 23.1 lb-ft)
Replace pad shim (D), pad retainers (C) and brake pads (B) in the caliper carrier (A).
Remove the rear wheel & tire.
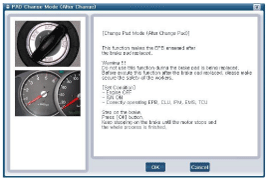
Connect the GDS to the data link connector located underneath the dash panel.
Ignition "ON" & Engine "OFF".
Release the electric parking brake.
Select vehicle name and EPB system.
Select the “PAD change mode (Before pad change)”.
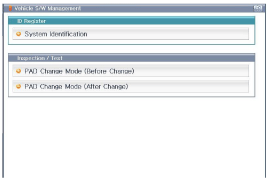
Perform the " PAD change mode (Before pad change)" procedure with GDS.
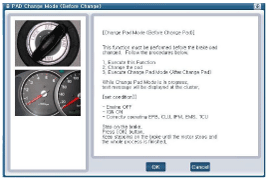
When disengaging while the motor is in operation, be sure to press down on the brake pedal.
Ignition "OFF".
Disconnect the electric parking brake actuator connector (A).
Loosen the guide rod bolts (B) and then remove caliper body (A).
Replace pad retainers (C) and brake pads (B) in the caliper carrier (A).
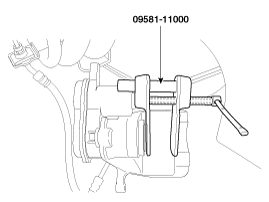
Use a SST (09581-11000) when installing the brake caliper assembly.
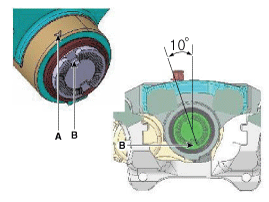
Make sure that the piston groove (B) is rotated 10˚ and faces the marking (A) on the housing as shown in the diagram.
Place the caliper body (A) on the caliper carrier and tighten the guide rod bolts (B).
Tightening torque:
21.6 ~ 31.4 N.m (2.2 ~ 3.2 kgf.m, 15.9 ~ 23.1 lb-ft)
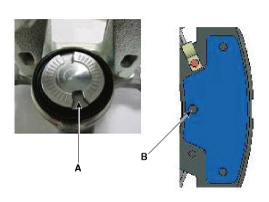
Assemble the caliper body so that the piston groove (A) is in-line with the pad center lobe (B).
* Make sure that the piston and pad are tightly attached.
Connect the electric parking brake actuator connector (A).
Ignition "ON".
Select the “PAD change mode (Before pad change)”.
Perform the " PAD change mode (Before pad change)" procedure with GDS.
Check that the parking brake operates normally.
When you activate the EPB for the first time after you change the brake pad, be sure to press down on the brake pedal.
IGN switch “OFF” and remove the GDS.
Install the rear wheel & tire.
Tightening torque:
88.3 ~ 107.9 N.m (9.0 ~ 11.0 kgf.m, 65.1 ~ 79.6 lb-ft)
Check the brake pads for wear and fade.
Check the brake disc for damage and cracks.
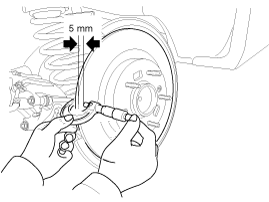
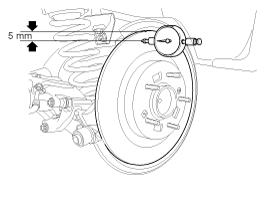
Remove all rust and contamination from the surface, and measure the disc thickness at 8 points, at least, of same distance (5mm) from the brake disc outer circle.
Rear Brake disc thickness
Standard: 10 mm (0.39 in)
Service limit: 8.4 mm (0.33 in)
Deviation: less than 0.005 mm (0.0002 in)
If wear exceeds the limit, replace the discs and pad assembly left and right of the vehicle.
Check the pad wear. Measure the pad thickness and replace it, if it is less than the specified value.
Pad thickness
Standard value: 10 mm (0.393 in)
Service limit: 2.0 mm (0.0787 in)
Check that grease is applied, to sliding contact points. Check for metal damage to the pad and backing.
Place a dial gauge about 5mm (0.2 in.) from the outer circumference of the brake disc, and measure the runout of the disc.
Brake disc runout
Limit: 0.05 mm (0.00197 in.) or less (new one)
If the runout of the brake disc exceeds the limit specification, replace the disc, and then measure the runout again.
If the runout exceeds the limit specification, install the brake disc after turning it 180° and then check the runout of the brake disc again.
If the runout cannot be corrected by changing the position of the brake disc, replace the brake disc.
Installation is the reverse of removal.
Use a SST (09581-11000) when installing the brake caliper assembly.
After installation, bleed the brake system.
(Refer to Brake system bleeding)
