Self-diagnosis process
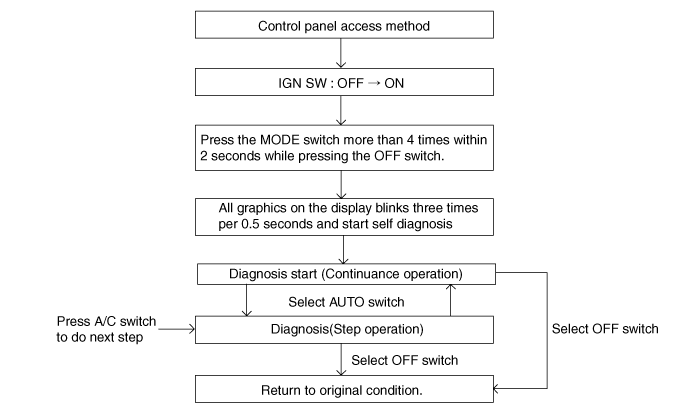
Self-diagnosis process

How to read self-diagnostic code
After the display panel flickers three times every 0.5 second, the corresponding fault code flickers on the setup temperature display panel every 0.5 second and will show two figures. Codes are displayed in numerical format
Display | Fail description |
00 | Normal |
11 | In-car sensor open |
12 | In-car sensor short |
13 | Ambient sensor open |
14 | Ambient sensor short |
17 | Evaporator sensor open |
18 | Evaporator sensor short |
19 | Temp door potentiometer open/short- Drive |
20 | Temp door potentiometer fault- Drive |
21 | Mode door potentiometer open/short |
22 | Mode door potentiometer fault |
23 | Auto defog sensor open |
24 | Auto defog sensor short |
25 | Intake door potentiometer open |
26 | Intake door potentiometer short |
32 | Temp door potentiometer open/short - Passenger |
33 | Temp door potentiometer fault - Passenger |
43 | Defog door potentiometer open/short |
44 | Defog door potentiometer fault |
45 | APT CAN signal fault |
47 | RPM CAN signal fault |
48 | Vehicle speed CAN signal fault |
49 | Engine coolant temp CAN signal fault |
50 | Cluster ion generator fault |
71 | ECV fault (open) |
Fault code display
Continuance operation : DTC code is one.

Continuance operation : DTC code is more two.

STEP operation
Normal or one fault code is same as a continuance operation.
DTC code as more two.

If fault codes are displayed during the check, Inspect malfunction causes by referring to fault codes.
Fail safe
In-car temperature sensor: Control with the value of 25°C(77°F)
Ambient temperature sensor: Control with the value of 20°C(67°F)
Evaporator temperature sensor: Control with the value of -2°C(28.4°F)
Water temperature sensor: Control with the value of -2°C(28.4°F) / Estimated torque calculation : 90°C(194°F)
Temperature control actuator (Air mix potentiometer):
If temperature setting 17°C-24.5°C, fix at maximum cooling position.
If temperature setting 25°C-32°C, fix at maximum heating position.
Mode control actuator (Direction potentiometer):
Fix vent position, while selecting vent mode.
Fix defrost position, while selecting all except vent mode.
Intake control actuator :
Fix fresh position, while selecting fresh mode.
Fix recirculation position, while selecting recirculation mode.
When prying with a flat-tip screwdriver, wrap it with protective tape, and apply protective tape around the related parts, to prevent damage.
Use a plastic panel removal tool to remove interior trim pieces to protect from marring the surface.
Take care not to bend or scratch the trim and panels.
Put on gloves to protect your hands.
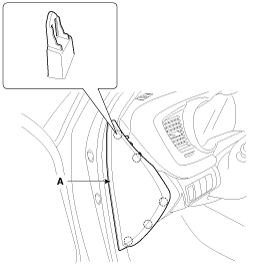
Using a screwdriver or remover, remove the crash pad side cover (A).
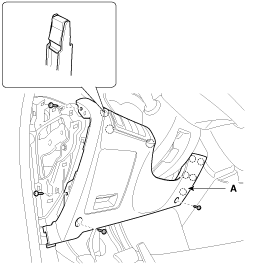
After loosening the mounting screws, then remove the crash pad lower panel (A).
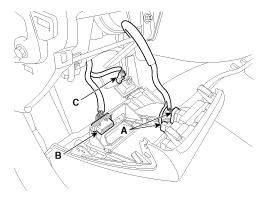
Disconnect the crash pad lower switch connectors (A).
Disconnect the diagnosis connector (B) and crash pad under lamp connector (C).
Disconnect the start/stop button connector (D).
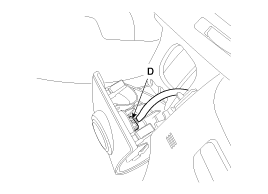
Using a screwdriver or remover, remove the crash pad garnish [RH] (A).
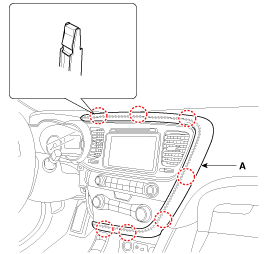
After loosening the mounting screws, then remove the heater control unit panel (A).
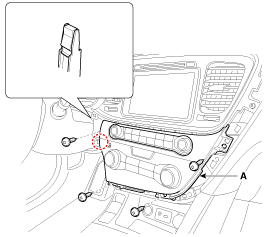
Disconnect the connectors (A) and hose (B).
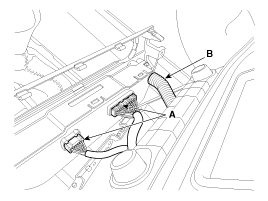
After loosening the mounting screws, then remove the heater control unit (A).
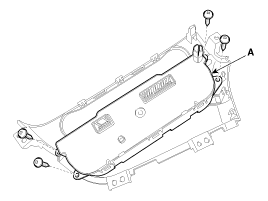
Installation is the reverse of removal.
Make sure the connector is plugged in properly.
Replace any damaged clips.