1.
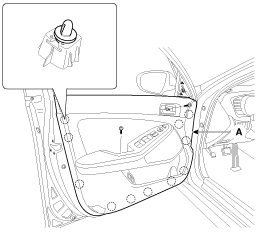
Using a screwdriver or remover, remove the front door quadrant inner cover (A).
Be careful not to scratch the door trim and other parts.
Put on gloves to protect your hands.
Using a screwdriver or remover, remove the front door quadrant inner cover (A).
After loosening the mounting screws, then remove the front door trim (A).
Remove the inside handle cage (A).
Disconnect the connectors (A).
Installation is the reverse of removal.
Make sure connectors are connected properly and each rod is connected securely.
Make sure the door locks/unlocks and opens/closes properly.
Replace any damaged clips.
Remove the front door trim
After loosening the mounting screws, then remove the inside handle (A).
Installation is the reverse of removal.
Make sure the door locks/unlocks and opens/closes properly.
Replace any damaged clips.
Remove the front door trim.
After loosening the mounting screws, then remove the front door pull handle mounting support (B).
Remove the front door trim seal (A).
Replace ant damaged door trim seal.
Disconnect the front door latch connector (A) and wiring harness (B).
Remove the front door belt inside weatherstrip (A).
Remove the glass mounting hole plug (B).
Take care not to drop to glass and scratch the glass surface.
Carefully adjust the glass (A) until you can see the bolts, then loosen them. Separate the glass from the glass run and carefully pull the glass out through the window slot.
Tightening torque :
7.8 ~ 11.8 N.m (0.8 ~ 1.2 kgf.m, 5.8 ~ 8.7 lb-ft)
Installation is the reverse of removal.
Roll the glass up and down to see if it move freely without binding.
Adjust glass position as needed.
Remove the front door trim.
Disconnect the speaker connector (B).
After loosening the mounting screws, then remove the speaker (A).
Installation is the reverse of removal.
Use sheet metal screws to secure the speaker.
Replace any damaged clips.
Make sure the door locks/unlocks and opens/closes properly.
Make sure connectors are connected properly and each rod is connected securely.
Remove the front door trim.
After loosening the mounting screws, then remove the front door pull handle mounting support (B).
Remove the front door trim seal (A).
Replace ant damaged door trim seal.
Disconnect the front door latch connector (A) and wiring harness (B).
Remove the front door belt inside weatherstrip (A).
Remove the glass mounting hole plug (B).
Take care not to drop to glass and scratch the glass surface.
Carefully adjust the glass (A) until you can see the bolts, then loosen them. Separate the glass from the glass run and carefully pull the glass out through the window slot.
Tightening torque :
7.8 ~ 11.8 N.m (0.8 ~ 1.2 kgf.m, 5.8 ~ 8.7 lb-ft)
Disconnect the tweeter speaker connector (A) and wiring harness (B).
Remove the front door trim seal (A).
Replace ant damaged door trim seal.
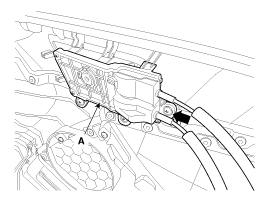
Disconnect the power window motor connector (A).
Loosen the front door power window regulatcr assembly mounting nuts.
Tightening torque :
3.9 ~ 5.9 N.m (0.4 ~ 0.6 kgf.m, 2.9 ~ 4.3 lb-ft)
Remove the front door power window regulatcr assembly (A).
Installation is the reverse of removal.
Grease should be applied to areas where there is rotational parts and springs.
Roll the glass up and down to see if it move freely without binding.
Replace any damaged clips.
Remove the following parts :
Front door trim
Front door seal
Loosen the front door channel mounting nuts.
Tightening torque:
3.9 ~ 5.9 N.m (0.4 ~ 0.6 kgf.m, 2.9 ~ 4.3 lb-ft)
Remove the front door channel (A).
Disconnect the outside handle rod (A).
Remove the hole plug (B).
After loosening the mounting bolt, then remove the outside handle cover (A).
Tightening torque:
0.7 ~ 0.5 N.m (0.07 ~ 0.1 kgf.m, 1.0 ~ 0.7 lb-ft)
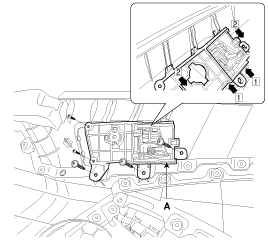
Loosen the front door latch mounting screws.
Tightening torque:
6.9 ~ 10.8 N.m (0.7 ~ 1.1 kgf.m, 5.1 ~ 8.0 lb-ft)
Disconnect the front door latch connector (B).
Remove the front door latch (A).
Installation is the reverse of removal.
Make sure the door locks/unlocks and opens/closes properly.
Make sure the connector is connected properly.
Replace any damage clips.
Remove the following parts :
Front door trim
Front door seal
Disconnect the outside handle rod (A).
Remove the hole plug (B).
After loosening the mounting bolt, then remove the outside handle cover (A).
Tightening torque:
0.7 ~ 0.5 N.m (0.07 ~ 0.1 kgf.m, 1.0 ~ 0.7 lb-ft)
Remove the outside handle (A) by sliding it rearward.
Installation is the reverse of removal.
Make sure the door locks/unlocks and opens/closes properly.
Make sure the door locks and opens properly.
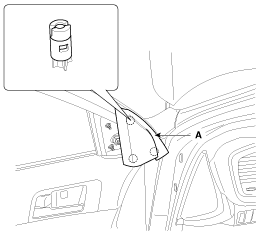
Loosen the checker mounting bolts.
Detach the clips, then remove the front door side weatherstrip (A).
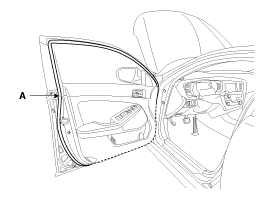
Installation is the reverse of removal.
