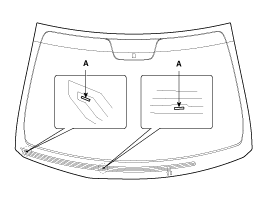
Install the wiper arm and blade to the auto stop position.
A : Auto stop position (Blade)

Install the wiper motor.
Install the crank arm.
Tighting torque:
24.5 ~ 26.4Nm (2.5 ~ 2.7, kgf.m, 18.0 ~ 19.5 lbf.ft)
To install the wiper motor crank arm, make sure that the linkage is aligned with the crank arm in straight line and set the angle of each linkages exactly.
Install the lower and upper linkage to the wiper motor crank arm.
To install the wiper motor crank arm, make sure that the linkage is aligned with the crank arm in straight line and set the angle of each linkages exactly.
Be careful not to bend the linkage.
Install the wiper motor and linkage assembly and then connect the wiper motor connector.
Tighting torque:
7 ~ 11Nm (0.7 ~ 1.1, kgf.m, 5.0 ~ 7.9 lbf.ft)
Install the cowl top cover.
Install the windshield wiper arm and blade.
Tighting torque:
22.5 ~ 26.4 Nm (2.3 ~ 2.7 kgf.m, 16.6 ~ 21.7 lbf.ft)
The windshield wiper motor must be cycled to make sure that it is in the auto stop position.
If necessary, adjust the wiper arm and blade.
Install the wiper arm and blade to the auto stop position.
A : Auto stop position (Blade)

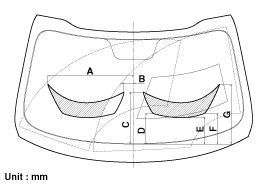
Set the cowl top cover on the specified spray position.
When you turn on the washer, confirm 50% or more of washer fluid lands within the spray area.
If the spray area is not within the standard positions, adjust the nozzle(s).

Specified position | Distance (in) | Distance (mm) |
A | 20.24 | 514.3 |
B | 2.46 | 62.6 |
C | 12.33 | 313.3 |
D | 7.39 | 187.7 |
E | 6.41 | 162.8 |
F | 7.32 | 186 |
G | 13.56 | 344.6 |