8.
Perform the test in accordance with the message.
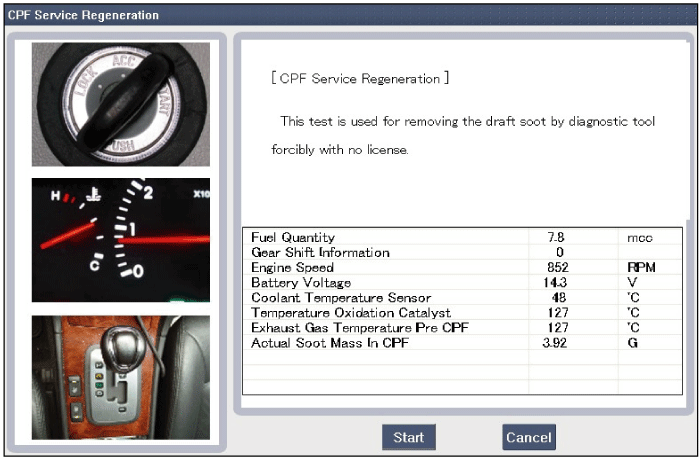

note
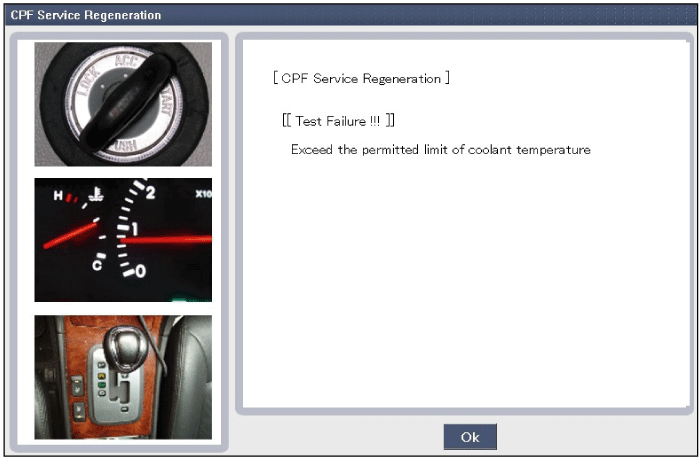
If the fulfillment condition is not satisfied, DPF regeneration test will fail.
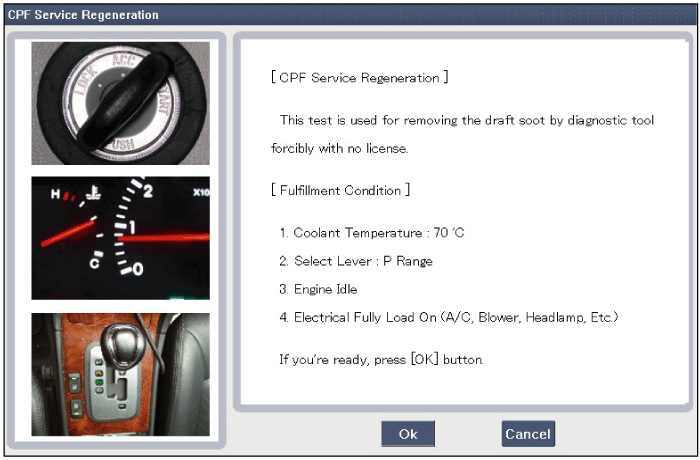
This procedures is to forcibly regenerate the DPF with the GDS when the DPF doesn't have been regenerated during driving. For example, if the vehicle has repeated "Low speed driving" or "Short distance driving", "Frequent idle driving", the DPF regeneration procedure cannot be proceeded because "Regeneration Mode" doesn't made.
If performing the DPF service regeneration mode indoors, fire or burn injuries may occur by high-temperature exhaust gas.
Therefore the DPF service regeneration mode must be performed in a outdoor safe zone.
Engine coolant temperature: about 70℃
Engine at idle
P-range (A/T) or Neutral (M/T)
Normal battery voltage
Electrical fully load ON (A/C ON if equipped, Blower ON with maximum speed, Head Lamp ON, Wiper ON, Other Lamps ON, etc.)
Engine hood open
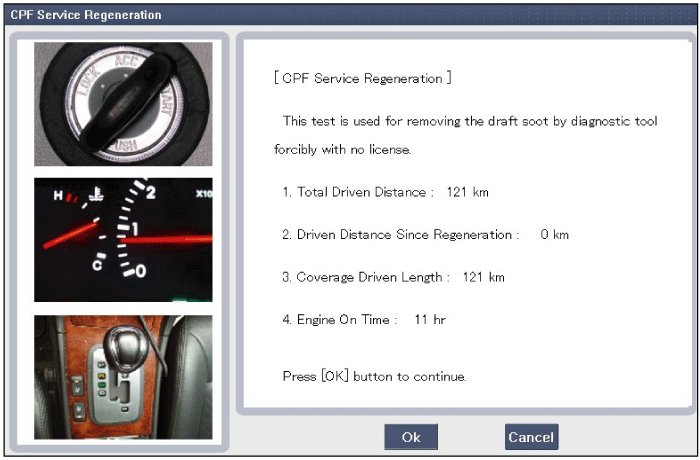
Quantity of soot is 25g below. (ECU indicated)
The air conditioner's electrical load is very high. Accordingly, to make regeneration mode more quickly, turn it ON (If eqquipped).
Turn ignition switch OFF.
Connect the GDS to Data Link Connector (DLC).
Start engine at idle and P-range (A/T) or neutral (M/T).
Apply electrical fully load to the vehicle (A/C ON, Blower ON with maximum speed, Head Lamp ON, Wiper ON, and Other Lamps ON, etc.)
Select "Vehicle, Model year, Engine, System".
Select "Vehicle S/W Management".
Select "DPF Service Regeneration".
Perform the test in accordance with the message.
If the fulfillment condition is not satisfied, DPF regeneration test will fail.
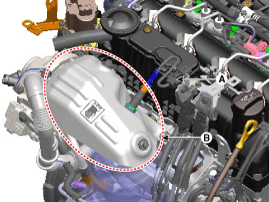
Must check damage of the DPF assembly before removing the DPF assembly.
Remove the exhaust pipe of the DPF end side.
Check damage or decoloration(white) of the rear section of the DPF.
Check existence of the soot of the rear section of the DPF.
DPS assembly has some trouble if you find black soot.
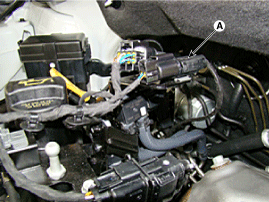
Turn the ignition switch off and disconnect the battery nagative (-) cable.
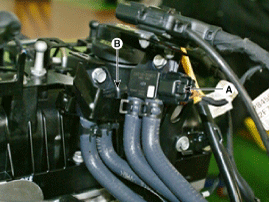
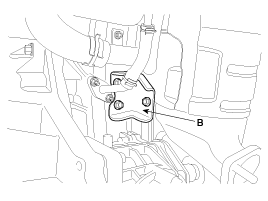
Remove the heater protector (B) after disconnecting the lambda sensor connector (A).
Tightenin torque : 17.7 ~ 21.6 N.m (1.8 ~ 2.2 kgf.m, 13.0 ~ 15.9 lb-ft)
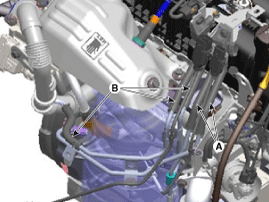
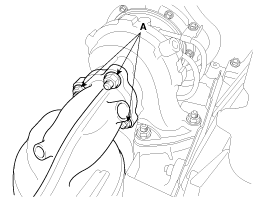
Disconnect the exhaust gas temperature sensor (EGTS) connector (A).
Disconnect the DPF differential pressure sensor connector (A) and the LP-EGR differential pressure sensor connector (B).
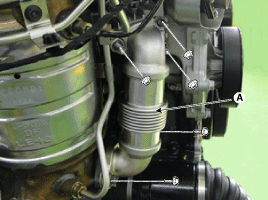
Disconnect the DPF differential pressure pipe hose (A) and the LP-EGR differential pressure pipe hose (B) from the DPF assembly.
When connecting the differential pressure pipe hose, there should be careful not to change back and forth.
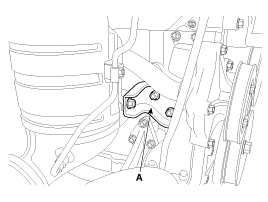
Loosen the front muffler assembly mounting nut after lifting the vehicle.
Tightenin torque : 39.2 ~ 58.9 N.m (4.0 ~ 6.0 kgf.m, 28.9 ~ 43.4 lb-ft)
Remove the sub-frame assembly.
(Refer to Suspension System - "Sub-frame")
Remove the oil level gauge & guide assembly.
(Refer to Lubricant System - "Oil level gauge & guide")
Remove the emergency filter (A).
Tightenin torque : 19.6 ~ 24.5 N.m (2.0 ~ 2.5 kgf.m, 14.5 ~ 18.1 lb-ft)
Remove the front muffler assembly installation nut after lifting the vehicle.
(Refer to Engine Mechanical System - "Muffler")
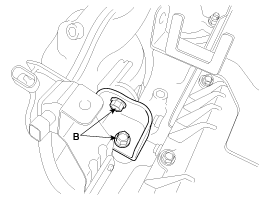
Remove the DPF assembly stay (A,B).
DPF assembly stay installation bolt:
44.1 ~ 54.0 N.m (4.5 ~ 5.5 kgf.m, 32.6 ~ 39.8 lb-ft)
Front muffler assembly installation nut:
39.2 ~ 58.8 N.m (4.0 ~ 6.4kgf.m, 28.9 ~ 43.4 lb-ft)
Remove the DPF assembly after removing the installation nuts (A) and bolts (B) from the turbo charger.
DPF assembly installation bolt:
44.1 ~ 54.0 N.m (4.5 ~ 5.5 kgf.m, 32.6 ~ 39.8 lb-ft)
DPF assembly installation nut:
49.1 ~ 68.7 N.m (5.0 ~ 7.0 kgf.m, 36.2 ~ 50.6 lb-ft)
Installation is reverse of removal.
Be careful not to insert foreign substances to the pipes and the DPF assembly.
DPF assembly may be damaged or permanent/excessive regeneration is occurred if foreign substances are inserted to the DPF assembly or the pipes.
Install the component with the specified torques.
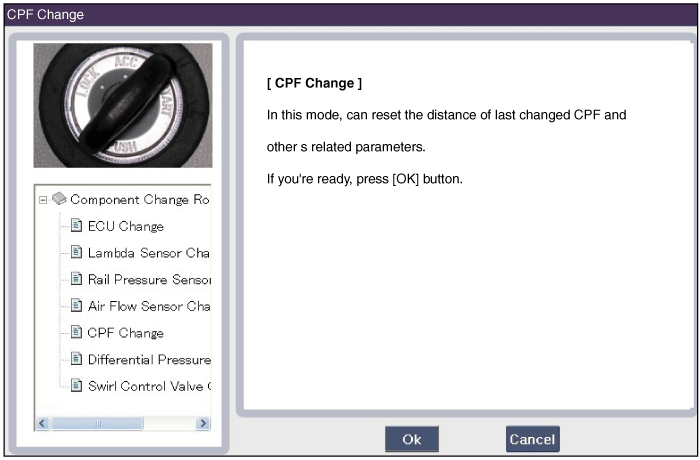
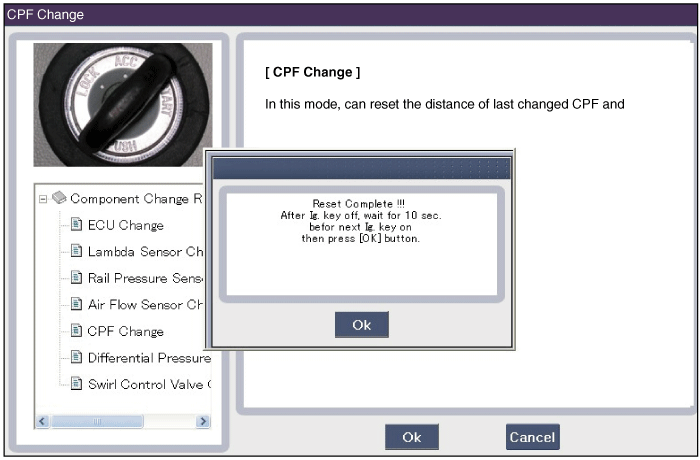
After replacing the DPF assembly, MUST perform the "Component Change Routine" procedure. Otherwise trouble related with engine performance or emission control may occur until ECM learning about the component is over.
Turn ignition switch OFF.
Connect the GDS to Data Link Connector (DLC).
Turn ignition switch ON.
Select "Vehicle, Model year, Engine, System".
Select "Vehicle S/W Management".
Select "Component Change Routine".
Select "DPF Change".
Perform the procedure in accordance with the message.