1.
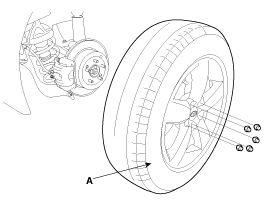
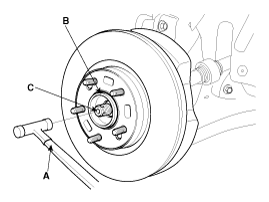
Remove the front wheel and tire (A) from front hub .
Tightening torque:
88.2 ~ 107.8 N.m (9.0 ~ 11.0 kgf.m, 65.0 ~ 79.5 lb-ft)
caution
Be careful not to damage to the hub bolts when removing the front wheel and tire (A).
Remove the front wheel and tire (A) from front hub .
Tightening torque:
88.2 ~ 107.8 N.m (9.0 ~ 11.0 kgf.m, 65.0 ~ 79.5 lb-ft)
Be careful not to damage to the hub bolts when removing the front wheel and tire (A).
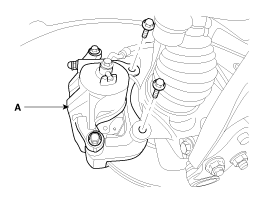
Remove the brake caliper mounting bolts, and then place the brake caliper assembly (B) with wire.
Tightening torque:
78.4 ~ 98.0N.m (8.0 ~ 10.0kgf.m, 57.8 ~ 72.3lb-ft)
Remove the coking nut (A).
Tightening torque:
274.4~ 294.3N.m (28.0 ~ 30.0kgf.m, 202.4 ~ 217.0lb-ft)
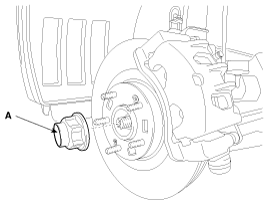
The front hub coking nut should be replaced with new ones.
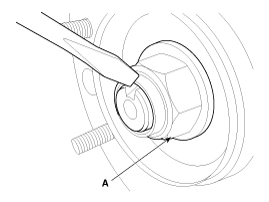
After installation coking nut (A), stake the coking nut using a chisel and hammer as shown in the illustration below.
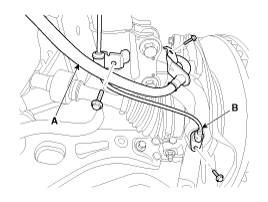
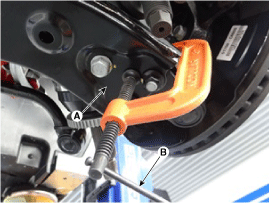
Remove the brake hose (A) and wheel speed sensor (B).
Tightening torque:
6.8 ~ 10.8N.m (0.7 ~ 1.1kgf.m, 5.1 ~ 7.9lb-ft)
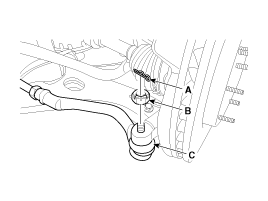
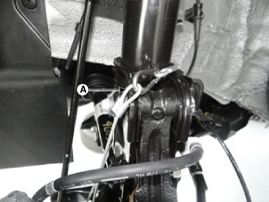
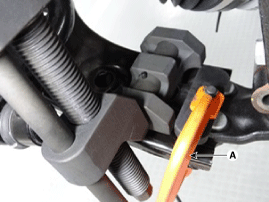
Remove the tie rod end ball joint (C) from the knuckle by using the SST (09568-34000).
Remove the split pin (A).
Remove the castle nut (B).
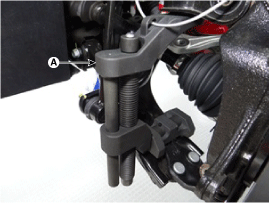
Use the SST (09568-34000).
Tightening torque :
23.5 ~ 33.3N.m (2.4 ~ 3.4kgf.m, 19.4 ~ 24.6lb-ft)
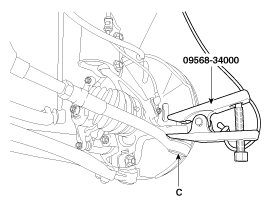
When using SST, be sure not to damage the dust cover of lower arm ball joint.
Keep SST tied to the car because there is a risk of injury by dropping the SST during removing the lower arm ball joint.
The peripheral parts may be damaged when removing the lower arm ball joint with a general tool such as lever, so be sure to use SST.
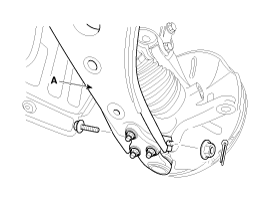
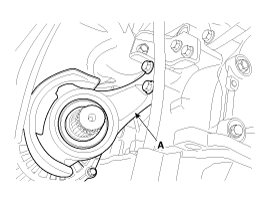
Remove the lower arm (A) mounting bolt and nut from the knuckle.
Tightening torque:
98.0 ~ 117.6N.m (10.0 ~ 12.0kgf.m, 72.3 ~ 86.7lb-ft)
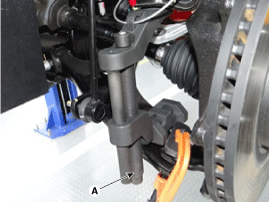
Remove the front lower arm from the front knuckle using the SST (0K545-A9100).
After removing bolts from the front knuckle, install and tighten the sub body bolt (A) .
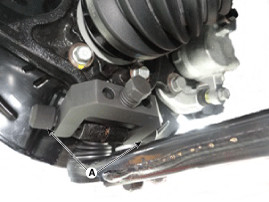
Input the sub body (A) between the front knuckle and the sub body bolt.
Tighten bolt (B) of the sub body bolt to broaden the gap of the front knuckle.
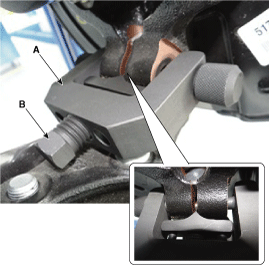
Install the safe wire (A).
Install a safe wire on the front strut to prevent dropping the SST and hurting technicians.
Install the main body, between the front strut and the lower arm.
To avoid the main body coming off, install a fixing clamp (A) beside the main body.
After installing a fixing clamp, rotate the handle (B) clock wise till the clamp is fixed on a lower arm.
Tighten a main body bolt (A) of the slowly and remove the lower arm from the front knuckle.
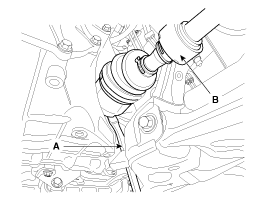
Using a plastic hammer (A), disconnect driveshaft (C) from the axle hub (B).
Remove the RH side cover (A).
Tightening torque:
7.8 ~ 11.8N.m (0.8 ~ 1.2kgf.m, 5.8 ~ 8.7lb-ft)

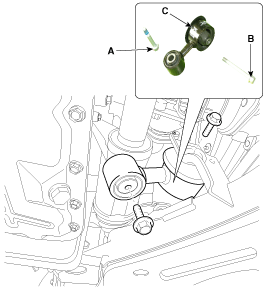
Remove the mounting bolts (A,B) of Upper roll rod bracket (C).
Tightening torque:
(A) 107.9 ~ 125.5N.m (11.0 ~ 13.0kgf.m, 79.6 ~ 94.0lb-ft)
(B) 49.0 ~ 63.7N.m (5.0 ~ 6.5kgf.m, 36.2 ~ 47.0lb-ft)
Do not reuse bolts.
Loosen the inner shaft mounting bolts and then disconnect the inner shaft (A).
Tightening torque:
49.0 ~ 68.6N.m (5.0 ~ 7.0kgf.m, 36.2 ~ 50.6lb-ft)
By the shape and the engine bracket bolts are mounted differently.
Insert a pry bar (A) between the transaxle case and joint case, and separate the drive shaft (B) from the transaxle case.
Install in the reverse order of removal.
Use a pry bar being careful not to damage the transaxle and joint.
Do not insert the pry bar too deep, as this may cause damage to the oil seal.
Do not pull the driveshaft by excessive force it may cause components inside the joint kit to dislodge resulting in a torn boot or a damaged bearing.
Plug the hole of the transaxle case with the oil seal cap to prevent contamination.
Support the driveshaft properly.
Replace the retainer ring whenever the driveshaft is removed from the transaxle case.
