Check the end play between piston and connecting rod.
Side clearance :
0.05 ~ 0.31 mm (0.0020 ~ 0.0122 in)
If out-of-tolerance, install a new connecting rod.
If still out-of-tolerance after connecting rod replacement, replace the crankshaft.
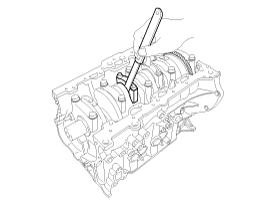
Check the end play between piston and connecting rod.
Side clearance :
0.05 ~ 0.31 mm (0.0020 ~ 0.0122 in)
If out-of-tolerance, install a new connecting rod.
If still out-of-tolerance after connecting rod replacement, replace the crankshaft.

Check the connecting rod bearing oil clearance.
Check the match marks on the connecting rod and cap are aligned to ensure correct reassembly.
Remove the 2 connecting rod cap bolts.
Remove the connecting rod cap and lower bearing.
Clean the crankshaft pin journal and bearing.
Place a plastigage across the crankshaft pin journal.
Reinstall the lower bearing and cap, and tighten the bolts.
Tightening torque :
27.5~31.4 N.m (2.8~3.2 kgf.m, 20.3~33.1 lb-ft) + 88°~92°
Do not turn the crankshaft.
Do not reuse the connection rod cap bolts.
Remove the connecting rod cap and lower bearing.
Measure the plastigage at its widest point.
Bearing oil clearance :
0.024 ~ 0.052 mm (0.0009 ~ 0.0020 in)
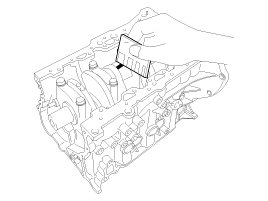
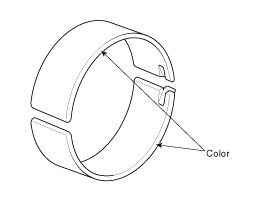
If the plastigage measures too wide or too narrow, remove the upper and lower bearing and then install a new bearings with the same color mark. Recheck the oil clearance.
Do not file, shim, of scrape the bearings or the caps to adjust clearance.
If the plastigage shows the clearance is still incorrect, try the next larger or smaller bearing. Recheck the oil clearance.
If the proper clearance cannot be obtained by using the appropriate larger or smaller bearings, replace the crankshaft and start over.
If the marks are indecipherable because of an accumulation of dirt and dust, do not scrub them with a wire brush or scraper. Clean them only with solvent or detergent.
Select the bearing by using selection table.
Connecting rod bearing | Connecting rod mark | |||
A(A) | B(B) | C(C) | ||
Crank shaft pin journal mark | I(A) | A(Blue) | A(Blue) | B(Black) |
II(B) | A(Blue) | B(Black) | C(Red) | |
III(C) | B(Black) | C(Red) | C(Red) | |
Class | Mark | Connecting rod big-end inner diameter | |
2.0L | 2.2L | ||
A | A | 51.000 ~ 51.006 mm ( 2.0079 ~ 2.0081 in) | 55.000 ~ 55.006 mm ( 2.1654 ~ 2.1656 in) |
B | B | 51.006 ~ 51.012 mm ( 2.0081 ~ 2.0083 in) | 55.006 ~ 55.012 mm ( 2.1656 ~ 2.1658 in) |
C | C | 51.012 ~ 51.018 mm ( 2.0083 ~ 2.0086 in) | 55.012 ~ 55.018 mm ( 2.1658 ~ 2.1661 in) |
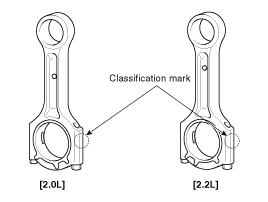
Class | Mark | Crankshaft pin journal outer diameter | |
2.0L | 2.2L | ||
I | I(A) | 48.012 ~ 48.018 mm (1.8902 ~ 1.8905 in) | 52.012 ~ 52.018 mm (2.0477 ~ 2.0479 in) |
II | II(B) | 48.006 ~ 48.012 mm (1.8900 ~ 1.8902 in) | 52.006 ~ 52.012 mm (2.0475 ~ 2.0477 in) |
III | III(C) | 48.000 ~ 48.006 mm (1.8898 ~ 1.8900 in) | 52.000 ~ 52.006 mm (2.0472 ~ 2.0475 in) |
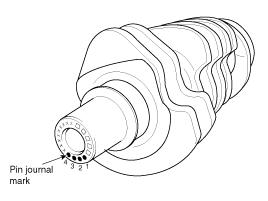
Class | Color | Connecting rod bearing thickness | |
Upper | Lower | ||
A | Blue | 1.472 ~ 1.477 mm ( 0.0580 ~ 0.0581 in) | 1.478 ~ 1.481 mm ( 0.0582 ~ 0.0583 in) |
B | Black | 1.477 ~ 1.482 mm ( 0.0581 ~ 0.0583 in) | 1.481 ~ 1.484 mm ( 0.0583 ~ 0.0584 in) |
C | Red | 1.482 ~ 1.487 mm ( 0.0583 ~ 0.0585 in) | 1.484 ~ 1.487 mm ( 0.0584 ~ 0.0585 in) |
Check the connecting rods.
When reinstalling, make sure that cylinder numbers put on the connecting rod and cap at disassembly match. When a new connecting rod is installed, make sure that the notches for holding the bearing in place are on the same side.
Replace the connecting rod if it is damaged on the thrust faces at either end. Also if step wear or a severely rough surface of the inside diameter of the small end is apparent, the rod must be replaced as well.
Using a connecting rod aligning tool, check the rod for bend and twist. If the measured value is close to the repair limit, correct the rod by a press. Any connecting rod that has been severely bent or distorted should be replaced.
Allowable bend of connecting rod :
0.05 mm (0.0020 in) or less / 100 mm (3.94 in)
Allowable twist of connecting rod :
0.1 mm (0.0039 in ) or less / 100 mm (3.94 in)
Clean the piston.
Using a gasket scraper, remove the carbon from the piston top.
Using a groove cleaning tool or broken ring, clean the piston ring grooves.
Using solvent and a brush, thoroughly clean the piston.
Do not use a wire brush.
Check the piston-to-cylinder clearance by calculating the difference between the cylinder bore inner diameter and the piston outer diameter.
Piston-to-cylinder clearance :
0.075 ~ 0.095 mm (0.0030 ~ 0.0037 in)
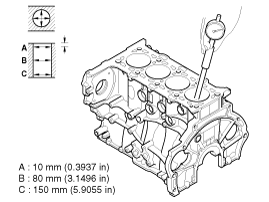
Using a cylinder bore gauge, measure the cylinder bore diameter at position in the thrust and axial direction.
Cylinder bore diameter
2.0L : 84.000 ~ 84.030 mm (3.3071 ~ 3.3083 in)
2.2L : 85.400 ~ 85.430 mm (3.3622 ~ 3.3634 in)
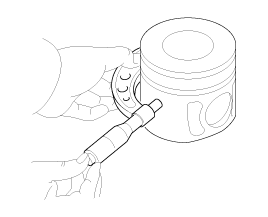
Measure the piston outside diameter at 10 mm (0.39 in) from bottom land of the piston.
Piston outside diameter
2.0L : 83.915 ~ 83.945 mm (3.3037 ~ 3.3049 in)
2.2L : 85.315 ~ 85.345 mm (3.3589 ~ 3.3600 in)
Select the piston matching with cylinder bore class.
Piston-to-cylinder clearance :
0.075 ~ 0.095 mm (0.0030 ~ 0.0037 in)
Check the cylinder bore size mark on the side of the cylinder block.
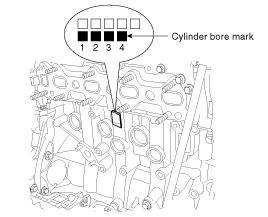
Class | Mark | Cylinder bore inner diameter | |
2.0L | 2.2L | ||
a | A | 84.000 ~ 84.010 mm (3.3071 ~ 3.3075 in) | 85.400 ~ 85.410 mm (3.3622 ~ 3.3626 in) |
b | B | 84.010 ~ 84.020 mm (3.3075 ~ 3.3079 in) | 85.410 ~ 85.420 mm (3.3626 ~ 3.3630 in) |
c | C | 84.020 ~ 84.030 mm (3.3079 ~ 3.3083 in) | 85.420 ~ 85.430 mm (3.3630 ~ 3.3634 in) |
Check the piston size mark on the piston top face.
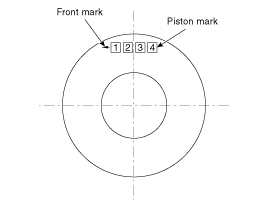
Item | Mark |
1 | Engine - 0 : 2.0L - 2 : 2.2L |
2 | Power - S : Standard - L : Low Power |
3 | Piston Grade - A - B - C |
4 | Ring- G : For General region - None : Except General |
Class | Mark | Piston outer diameter | |
2.0L | 2.2L | ||
A | A | 83.915 ~ 83.925 mm (3.3037 ~ 3.3041 in) | 85.315 ~ 85.325 mm (3.3626 ~ 3.3630 in) |
B | B | 83.925 ~ 83.935 mm (3.3041 ~ 3.3045 in) | 85.325 ~ 85.335 mm (3.3630 ~ 3.3596 in) |
C | C | 83.935 ~ 83.945 mm (3.3045 ~ 3.3049 in) | 85.335 ~ 85.345 mm (3.3596 ~ 3.3600 in) |
Inspect the piston ring side clearance.
Using a feeler gauge, measure the clearance between new piston ring and the wall of ring groove.
Piston ring side clearance
No.1 : 0.102 ~ 0.146 mm (0.0040 ~ 0.0057 in)
No.2 : 0.070 ~ 0.110 mm (0.0028 ~ 0.0043 in)
Oil ring : 0.030 ~ 0.070 mm (0.0012 ~ 0.0028 in)
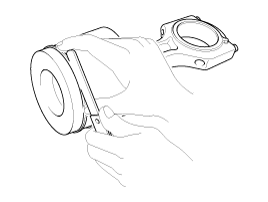
If the clearance is greater than maximum, replace the piston.
Inspect the piston ring end gap.
To measure the piston ring end gap, insert a piston ring into the cylinder bore. Position the ring at right angles to the cylinder wall by gently pressing it down with a piston. Measure the gap with a feeler gauge.
Piston ring end gap
No.1 : 0.18 ~ 0.33 mm (0.0071 ~ 0.0130 in)
No.2 : 0.35 ~ 0.50 mm (0.0138 ~ 0.0297 in)
Oil ring : 0.25 ~ 0.50 mm (0.0098 ~ 0.0197 in)
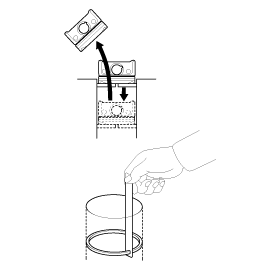
If the gap exceeds the specifications, replace the piston rings. If the gap is too large, recheck the cylinder bore inner diameter. If the bore is over the specifications, the cylinder block must be rebored.
Measure the outer diameter of piston pin.
Piston pin diameter :
33.991 ~ 33.997 mm (1.3382 ~ 1.3385 in)
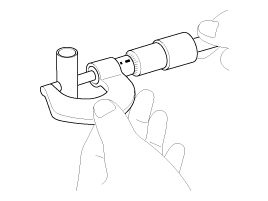
Measure the piston pin-to-piston clearance.
Piston pin-to-piston clearance :
0.007 ~ 0.019 mm (0.0003 ~ 0.0007 in)
Check the difference between the piston pin outer diameter and the connecting rod small end inner diameter.
Piston pin-to-connecting rod interference :
0.023 ~ 0.041 mm (0.0009 ~ 0.0016 in)