12.
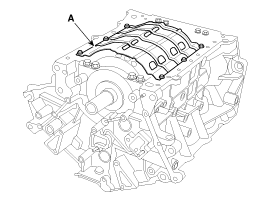
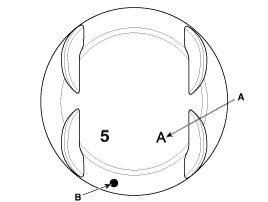
Remove the baffle plate (A).
Use fender covers to avoid damaging painted surfaces.
To avoid damage, unplug the wiring connectors carefully while holding the connector portion.
Mark all wiring and hoses to avoid misconnection.
Inspect the timing chain before removing the cylinder head.
Turn the crankshaft pulley so that the No.1 piston is at top dead center (TDC).
Remove the engine assembly from the vehicle.
(Refer to Engine And Transmission Assembly - "Engine And Transmission Assembly")
Remove the drive plate and adapter plate.
(Refer to Cylinder Block - "Drive Plate")
Attach the engine to engine stand for disassembly.
Remove the exhaust manifold.
(Refer to Intake And Exhaust System - "Exhaust Manifold")
Remove the intake manifold.
(Refer to Intake And Exhaust System - "Intake Manifold")
Remove the timing chain.
(Refer to Timing System - "Timing Chain")
Remove the water temperature control assembly.
(Refer to Cooling System - "Water Temperature Control Aassembly")
Remove the cylinder head.
(Refer to Cylinder Head Assembly - "Cylinder Head")
Remove the oil pump.
(Refer to Lubrication System - "Oil Pump")
Remove the oil filter body.
(Refer to Lubrication System - "Oil filter body")
Remove the upper oil pan.
(Refer to Lubrication System - "Oil Pan")
Remove the baffle plate (A).
Check the connecting rod end play.
Check the connecting rod cap oil clearance.
Detach the piston and connecting rod assemblies from the cylinder block.
Using a ridge reamer, remove all the carbon from the top of the cylinder.
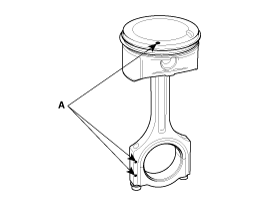
Remove the connecting rod bearing cap.
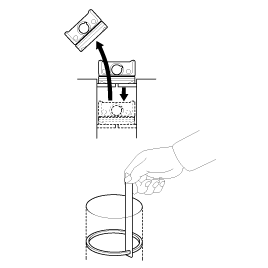
Push the piston, connecting rod assembly and upper bearing through the top of the cylinder block.
Keep the bearings, connecting rod and cap together.
Arrange the piston and connecting rod assemblies in the correct order.
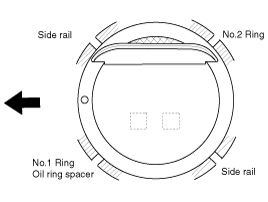
Remove the piston rings.
Using a piston ring expander, remove the 2 compression rings.
Remove 2 side rails and the spacer by hand.
Arrange the piston rings in the correct order only.
Disconnect the connecting rod from piston. Remove the snap ring at both ends of piston pin. And push the piston pin to seperate and connecting rod.
Check the connecting rod end play.
Using a feeler gauge, measure the end play while moving the connecting rod back and forth.
Standard end play : 0.1 ~ 0.25 mm (0.004 ~ 0.010 in.)
If out-of-tolerance, install a new connecting rod.
If still out-of-tolerance after connecting rod replacement, replace the crankshaft.
Check the connecting rod bearing oil clearance.
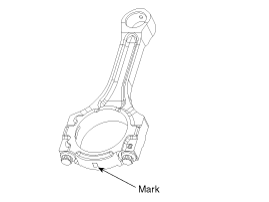
Check the matchmarks on the connecting rod and cap are aligned to ensure correct reassembly.
Remove 2 connecting rod cap bolts.
Remove the connecting rod cap and bearing half.
Clean the crank pin and bearing.
Place plastigage across the crank pin.
Reinstall the bearing half and cap, and torque the bolts.
Tightening torque:
[27.5 ~ 31.4 N.m (2.8 ~ 3.2 kgf.m, 20.3 ~ 23.1 lb-ft)] + [68 ~ 72°]
Do not turn the crankshaft.
Remove 2 bolts, connecting rod cap and bearinghalf.
Measure the plastigage at its widest point.
Standard oil clearance:
0.048 ~ 0.066 mm (0.0018 ~ 0.0026 in.)
If the plastigage measures too wide or too narrow, remove the upper half of the bearing, install a new, complete bearing with the same color mark (select the color as shown in the next column), and recheck the clearance.
Do not file, shim, or scrape the bearings or the caps to adjust clearance.
If the plastigage shows the clearance is still incorrect, try the next larger or smaller bearing (the color listed above or below that one), and check clearance again.
If the proper clearance cannot be obtained by using the appropriate larger or smaller bearings, replace the crankshaft and start over.
If the marks are indecipherable because of an accumulation of dirt and dust, do not scrub them with a wire brush or scraper. Clean them only with solvent or detergent.
Class | Mark | Inside Diameter |
0 | a | 58.000 ~ 58.006 mm (2.2834 ~ 2.2837 in.) |
1 | b | 58.006 ~ 58.012 mm (2.2837 ~ 2.2839 in.) |
2 | c | 58.012 ~ 58.018 mm (2.2839 ~ 2.2842 in.) |

Class | Mark | Outside Diameter Of Pin |
I | 1 or A | 54.966 ~ 54.972 mm (2.1640 ~ 2.1642 in.) |
II | 2 or B | 54.960 ~ 54.966 mm (2.1638 ~ 2.1640 in.) |
III | 3 or C | 54.954 ~ 54.960 mm (2.1635 ~ 2.1638 in.) |
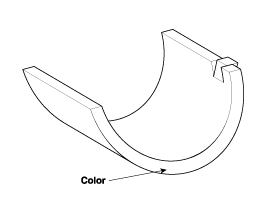
Class | Mark | Thickness Of Bearing |
E | Blue | 1.509 ~ 1.512 mm (0.0594 ~ 0.0595 in.) |
D | Black | 1.506 ~ 1.509 mm (0.0592 ~ 0.0594 in.) |
C | Red | 1.503 ~ 1.506 mm (0.0591 ~ 0.0592 in.) |
B | Green | 1.500 ~ 1.503 mm (0.0590 ~ 0.0591 in.) |
A | Yellow | 1.497 ~ 1.500 mm (0.0589 ~ 0.0590 in.) |
Selection
Connecting Rod Identification Mark | ||||
0(a) | 1(b) | 2(c) | ||
Crankshaft Indentification Mark | 1 or A | A (Yellow) | B (Green) | C (Red) |
2 or B | B (Green) | C (Red) | D (Black) | |
3 or C | C (Red) | D (Black) | E (Blue) | |
Check the connecting rod.
When reinstalling, check the cylinder numbers on the connecting rods and the caps. When installing a new connecting rod, the notches for bearing fixing on the connecting rods and caps should face the same direction.
If one or both edge of the connecting rod thrust surface is damaged, replace the rod. If the inner surface of the rod is damaged or rough, also replace it.
Using a connecting rod aligner, measure the bent or torsion of the rod. If the measurement is near the specification, adjust the rod with a press. If the rod is bent or twisted excessily, replace it.
Allowable bend of connecting rod:
0.05 mm/100 mm (0.0020 in./3.9370 in.)
Allowable twist of connecting rod:
0.1 mm/100 mm (0.0039 in./3.9370 in.)
When assembling the rod without a bearing, there should be no differance.
Clean piston
Using a gasket scraper, remove the carbon from the piston top.
Using a groove cleaning tool, clean the piston ring grooves.
Using solvent and a brush, thoroughly clean the piston.
Do not use a wire brush.
Check the piston-to-cylinder clearance by calculating the difference between the cylinder bore inner diameter and the piston outer diameter.
Clearance : 0.03 ~ 0.05 mm (0.0012 ~ 0.0020 in.)
Using a cylinder bore gauge, measure the cylinder bore diameter at position in the thrust and axial direction
Standard diameter :
92.00 ~ 92.03 mm (3.6220 ~ 3.6232 in.)

Measure the piston outside diameter at 14 mm (0.55118 in.) from bottom land of the piston.
Standard diameter :
91.96 ~ 91.99 mm (3.6204 ~ 3.6216 in.)
Select the piston matching with cylinder bore class.
Clearance : 0.03 ~ 0.05 mm (0.0012 ~ 0.0020 in.)
Check the cylinder bore size code on the cylinder block.
Class | Size code | Cylinder bore inner diameter |
A | A | 92.00 ~ 92.01 mm (3.6220 ~ 3.6224 in.) |
B | B | 92.01 ~ 92.02 mm (3.6224 ~ 3.6228 in.) |
C | C | 92.02 ~ 92.03 mm (3.6228 ~ 3.6232 in.) |
Check the piston size code(A) and the front mark(B) on the piston top face.
Class | Size code | Piston outer diameter |
A | A | 91.96 ~ 91.97 mm (3.6204 ~ 3.6208 in.) |
B | B | 91.97 ~ 91.98 mm (3.6208 ~ 3.6212 in.) |
C | C | 91.98 ~ 91.99 mm (3.6212 ~ 3.6216 in.) |
Inspect the piston ring side clearance.
Using a feeler gauge, measure the clearance between new piston ring and the wall of the ring groove.
Piston ring side clearance
Standard
No.1 : 0.04 ~ 0.08 mm (0.0015 ~ 0.0031 in.)
No.2 : 0.04 ~ 0.08 mm (0.0015 ~ 0.0031 in.)
Oil ring : 0.06 ~ 0.15 mm (0.0024 ~ 0.0059 in.)
Limit
No.1 : 0.1 mm (0.004 in.)
No.2 : 0.1 mm (0.004 in.)
Oil ring : 0.2 mm (0.008 in.)
If the clearance is greater than maximum, replace the piston.
Inspect piston ring end gap.
To measure the piston ring end gap, insert a piston ring into the cylinder bore. Position the ring at right angles to the cylinder wall by gently pressing it down with a piston. Measure the gap with a feeler gauge. If the gap exceeds the service limit, replace the piston ring. If the gap is too large, recheck the cylinder bore diameter against the wear limits. If the bore is over the service limit, the cylinder block must be replaced.
Piston ring end gap
Standard
No.1 : 0.17 ~ 0.32 mm (0.0067 ~ 0.0126 in.)
No.2 : 0.37 ~ 0.52 mm (0.0145 ~ 0.0204 in.)
Oil ring (Leaded type) :
0.20 ~ 0.70 mm (0.0078 ~ 0.0276 in.)
Oil ring (Unleaded type ) :
0.20 ~ 0.50 mm (0.0078 ~ 0.0196 in.)
Limit
No.1 : 0.6 mm (0.0236 in.)
No.2 : 0.7 mm (0.0275 in.)
Oil ring : 0.8 mm (0.0315 in.)
Measure the diameter of the piston pin.
Piston pin diameter :
21.097 ~ 22.000 mm (0.8305 ~ 0.8661 in.)
Measure the piston pin-to-piston clearance.
Piston pin-to-piston clearance :
0.004 ~ 0.013 mm (0.00015~ 0.00051 in.)
Check the difference between the piston pin diameter and the connecting rod small end diameter.
Piston pin-to-connecting rod interference :
0.005 ~ 0.019 mm (0.00019 ~ 0.00074 in.)
Thoroughly clean all parts to be assembled.
Before installing the parts, apply fresh engine oil to all sliding and rotating surfaces.
Replace all gaskets, O-rings and oil seals with new parts.
Assemble the piston and the connecting rod.
Install the piston pin with snap ring 2EA and check the snap ring assembly thoroughly.
The piston front mark and the connecting rod front mark must face the timing belt side of the engine.
Install the piston rings.
Install the oil ring spacer and 2 side rails by hand.
Using a piston ring expander, install the 2 compression rings with the code mark facing upward.
Position the piston rings so that the ring ends are as shown.
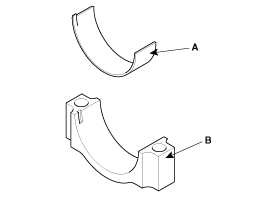
Install the connecting rod bearings.
Align the bearing claw with the groove of the connecting rod or connecting rod cap.
Install the bearings(A) in the connecting rod and connecting rod cap(B).
When reassembling the connecting rods and the caps, ensure te front marks on then and the number of cylinder.
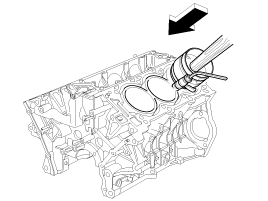
Attach the piston and connecting rod assemblies from the cylinder block.
Before installing the pistons, apply a coat of engine oil to the ring grooves and cylinder bores.
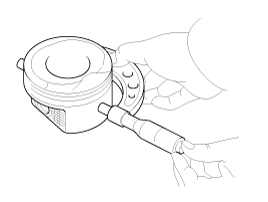
Install the ring compressor, check that the bearing is securely in place, then position the piston in the cylinder, and tap it in using the wooden handle of a hammer.
Stop after the ring compressor pops free, and check the connecting rod-to-check journal alignment before pushing the piston into place.
Install the rod caps with bearings, and torque the bolts.
Tightening torque :
[27.5 ~ 31.4 N.m (2.8 ~ 3.2 kgf.m, 20.3 ~ 23.1 lb-ft) + [68 ~ 72]°
Always use new connecting rod bearing cap bolts.
Maintain downward force on the ring compressor to prevent the rings from expanding before entering the cylinder bore.
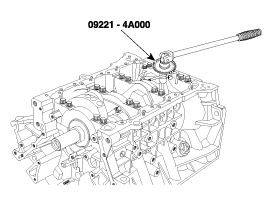
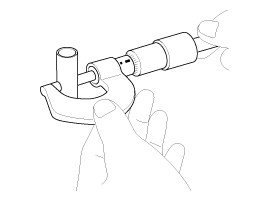
Use SST(09221-4A000), install connecting rod bearing cap bolts.
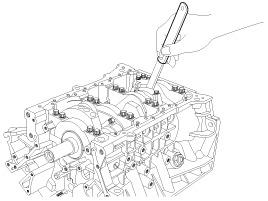
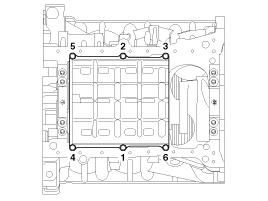
Install the baffle plate.
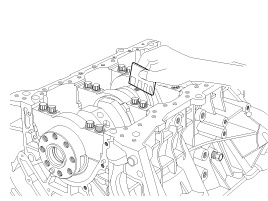
Install and uniformly tighten the baffle plate bolts, in several passes, in the sequence shown.
Tightening torque :
9.8 ~ 11.8 N.m (1.0 ~ 1.2 kgf.m, 7.2 ~ 8.7 lb-ft)
Install all other parts in reverse order of removal.
