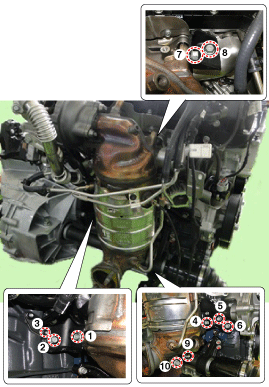
7.
Disconnect the wiring connectors and harness clamps and remove the connector brackets around the exhaust manifold.
To avoid getting burned by exhaust heating parts, wait until the engine coolant temperature drops below normal temperature (20°C [68°F]).
Use fender covers to avoid damaging painted surfaces.
To avoid damaging the turbocharger, wait until the engine coolant temperature drops below normal temperature (20°C [68°F]) before removing it.
When handling a metal gasket, take care not to fold the gasket or damage the contact surface of the gasket.
To avoid damage, unplug the wiring connectors carefully while holding the connector portion.
Mark all wiring and hoses to avoid misconnection.
Turn the crankshaft damper pulley so that the piston of No. 1 cylinder is at TDC (top dead center) on compression stroke.
Remove the engine cover.
Remove the engine room under cover.
(Refer to Engine And Transaxle Assembly - "Engine Room Under Cover")
Drain the coolant.
(Refer to Cooling System - "Coolant")
Remove the air duct.
(Refer to Intake and Exhaust System - "Air Cleaner")
Remove the battery.
(Refer to Engine Electrical System - "Battery")
Remove the air cleaner assembly.
(Refer to Intake and Exhaust System - "Air Cleaner")
Disconnect the wiring connectors and harness clamps and remove the connector brackets around the exhaust manifold.
Remove the front muffler mounting nuts (A) then detach the front muffler from the exhaust pressure control valve.
Tightening torque :
39.2 ~ 58.8 N.m (4.0 ~ 6.0 kgf.m, 28.9 ~ 43.4 lb-ft)
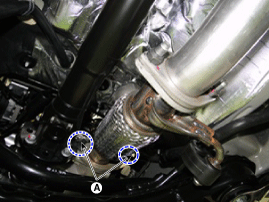
When installing the front muffler, make sure the gasket is installed.
Remove the sub frame.
(Refer to Suspension System - "Sub Frame")
To remove the DPF assembly from the vehicle, remove the sub frame first.
Remove the oil level gauge & guide assembly.
(Refer to Lubrication System - "Oil Level Gauge & Guide")
Remove the emergency filter (A).
Tightening torque :
19.6 ~ 24.5 N.m (2.0 ~ 2.5 kgf.m, 14.5 ~ 18.1 lb-ft)
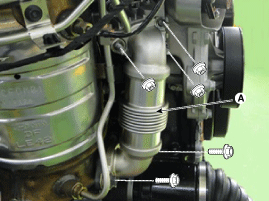
When installing the emergency filter, make sure the gasket is installed.
Remove the DPF heat protector (A).
Tightening torque :
17.7 ~ 21.6 N.m (1.8 ~ 2.2 kgf.m, 13.0 ~ 15.9 lb-ft)
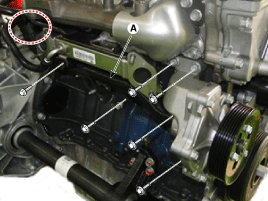
Remove the DPF converter assembly support brackets (A).
Tightening torque :
49.0 ~ 63.7 N.m (5.0 ~ 6.5 kgf.m, 36.2 ~ 47.0 lb-ft)
When installing the support brackets, tighten the bolts with pre-torque first, and then tighten the bolts with specified torque in the sequence shown.
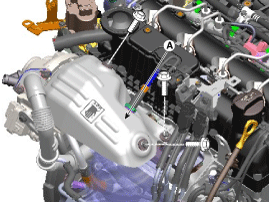
Remove the DPF converter assembly (A).
Tightening torque :
49.0 ~ 63.7 N.m (5.0 ~ 6.5 kgf.m, 36.2 ~ 47.0 lb-ft)
When installing the DPF converter assembly, make sure the gasket is installed.
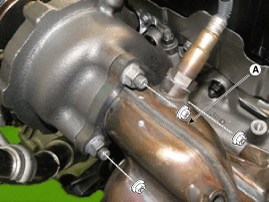
Remove the low pressure EGR pipe (A).
Tightening torque :
19.6 ~ 24.5 N.m (2.0 ~ 2.4 kgf.m, 14.5 ~ 18.1 lb-ft)
When installing the low pressure EGR pipe, make sure the gasket is installed.
Unfasten the turbocharger oil drain pipe lower nuts (A).
Tightening torque :
19.6 ~ 26.5 N.m (2.0 ~ 2.7 kgf.m, 14.5 ~ 19.5 lb-ft)
When installing the oil drain pipe, make sure the gasket is installed.
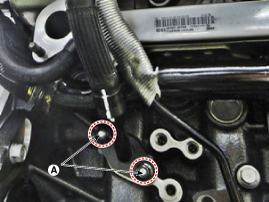
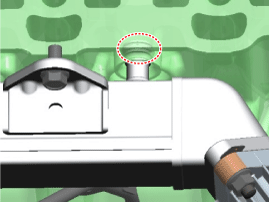
Remove the turbocharger oil feed pipe lower eye bolt (A) and mounting bolt (B).
Tightening torque :
19.6 ~ 26.5 N.m (2.0 ~ 2.7 kgf.m, 14.5 ~ 19.5 lb-ft)
When installing the eye bolt, make sure the gasket is installed.
Remove the low pressure EGR valve.
(Refer to Engine Control/Fuel System - "Low Pressure EGR Valve")
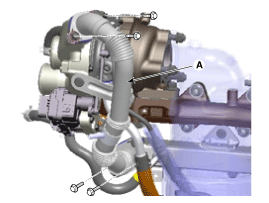
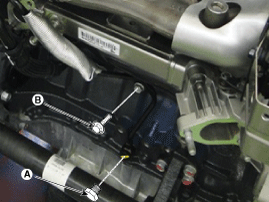
Remove the water pump and pipe assembly (A).
Tightening torque :
19.6 ~ 24.5 N.m (2.0 ~ 2.5 kgf.m, 14.5 ~ 18.1 lb-ft)
When installing the water pump assembly, make sure the gasket is installed.
Disconnect the EGR cooler hose (A).
Remove the low pressure EGR cooler (B).
Tightening torque :
19.6 ~ 24.5 N.m (2.0 ~ 2.5 kgf.m, 14.5 ~ 18.1 lb-ft)

When installing the low pressure EGR cooler on the cylinder block, apply a coat of alhorm (BW-0431) or equivalent to the O-ring.
Install in the reverse order of removal.
