3.
Disconnect the feedback position sensor connector (B).
Turn the ignition switch off.
Disconnect the LP-EGR solenoid valve connector.
Measure the resistance between 1 and 2 terminal of the solenoid valve.
Check that the resistance is within the specification.
▷ Specification
Item | Specification |
Coil Resistance (Ω) | 14.7 ~ 15.1 [20℃(68℉)] |
Connect the GDS to the data link connector.
Perform the fully open and the fully closing operation of the LP-EGR valve by using the actuation test.
Check that the voltage is within the specification.
▷ Specification
Item | Specification | |
Component (Reference voltage : 5V) | On vehicle (Reference voltage : 3.3V) | |
Output voltage (V) [At the fully open position] | 4.1 ~ 4.7 | 2.7 ~ 3.1 |
Output voltage (V) [At the fully closed position] | 0.4 ~ 0.8 | 0.27 ~ 0.53 |
Turn the ignition switch off and disconnect the battery nagative (-) cable.
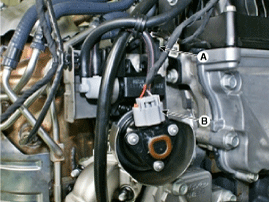
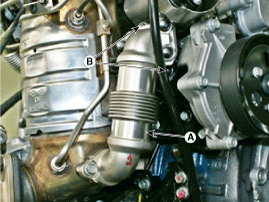
Disconnect the LP-EGR solenoid valve connector (A).
Disconnect the feedback position sensor connector (B).
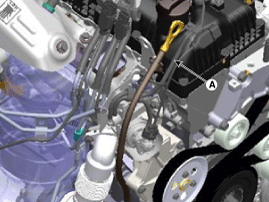
Disconnet the vacuum hose from the vacuum pipe on the head cover.
Remove the emergency filter (A).
DPF side installation bolt/nut: One each
LP-EGR valve side installation: 2 nuts
Remove the LP-EGR valve after removing the nuts (B).
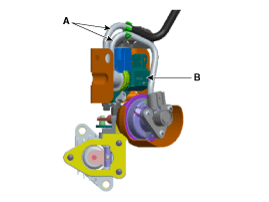
Disconnect the vacuum hose (A) connected to the solenoid valve.
Remove the solenoid valve (B) after removing the installation nut on the back side of the bracket.
Install in the reverse order of removal
LP-EGR solenoid valve installation nut :
3.9 ~ 5.9 N.m (0.4 ~ 0.6 kgf.m, 2.9 ~ 4.3 lb-ft)
LP-EGR valve installation nut :
29.4 ~ 34.3 N.m (3.0 ~ 3.5 kgf.m, 21.7 ~ 25.3 lb-ft)
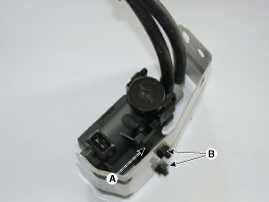
When installing the solenoid valve to mounting bracket, fix the rubber by using a spanner to prevent twisting mounting rubbers (A). And then, install the the solenoid valve after tightening the nut (B) of the back side of the bracket.
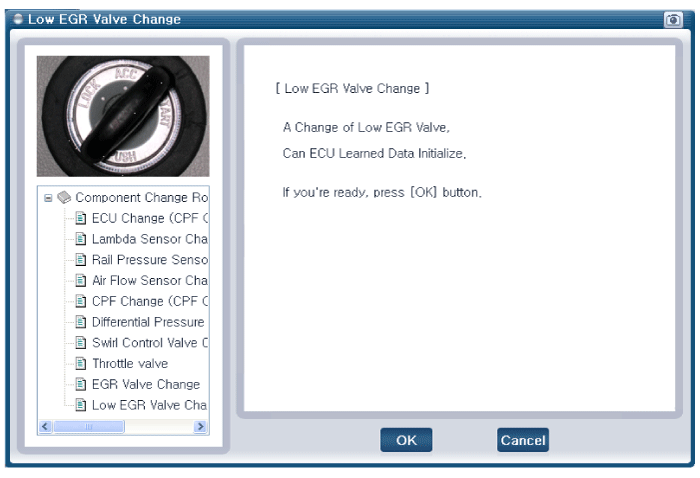
After replacing the LP-EGR valve, MUST perform the "Component Change Routine" procedure. Otherwise trouble related with engine performance or emission control may occur until ECM learning about the component is over.
Turn the ignition switch OFF.
Connect the GDS to Data Link Connector (DLC).
Turn ignition switch ON.
Select "Vehicle, Model year, Engine, System".
Select "Vehicle S/W Management".
Select "Component Change Routine".
Select "Low EGR Valve Change".
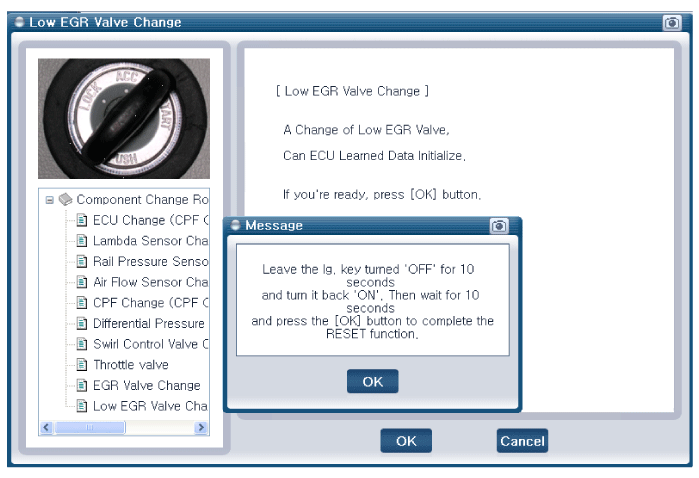
Perform the procedure in accordance with the message.