14.
Remove the idler (A), the water pump pulley (B), the crankshaft pulley (C) and the drive belt tensioner pulley (D).
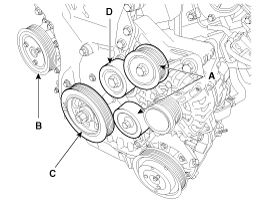
caution
Tensioner pulley bolt is left-handed screw.
Use fender covers to avoid damaging painted surfaces.
To avoid damage, unplug the wiring connectors carefully while holding the connector portion.
Mark all wiring and hoses to avoid misconnection.
In case of removing the high pressure fuel pump, high pressure fuel pipe, delivery pipe, and injector, there may be injury caused by leakage of the high pressure fuel. So don’t do any repair work right after engine stops.
Disconnect the battery negative terminal.
Remove the engine cover.
Remove the air duct.
Remove the air cleaner assembly.
Remove the RH front wheel.
Remove the under covers.
Remove the drive belt.
(Refer to Timing System - "Drive Belt")
Remove the cylinder head cover.
(Refer to Cylinder Head Assembly - "Cylinder Head Cover")
Remove the A/C compressor lower bolts.
(Refer to Heating, Ventilation, Air Conditioning - "Compressor")
Remove the oil pan.
(Refer to Lubrication System - "Oil Pan")
Set the jack to the edge of ladder frame.
Put the wooden block between ladder frame and jack.
Be careful not to damage the balance shaft & oil pump module.
Disconnect the ground line, and then remove the engine mounting support bracket.
(Refer to Engine And Transaxle Assembly - "Engine Mounting")
Loosen the bolts and then remove the power steering oil pump.
(Refer to Steering System - "Power Steeing Oil Pump")
Remove the idler (A), the water pump pulley (B), the crankshaft pulley (C) and the drive belt tensioner pulley (D).
Tensioner pulley bolt is left-handed screw.
Remove the drive belt tensioner.
(Refer to Timing System - "Drive Belt Tensioner")
Remove the timing chain cover (A) by gently prying the portions between the cylinder head and cylinder block.
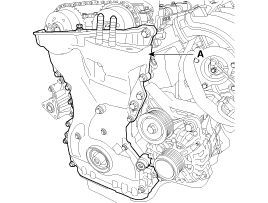
Be careful not to damage the contact surfaces of cylinder block, cylinder head and timing chain cover.
