Installation
1.

Install the timing chain cover.

(1)

Using a gasket scraper, remove all the old packing material from the gasket surfaces.

(2)

The sealant locations on chain cover and on counter parts (cylinder head, cylinder block, and ladder frame) must be free of engine oil and etc.

(3)

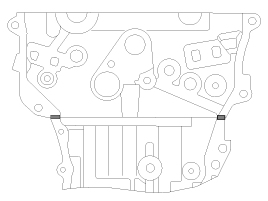
Before assembling the timing chain cover, liquid sealant Loctite 5900H or equivalent should be applied on the gap between cylinder head and cylinder block. The part must be assembled within 5 minutes after sealant was applied.

Bead width: 3.0 mm (0.12 in.)
(4)

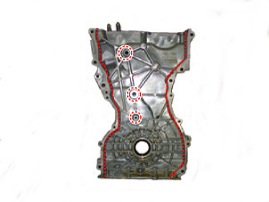
After applying liquid sealant Loctite 5900H or equivalent on the timing chain cover.

The part must be assembled within 5 minutes after sealant was applied. Continuous bead of sealant should be applied to prevent any path of oil leakage.

Bead width: 3.0 mm (0.12 in.)
(5)

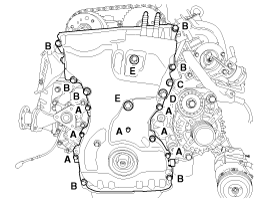
The dowel pins on the cylinder block and holes on the timing chain cover should be used as a reference in order to assemble the timing chain cover to be in exact position.

Tightening torque

Bolts A (M6 X 25) :

7.8 ~ 9.8 N.m (0.8 ~ 1.0 kgf.m, 5.8 ~ 7.2 lb-ft)

Bolts B (M8 X 28) :

18.6 ~ 22.6 N.m (1.9 ~ 2.3 kgf.m, 13.7 ~ 16.6 lb-ft)

Bolts C (M8 X 30) :

19.6 ~ 24.5 N.m (2.0 ~ 2.5 kgf.m, 14.5 ~ 18.1 lb-ft)

Bolts D (M10 X 40) :

39.2 ~ 44.1 N.m (4.0 ~ 4.5 kgf.m, 28.9 ~ 32.5 lb-ft)

Bolts E (M10 X 45) :

39.2 ~ 44.1 N.m (4.0 ~ 4.5 kgf.m, 28.9 ~ 32.5 lb-ft)
caution

The engine starting or pressure tests should not be performed within 30 minutes after the timing chain cover was assembled.
2.

Install the crankshaft front oil seal.

(Refer to Timint System - "Front Oil Seal")

3.

Install the drive belt tensioner.

(Refer to Timing System - "Drive Belt Tensioner")

4.

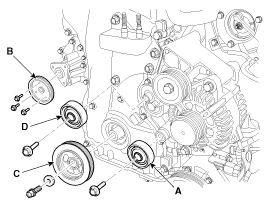
Install the idler (A), the water pump pulley (B), the crankshaft pulley (C) and the drive belt tensioner pulley (D).

Tightening torque

Idler (A) :

53.9 ~ 63.7 N.m (5.5 ~ 6.5 kgf.m, 39.8 ~ 47.0 lb-ft)

Water pump pulley (B) :

7.8 ~ 9.8 N.m (0.8 ~ 1.0 kgf.m, 5.8 ~ 7.2 lb-ft)

Crankshaft pulley (C) :

166.6 ~ 176.4 N.m (17.0 ~ 18.0 kgf.m, 122.9 ~ 130.1 lb-ft)

Drive belt tensioner pulley (D) :

53.9 ~ 63.7 N.m (5.5 ~ 6.5 kgf.m, 39.8 ~ 47.0 lb-ft)

caution

Tensioner pulley bolt is left-handed screw.

5.

Remove the power steering oil pump.

(Refer to Steering System - "Power Steeing Oil Pump")

6.

Install the engine mounting support bracket and connect the ground line.

(Refer to Engine And Transaxle Assembly - "Engine Mounting")

7.

Remove the jack from the ladder frame.

8.

Install the oil pan.

(Refer to Lubrication System - "Oil Pan")

9.

Install the A/C compressor lower bolts.

(Refer to Heating, Ventilation, Air Conditioning - "Compressor")

10.

Install the drive belt.

(Refer to Timing System - "Drive Belt")

11.

Install cylinder head cover.

(Refer to Cylinder Head Assembly - "Cylinder Head Cover")

12.

Install the under cover.

13.

Install the RH front wheel.

14.

Install the air cleaner assembly.

15.

Install the air duct.

16.

Install the engine cover.

17.

Connect the battery negative terminal.

18.

Add all the necessary fluids and check for leaks. Connect GDS. Check for codes, note, and clear. Recheck.

note

Refill engine with engine oil.

Refill a transaxle with fluid.

Refill a radiator and a reservoir tank with engine coolant.

Clean battery posts and cable terminals and assemble.

Inspect for fuel leakage.

-

After assemble the fuel line, turn on the ignition switch (do not operate the starter) so that the fuel pump runs for approximately two seconds and fuelline pressurizes.

-

Repeat this operation two or three times, then check for fuel leakage at any point in the fuel line.

Refill radiator and reservoir tank with engine coolant.

Bleed air from the cooling system.

Яндекс.Метрика