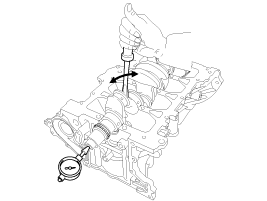
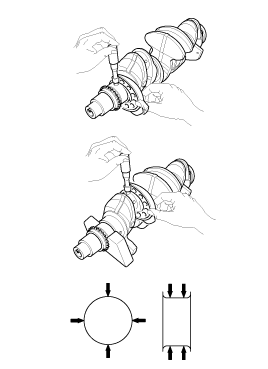
Check the crankshaft bearing oil clearance.
To check main bearing-to-journal oil clearance, remove the lower crankcase and lower bearings.
Clean each main journal and bearing with a clean shop towel.
Place one strip of plastigage across each main journal.
Reinstall the lower crankcase and lower bearings, and then tighten the main bolts.
Tightening torque
1st step:
27.5 ~ 31.4 N.m (2.8~3.2 kgf.m, 20.3 ~ 23.1 lb-ft)
2nd step: 120 ~ 125°
Do not turn the crankshaft.
Remove the lower crankcase and lower bearings.
Measure the width of the plastigage at its widest point.
Oil clearance:
0.016 ~ 0.034 mm (0.00063 ~ 0.00134 in.)
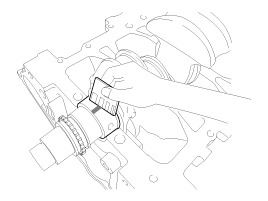
If the plastigage measures too wide or too narrow, remove the upper and lower bearing and then install a new bearings with the same color mark. Recheck the oil clearance.
Do not file, shim, or scrape the bearings or the caps to adjust clearance.
If the plastigage shows the clearance is still incorrect, try the next larger or smaller bearing. Recheck the oil clearance.
If the proper clearance cannot be obtained by using the appropriate larger or smaller bearings, replace the crankshaft and start over.
If the marks are indecipherable because of an accumulation of dirt and dust, do not scrub them with a wire brush or scraper. Clean them only with solvent or detergent.
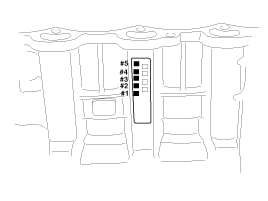
Letters have been stamped on the block as a mark for the size of each of the 5 main journal bores.
Use them, and the numbers or bar stamped on the crank (marks for main journal size), to choose the correct bearings.
Calss | Mark | Inside Diameter |
a | A | 59.000 ~ 59.006 mm (2.32283 ~ 2.32307 in.) |
b | B | 59.006 ~ 59.012 mm (2.32307 ~ 2.32330 in.) |
c | C | 59.012 ~ 59.018 mm (2.32330 ~ 2.32354 in.) |
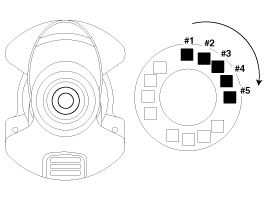
Conform to read stamping order as shown arrow direction from #1.
Class | Mark | Outside Diameter Of Journal |
I | 1 | 54.954 ~ 54.960 mm (2.16354 ~ 2.16378 in.) |
II | 2 | 54.948 ~ 54.954 mm (2.16330 ~ 2.16354 in.) |
III | 3 | 54.942 ~ 54.948 mm (2.16307 ~ 2.16330 in.) |
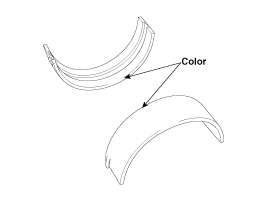
Class | Mark | Thickness Of Bearing |
A | Blue | 2.021 ~ 2.024 mm (0.07957 ~ 0.07968 in.) |
B | Black | 2.018 ~ 2.021 mm (0.07945 ~ 0.07957 in.) |
C | None | 2.015 ~ 2.018 mm (0.07933 ~ 0.07945 in.) |
D | Green | 2.012 ~ 2.015 mm (0.07921 ~ 0.7933 in.) |
E | Yellow | 2.009 ~ 2.012 mm (0.07909 ~ 0.07921 in.) |
Select a crankshaft bearing using the selection chart.
Assembling Classification Of Bearing | Crankshaft Bore Identification Mark | |||
a (A) | b (B) | c (C) | ||
Crankshaft Identification Mark | I (1) | E (Yellow) | D (Green) | C (None) |
II (2) | D (Green) | C (None) | B (Black) | |
III (3) | C (None) | B (Black) | A (Blue) | |
