2.
Cover all glasses, seats and mats with a heat resistant cover when welding.

This vehicle is a completely new design. During its development, close attention has been given to safety, stability, weight and corrosion protection. Typical of unit body design, the vehicle is designed so that the front and rear compartments will absorb much of the collision energy so that the passengers are better protected. During collisions, these front and rear energy absorbing systems may be severely damaged. During repair, these damaged areas must be returned to their original strength and geometry. If this is not properly done, the vehicle will not provide the intended level of protection to its occupants in the event of another collision.
The repairs described in this manual were performed on the vehicle's body shells. In some instances special fixtures were welded in place to support the structure. During the repair of an actual vehicle, the interior would be fully disassembled and standard jack screws or portable braces may be used for temporary support. During the repair of an accident involved vehicle, the vehicle must first be returned to pre-impact dimensions prior to beginning the sectioning repair procedures. The extent of damage that must be repaired should then be evaluated to determine the appropriate repair procedures. This manual provides locations and procedures where structural sectioning may be employed. It is the responsibility of the repair technician, based upon the extent of damage, to determine which location and procedure is suitable for the particular damaged vehicle.
During the repair of a collision damaged automobile, it is impossible to fully duplicate the methods used in the factory during the vehicle manufacture. Therefore, auto body repair techniques have been developed to provide a repair that has strength properties equivalent to those of the original design and manufacture.
Cover the seats before performing any procedure to keep them from getting dirty.
Cover all glasses, seats and mats with a heat resistant cover when welding.
Protect moldings, garnishes and ornaments.
Disconnect the negative (-) battery cable before performing any work on the vehicle.
Protect yourself by wearing goggles, earplugs, respirators, gloves, safety shoes, caps, etc. when working on a vehicle.
Safely support the vehicle before any work is done. Block the front or rear wheels if the vehicle is not lifted off of the ground.
When welding or performing other procedures that require the use of an open flame near the fuel tank, disconnect and remove the tank and fuel pipe, and cap the pipe to prevent fuel leakage.
Insure proper ventilation of your working area. Some paint and sealant can generate toxic gases when heated. Use an air chisel or saw to remove damaged panels instead of a gas torch.
Observe all local and national safety regulations when performing any work.
Cover interior with heat-resistant cover to insure safety when welding.
Take care when using gas or cutting torches so as not to burn body sealer or interior. Extinguish immediately if they should catch fire.

The supplemental restraint system (SRS) is designed to supplement the seat belt to help reduce the risk or severity of injury to the driver and passenger by activating and deploying the driver, passenger, side airbag and belt pretensioner in certain frontal or side collisions.
The SRS (Airbag) consists of ; a driver side airbag module located in the center of the steering wheel, which contains the folded cushion and an inflator unit ; a passenger side airbag module located in the passenger side crash pad contains the folded cushion assembled with inflator unit ; side airbag modules located in the front seat contain the folded cushion and an inflator unit ; curtain airbag modules located inside of the headliner which contains folded cushions and inflator units.
WARNING/CAUTION labels are attached to the periphery of the air-bag components. Refer to the Shop Manual.


Operation Procedures and Cautions in Using Epoxy Adhesives
Heat up the adhesive face on the panel to remove it.
Heating temperature should be in the range of 110℃ - 140℃.
Use a torch or a heating gun.
Using a scraper, completely remove the remaining adhesive on the panel.
Using #50 - #80 sand paper, neatly grind off the adhesive area.
Any remaining paint or surfacer must be removed from the adhesive area.
After grinding, clean the surface with a cleaner (adhesive cleaner).
Cleaning the epoxy adhesive area is important as dust or oiliness may greatly decrease the adhesive strength.
Follow the same procedure of removing the paint and cleaning with a cleaner when applying adhesive on new panels.
Apply a light coat of adhesive on new panels or body panels, and then use a scraper to apply a second coat as thin as possible so that the metal surface is not visible (Skin coat).
Ordinary adhesives are two-component types where the resin and hardener are filled in separate cartridges before being released from a nozzle or a gun.
As the nozzle used for two-component type adhesive may harden after approximately 60 minutes without application, in case of delayed application, replace with a new nozzle.
Check that the resin and hardener in the adhesive are released simultaneously before mounting the nozzle to the adhesive gun.
This is important as non-simultaneous release of resin and hardener may affect the hardening process.
Use the adhesive for a secondary application.
The adhesive strength is generated on the panel in the secondary application in which the adhesive should be applied in a width of approximately 10mm.
Apply in a width of 5 – 6mm on flange areas.
Mount the panel onto the body.
After mounting the panel, use a clamp to firmly fix it so that there are no gaps or shaking.
While the gaps and clearing of the panel may be adjusted before the adhesive is dry, caution is needed as adhesive must be applied again in case the mounted panel is detached.
Maintain a distance of approximately 100 – 150mm to the panel fixing clamp.
Using a scraper, remove any leaking adhesives during mounting process.
As the adhesive is difficult to remove after it has been hardened, it must be removed before hardening.
Heat up the panel to harden.
The adhesive is heat hardening type; it must be heated to harden.
Table of Heat Drying for Different Adhesives.
Temp. | 10℃ | 20℃ | 40℃ | 65℃ | 90℃ |
Day (Duration) | 7 days | 1 day | 4 hours | 40 minutes | 20 minutes |
Temp. | 10℃ | 20℃ | 40℃ | 65℃ | 90℃ |
Day (Duration) | 7 days | 1 day | 4 hours | 50 minutes | 30 minutes |
All repairs in this manual require the use of a Metal-Inert Gas (MIG) welder, Gas (oxyacetylene) welding must not be used. Both high strength steel and mild steel can be welded using the MIG welder. The I-CAR recommendations for welding should be followed. The shielding gas should be 75% Argon and 25% CO2.
The recommended welding wire size is 0.23" and the wire should satisfy the American Welding Society standard code AWSER70S-6.
During the repair process, plug welds are used to duplicate original factory spot welds. All plug welds should be done with the MIG welder. An 8mm (5/16") hole is placed in the top (welding side) sheetmetal.
Then begin welding along the edges and the spiral towards the center (see illustration). This is important so that weld penetration between the two metal pieces takes place along the circumference of the circle.

Observe the following tips when welding.
Wear appropriate eye protection.
Carefully follow the manufacturers operating instructions for the welding machine you are using.
Do not weld, smoke or allow open flames around volatile chemicals, cleaners or solvents or in any area where they have just been used.
When using a frame straightener, do not enter the area where the body is being straightened by the chain.
Vehicles today include many electronic parts and components, and these are in general very susceptible to adverse effects caused by overcurrent, reverse current, electromagnetic waves, high temperature, high humidity impacts, etc.
In particular such electronic components can be damaged if there is a large current flow during welding from the body side.
Therefore, take the following precautions during body repair to prevent damage to the CONTROL MODULES (ECM, TCM, ABS CM, SRS CM, etc.).
Before removing and inspecting the electrical parts or before starting electric welding operations, disconnect the negative (-) terminal cable from the battery.
Do not expose the CONTROL MODULES to ambient temperatures above 80°C (176°F).
If it is possible the ambient temperatures may reach 80°C (176°F) or more, remove the CONTROL MODULES from the vehicle before starting work.
Be careful not to drop the CONTROL MODULES and not to apply physical shocks to them.
Measuring Dimensions before Beginning
Measure the dimensions of the damaged area according to the body dimension drawings before removing and repairing. Adjust dimensions with body frame adjuster if deformed.
Selecting Cutting Area
Select a cutting area that is easily accessible and that is prone to the least amount of distortion when welding.Select an area that would allow the new part to overlap the repair area by 30~50mm (1.2~2.0 in).
Protecting Body from Damage
Secure the body with clamps and jacks to prevent damage to the body when working on it.

Removing
Use caution when removing body molding and trim from the area to be worked.
Apply masking tape where needed to prevent damage to the part being removed or to the vehicle body.
Before starting repairs, check if pipes, hoses or electrical components are present near damaged area.

Applying Spot Sealer
Remove paint from the surface of new parts and body to spot weld, and apply spot sealer for rustproofing.
Selecting a Welding Method
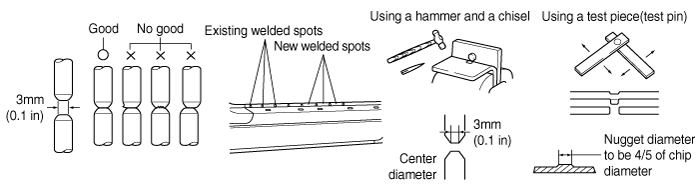
If the thickness of the area to be welded with the panels overlapped is greater than 3mm (0.1 in), do plug welding using a carbon arc welding machine.
Protecting Body from Damage
Secure the body with clamps and jacks to prevent damage to the body when working on it.

Making Holes for Plug Welding
For areas where a spot welder cannot be used, use a puncher or drill to make hole for pulg welding.

Adjusting a New Part
The new part should be cut larger than the repair area, overlapping the repair area by 30~50mm (1.2~2.0 in).

Measuring Dimensions before Welding
When installing a new part, assemble it according to the body dimensions given in Section BD, and start welding after checking the gaps with nearby parts.
Caution when Welding
The number of welding points should be determined based on the criteria below:

Caution when Spot Welding
The tip of the spot welding machine should be maintained to a minimum of 3mm (0.1 in) because it greatly affects welding strength. When possible, spot welding should be done between the existing spot welded points.
Before and after spot welding, weld a test piece (test pin) of the same material as the body panel, and check the welding strength.
Proper corrosion protection and sealing is an important part of repair. When reviewing these repair procedures, it is important to recognize the need for corrosion restoration to provide long term strength of the repaired member.
A two part epoxy primer was applied to the metal surfaces during the latter part of the repair. For closed sections, such as front and rear rails, rocker panels and pillars, the primer is applied without applying the metal conditioner and the conversion coating. These steps are omitted to insure that no rinse water is trapped in the closed sections. The primer application followed by an application of an oil or wax based rust proofing material.
After the corrosion restoration process for the closed sections are completed, then the process can be applied to all exterior sections. For exterior surfaces, both metal conditioner and conversion coating treatments are applied to the exterior surface prior to application of the epoxy primer. The procedure in applying the corrosion restoration process is an important order to insure that moisture, due to the water rinsing of the metal conditioner and conversion coating is not inadvertently trapped inside any closed section before the epoxy primer and rust proofing materials have been applied.
Appropriate seam sealers are then applied to all joints. Follow manufacturer's recommendations for the appropriate type of seam sealer to be used at each seam or joint.

The side body panel for this vehicle is designed and stamped from a single piece of sheet metal from the factory as shown in the figure. While the entire side panel is available for service, the partial panels sectioned by several damaged areas are also available.

Place the lift blocks under the support points as shown in the illustration.
Raise the hoist a few inches and rock the vehicle to be sure it is firmly supported.
Raise the hoist to full height to inspect the lift points for secure support.

Items | Specification | |
Hood | Type | Rear hinged, Front opening type, stay type |
Front Door | Construction | Front hinged, frame door construction |
Regulator system | Wire drum type | |
Locking system | Pin-fork system | |
Rear Door | Construction | Front hinged, frame door construction |
Regulator system | Wire drum type | |
Locking system | Pin-fork system | |
Trunk Lid | Type | Torsior bar type |
Seat Belts | Front | 3 point type with Emergency Locking Retractor (E.L.R) |
Rear | 3 point type with Emergency Locking Retractor (E.L.R) | |
2 point type | ||
Applied parts | Bead width |
Windshield Glass | Height : 12 mm (0.4724 in.) |
Width : 8 mm (0.3150 in.) | |
Rear Window Glass | Height : 12 mm (0.4724 in.) |
Width : 8 mm (0.3150 in.) |
Items | N.m | Kgf.m | lb-ft | |
Front and rear doors | Door hinge to body | 33.3 ~ 41.2 | 3.4 ~ 4.2 | 24.6 ~ 30.4 |
Door hinge to door | 21.6 ~ 26.5 | 2.2 ~ 2.7 | 15.9 ~ 19.5 | |
Door checker to door | 3.9 ~ 5.9 | 0.4 ~ 0.6 | 2.9 ~ 4.3 | |
Door checker to body | 19.6 ~ 29.4 | 2.0 ~ 3.0 | 14.5 ~ 21.7 | |
Door glass mounting bolt | 7.8 ~ 11.8 | 0.8 ~ 1.2 | 5.8 ~ 8.7 | |
Outside handle base mounting bolt | 7.8 ~ 11.8 | 0.8 ~ 1.2 | 5.8 ~ 8.7 | |
Door channel mounting bolt and nuts | 3.9 ~ 5.9 | 0.4 ~ 0.6 | 2.9 ~ 4.3 | |
Door latch mounting screws | 7.8 ~ 10.8 | 0.8 ~ 1.1 | 5.8 ~ 8.0 | |
Door module mounting bolts | 7.8 ~ 11.8 | 0.8 ~ 1.2 | 5.8 ~ 8.7 | |
Door regulator mounting bolts | 3.9 ~ 5.9 | 0.4 ~ 0.6 | 2.9 ~ 4.3 | |
Door striker mounting bolts | 16.7 ~ 21.6 | 1.7 ~ 2.2 | 12.3 ~ 15.9 | |
Trunk lid | Trunk lid hinge to body | 21.6 ~ 26.5 | 2.2 ~ 2.7 | 15.9 ~ 19.5 |
Trunk lid hinge to tail gate | 21.6 ~ 26.5 | 2.2 ~ 2.7 | 15.9 ~ 19.5 | |
Trunk lid latch mounting bolts | 6.9 ~ 10.8 | 0.7 ~ 1.1 | 5.1 ~ 8.0 | |
Trunk lid striker mounting bolts | 21.6 ~ 26.5 | 2.2 ~ 2.7 | 15.9 ~ 19.5 | |
Hood | Hood hinge to body | 21.6 ~ 26.5 | 2.2 ~ 2.7 | 15.9 ~ 19.5 |
Hood hinge to hood | 21.6 ~ 26.5 | 2.2 ~ 2.7 | 15.9 ~ 19.5 | |
Hood latch to body | 7.8 ~ 11.8 | 0.8 ~ 1.2 | 5.8 ~ 8.7 | |
Seat | Front seat mounting bolts | 34.3 ~ 53.9 | 3.5 ~ 5.5 | 25.3 ~ 39.8 |
Front seat frame mounting bolts | 44.1 ~ 53.9 | 4.5 ~ 5.5 | 32.5 ~ 39.8 | |
Front seat cushion track mounting bolts | 44.1 ~ 53.9 | 4.5 ~ 5.5 | 32.5 ~ 39.8 | |
Rear seat back mounting bolts | 16.7 ~ 25.5 | 1.7 ~ 2.6 | 12.3 ~ 18.8 | |
Rear seat cushion mounting bolts | 16.7 ~ 25.5 | 1.7 ~ 2.6 | 12.3 ~ 18.8 | |
Seat belt | Height adjuster mounting bolts | 39.2 ~ 53.9 | 4.0 ~ 5.5 | 28.9 ~ 39.8 |
Front seat belt upper anchor mounting bolt | 39.2 ~ 53.9 | 4.0 ~ 5.5 | 28.9 ~ 39.8 | |
Front seat belt lower anchor mounting bolt | 39.2 ~ 53.9 | 4.0 ~ 5.5 | 28.9 ~ 39.8 | |
Front seat belt pretensioner mounting bolt | 39.2 ~ 53.9 | 4.0 ~ 5.5 | 28.9 ~ 39.8 | |
Rear seat belt lower anchor mounting bolts | 39.2 ~ 53.9 | 4.0 ~ 5.5 | 28.9 ~ 39.8 | |
Rear seat belt retractor mounting bolt | 39.2 ~ 53.9 | 4.0 ~ 5.5 | 28.9 ~ 39.8 | |
Seat belt buckle mounting bolt | 39.2 ~ 53.9 | 4.0 ~ 5.5 | 28.9 ~ 39.8 | |
Outside rearview mirror | Outside rearview mirror mounting bolts | 6.9 ~ 10.8 | 0.7 ~ 1.1 | 5.1 ~ 8.0 |
Wiper arm | Wiper arm mounting nuts | 22.6 ~ 26.5 | 2.3 ~ 2.7 | 16.6 ~ 19.5 |
Quarter fixed glass | Quarter fixed glass mounting nuts | 3.9 ~ 4.4 | 0.4 ~ 0.45 | 2.9 ~ 3.3 |
Sunroof | Sunroof mounting nuts | 3.9 ~ 5.9 | 0.4 ~ 0.6 | 2.9 ~ 4.3 |
