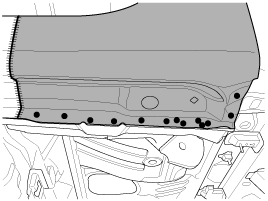
Measure and mark the cutlines on the quarter outer panel. Cut the quarter outer panel along the cutlines.
When cutting the quarter outer panel, be careful not to cut through the mating flanges or the side sill outer reinforcement and quarter inner panel.
Drill out all spotwelds attaching the quarter outer panel.
Remove the quarter outer panel.
Clean cut portions with a disc grinder.
Prepare all surfaces to be welded.
After removing, apply the welding primer.
Measure and mark the cutlines on the new quarter outer panel. Cut the new quarter outer panel along the cutlines.
Drill the holes in the flange of the replacement new quarter outer panel for MIG plug welding.
Fit and clamp the new quarter outer panel in place.
Measure each measurement point (Refer to the Body Dimensions) and correct the installation position.
Spot weld all holes and MIG butt weld the seams.
If spot welding is imposible, MIG plug weld all holes.
Apply epoxy adhesive to the weld points of new panel or body panel.
Be sure to use the recommended epoxy adhesive below.
Epoxy adhesive : 3M(PN8115), Henkel (Terokal 5055) or equivalent
Apply body filler to the welded seam. Sand and finish.
Clean and prepare all welds, remove all residues.
Apply an anti-corrosion agent as required (Refer to the Corrosion Protection).
Place the panel protection guide onto the quarter outer panel as shown so that the lower end of the guide can be put 5mm down from the lower end of panel and clamp the left and right ends of the guide to the panel.
Bend the arch wheel flange toward the quarter inner panel with a rubber hammer by approx. 60 degrees.
Fix the hemming tool fixing bracket to the wheel hub and install the hemming tool main body.
Loosen the knob of height adjusting rod to allow the rollers to move along the panel protection guide.
The height adjusting rod can extend by the inner spring, so when loosening the knob, be careful not to allow the rollers to damage the quarter outer panel.
Adjust the clearance between rollers with the bolt.
If using excessive force for hemming, it may cause damage to the quarter outer panel. Adjust the roller clearance little by little.
Move the rollers of hemming tool (09270 - 2H000) from side to side along the panel protection guide about 3 times.
If it is impossible for the rollers of hemming tool to move along the panel protection, remove the hemming tool fixing bracket from the wheel hub then perform the below steps.
Repeat the steps 13 to 14, 2~3 times, until the wheel arch flange is completely hemmed.
Apply the sealant to the hemmed area.
Prepare exterior surfaces for priming, using wax and grease remover.
Apply the correct seam sealers to all joints.
In order to improve corrosion resistance, if necessary, apply an under body anti-corrosion agent to the wheel well (Refer to the Corrosion Protection).