Symbols
Used for
Figure

Spot weld


Outside


Middle


Inside


Cut


MIG plug welding


MIG butt welding


MIG lap welding


Sealer


Epoxy adhesive


Symbols | Used for | Figure |
 | Spot weld |  |
 | Outside |  |
 | Middle |  |
 | Inside |  |
 | Cut |  |
 | MIG plug welding |  |
 | MIG butt welding |  |
 | MIG lap welding |  |
 | Sealer |  |
 | Epoxy adhesive |  |
Most body parts are spot welded. In order to remove the damaged area, it is best to remove the spot welded area from the body frame using a spot cutter or candle type edge drill bit. Do not use a drill bit with a tapered edge. Center punch the middle of the spot weld to insure the entire spot weld will be removed.
 |  |  |
Correct | Correct | Not correct |
 |  |
The efficiency of the transmission and load distribution are determined by many complicated factors such as thickness of plate, shape and size of a cross section, damage of parts, variance of joints, welding method, and/or welding locations. Therefore, a new part should be fitted to the body frame using proper procedures to avoid reducing the strength of the body.
It is extremely important that appropriate welding methods, which don't reduce the original strength and durability of the body be used when making repairs, Try to use either spot welding or carbon arc(plug) welding, Do not braze any body components other than the ones brazed at the factory. Do not use an oxy-acetylene torch for welding.
Welding | Symbol | Details |
Spot welding | ● | The most reliable welding method. (provides high efficiency and quality of assembled part.) |
Carbon arc (MIG/MAG) welding (Plug welding) | ■ | Use when spot welding cannot be done or spot welding is not necessary. |
Oxygen-acetylene welding | X | Not used |
Commercial spot welding machines do not perform as well as the machines used in the manufacturing process. When spot welding, increase the number of spot weld by 30% (1.3 times the original number of welds).

When spot welding, weld in the middle of the joint.

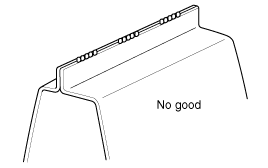
Spot welding on the edge of the joint will reduce welding strength.

In areas where spot welding is not suitable, do plug welding using a carbon arc welding machine.
Clamp the parts to be welded together tightly. Do not exceed 1mm of space between parts. A tolerance greater than 1mm will reduce the strength of the welded area.

Weld in the middle of the flange joint.
Drill a hole 5~6mm on one side of the flange only, and weld within the hole.

Do not weld on the edge of the flange joint.

Removal
Body measurement
Before removing, measure the damaged area according to the dimensions supplied in Body Dimension, section BD. If deformation is present, use a frame straightener to adjust.
When removing a panel, apply clamps to prevent damage of each part, and support the lower end of the frame to prevent deformation during the procedure.

Caution during ultra high strength panel repair
A damaged ultra strength panel should not be repaired by pulling it. Replace the whole panel with new one (Refer to the BC section).

A damaged ultra strength panel should not be partially replaced at random. Replace the whole panel with new one.

When a damaged ultra strength panel is replaced with new one, spot-welding should be used, if possible. Apply the epoxy adhesive and then carry out spot-welding.
Cutting rough area for replacement part
Cutting should be done according to the following steps to make removal easy:
Use care when cutting an area close to a pipe or wiring harness.
Cut an area leaving 30~50mm of tolerance.

Removing paint from an area to be spot welded
Using a torch and wire brush, remove paint completely before beginning welding.

Determine a cutting method
Cutting a spot welded area
Make a hole in the middle of spot welded area with a punch, remove the welded area using a spot cutter and remove using a chisel.

Removing brazed area
Remove using a torch and wire brush, and chisel.

Removing arc welded area
Remove plug welded area using a disk grinder and chisel.

Preparation for Installation
Spot weld finish
Use a disk grinder or similar tool to finish the spot weld mark, Do not grind more than is necessary to smooth the surface.

Panel preparation
Repair any bent or uneven areas with a hammer to improve the installation process.

Cutting a rough area for a new part
When rough cutting an area for a new part, leave a tolerance of 30~50mm.
Preparation for spot welding
Remove paint on spot welded area and on the area overlapped by the new part using a belt sander or similar tool.

Drilling a hole for plug welding

Do not spot weld where it is thicker than 3mm.

Installation
Checking welding and fitting in advance
When installing a new part, measure the dimensions of each part according to the body dimensions given in Section BD, and set part to the reference dimensions.

Prior to final welding, check the fit of all related parts.

Selecting number of welding points
Spot welding : Multiply the original number of factory welds by 1.3 times
Plug welding : Same number as original number of factory welds
Plug welding should be done using a carbon arc welding machine.
Brazing should be done only on areas that were originally brazed at the factory.

Caution when spot welding
Do a test welding on a piece of material of the same type and thickness as the part to be welded and proceed if the test welding is good.
Before spot welding, check if welding debris, oil or paint is present on the area where surfaces meet.
Clean or sand if necessary.

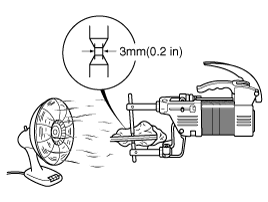
The tip of the spot welding machine should be maintained to a minimum tolerance of 3mm. Also let the area cool after 5 or 6 welds to minimize problems caused by excessive heat.

Cutting and welding an removed area
To align a roof panel and center pillar together for butt welding, temporarily fasten a steel flange to the roof panel and then apply the new center pillar panel. Remove the flange when final welding is done.

Finishing after welding
Grind any areas that were plug welded or butt welded using a disk grinder. Grind carefully to avoid removing too much material. This degrades the strength of the weld.

Finish areas that have been brazed by applying body filler then smooth the area with a flexible file and sander.

Applying anti-rust agent and body sealer
After coating the surface with anti-rust agent, apply body sealer where necessary.
Apply body sealer before assembly.

Anti-rust treatment
Apply anti-rust agent inside of doors and sills by spraying through access holes provided.
