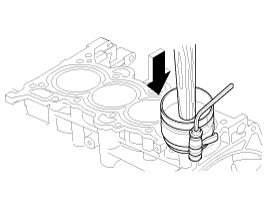
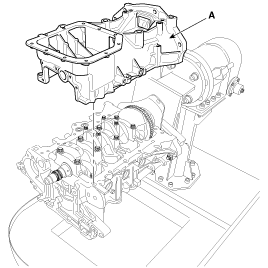
Reassembly
note

Thoroughly clean all parts to assembled.

Before installing the parts, apply fresh engine oil to all sliding and rotating surfaces.

1.

Assemble the piston and the connecting rod.

(1)

Apply a sufficient amount of engine oil to the outer surface of the piston pin and small end bore of the connecting rod.

(2)

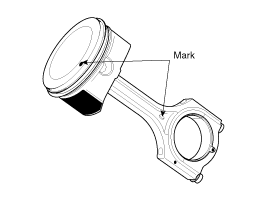
Set the connecting rod and piston with the front marks upward on the support.

(3)

Press the piston pin into the small end bore of the connecting rod.

Pressing load : 500 ~ 1,500 kg (1,102 ~ 3,306 lb)
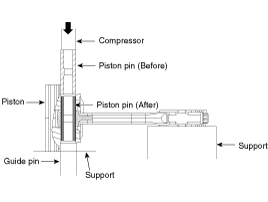
note

Be careful not to damage and scratch the small end bore, piston pin hole and piston pin when inserting the piston pin.

2.

Assemble the piston rings.

(1)

Install the oil ring (two side rails and one spacer) by hand.

(2)

Using a piston ring expander, install the 2 compression rings with the maker mark facing upward.

(3)

Position the piston rings so that the ring ends are as shown.

(The No.1 ring's end gap should be on the opposite side of the No.2 ring's end gap. The lower side rail's end gap should be on the opposite side of the upper side rail's end gap. The spacer's end gap should be between the lower and upper side rails.)

Example)
3.

Assemble the connecting rod bearings.

(1)

Align the bearing claw with the groove of the connecting rod or connecting rod cap and install the bearings (A) in the connecting rod and connecting rod cap (B).

(2)

Apply a coat of engine oil after assembling the bearings.

4.

Insert the piston and connecting rod assemblies into the cylinder bores.

note

Before installing the piston, apply a sufficient amount of engine oil to the ring grooves and cylinder bores.

Insert the piston and connecting rod assembly with the front marks facing the front of the engine.

(1)

Press the piston rings with a ring compressor and check that the rings are securely in place. Then insert the piston into the cylinder bore, and tap it in using the wooden handle of a hammer.

(2)

Stop after the ring compressor pops free, and check the connecting rod-to-crank journal alignment before pushing the piston into place.

(3)

Install the rod caps with bearings, and tighten the bolts.

Tightening torque :

17.7 ~ 21.8 N.m (1.8 ~ 2.2 kgf.m, 13.0 ~ 15.9 lb-ft) + 88 ~ 92°

Using the SST (09221-4A000), tighten the connecting rod cap bolts.

note

Do not reuse the connecting rod cap bolts.

5.

Check the side clearance between piston and connecting rod.

6.

Install the ladder frame.

(1)

Apply the liquid gasket on the ladder frame.

Bead width : 2.5 ~ 3.5 mm (0.0984 ~ 0.1378 in)

note

Apply the sealant, THREE-BOND 1217H or LOCTITE 5900H on the ladder frame rail portion and install it with in five minutes. If when sealant is applied to cylinder block bottom position, sealant position to be same with positon that is applied to ladder frame rail position.

Apply sealant along the inner line of the bolt holes.

(2)

Install the ladder frame (A).

Tightening torque :

18.6 ~ 23.5 N.m (1.9 ~ 2.4 kgf.m, 13.7 ~ 17.4 lb-ft)

7.

Assemble the other parts in the reverse order of disassembly.

Яндекс.Метрика