11.
Remove the engine mounting support bracket (A).
Tightening torque
Nut (B):
63.7 ~ 107.8 N.m (6.5 ~ 11.0 kgf.m, 47.0 ~ 79.5 lb-ft)
Bolt and nuts (C):
58.8 ~ 73.5 N.m (6.0 ~ 7.5 kgf.m, 43.3 ~ 54.2 lb-ft)

Use fender covers to avoid damaging painted surfaces.
To avoid damage, unplug the wiring connectors carefully while holding the connector portion.
Mark all wiring and hoses to avoid misconnection.
In case of removing the high pressure fuel pump, high pressure fuel pipe, delivery pipe, and injector, there may be injury caused by leakage of the high pressure fuel. So don’t do any repair work right after engine stops.
Remove the drive belt.
(Refer to Timing System - "Drive Belt")
Remove the drive belt idler.
(Refer to Timing System - "Idler")
Remove the alternetor.
(Refer to Engine Electrical System - "Alternator")
Remove the alternetor bracket.
(Refer to Engine Electrical System - "Alternator")
Remove the engine room under cover.
(Refer to Engine And Transaxle Assembly - "Engine Room Under Cover")
Remove the crankshaft damper pulley.
(Refer to Timing System - "Crankshaft Damper Pulley")
Remove the water pump.
(Refer to Cooling System - "Water Pump")
Remove the air cleaner assembly.
(Intake and Exhaust System - "Air Cleaner")
Remove the high pressure fuel pump.
(Refer to Engine Control / Fuel System - "High Pressure Fuel Pump")
Remove the cylinder head cover.
(Refer to Cylinder Head Assembly - "Cylinder Head Cover")
Remove the engine mounting support bracket (A).
Tightening torque
Nut (B):
63.7 ~ 107.8 N.m (6.5 ~ 11.0 kgf.m, 47.0 ~ 79.5 lb-ft)
Bolt and nuts (C):
58.8 ~ 73.5 N.m (6.0 ~ 7.5 kgf.m, 43.3 ~ 54.2 lb-ft)
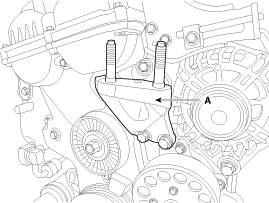
Remove the engine support bracket (A).
Tightening torque
Bolts:
29.4 ~ 41.2 N.m (3.0 ~ 4.2 kgf.m, 21.7 ~ 30.4 lb-ft)
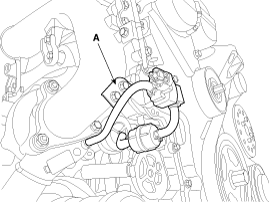
Remove the turbo charger actuator solenoid valve bracket (A).
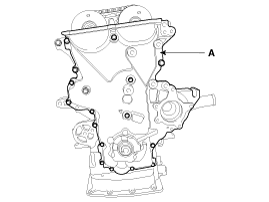
Remove the timing chain cover(A).