7.
Remove the intercooler inlet hoses & pipe (A).
Tightening torque
Bolt :
19.6 ~ 26.4 N.m (2.0 ~ 2.7 kgf.m, 14.4 ~ 19.5 lb-ft)
Clamp :
4.9 ~ 6.8 N.m (0.5 ~ 0.7 kgf.m, 3.6 ~ 5.0 lb-ft)

Engine removal is not required for this procedure.
Use fender covers to avoid damaging painted surfaces.
To avoid damaging the cylinder head, wait until the engine coolant temperature drops below normal temperature before removing it.
When handling a metal gasket, take care not to fold the gasket or damage the contact surface of the gasket.
To avoid damage, unplug the wiring connectors carefully while holding the connector portion.
Mark all wiring and hoses to avoid misconnection.
Remove the engine cover.
Disconnect the battery negative terminal.
Remove the air duct and air cleaner assembly.
(Refer to Intake and Exhaust System - "Air Cleaner")
Remove the battery and battery tray.
(Refer to Engine Electrical System - "Battery")
Remove the engine room under cover.
(Refer to Engine And Transmission Assembly - "Engine Room Under Cover")
Loosen the drain plug and drain the coolant. Open the radiator cap to make rapid draining.
(Refer to Cooling System - "Coolant")
Remove the intercooler inlet hoses & pipe (A).
Tightening torque
Bolt :
19.6 ~ 26.4 N.m (2.0 ~ 2.7 kgf.m, 14.4 ~ 19.5 lb-ft)
Clamp :
4.9 ~ 6.8 N.m (0.5 ~ 0.7 kgf.m, 3.6 ~ 5.0 lb-ft)
Remove the intercooler outlet hose (A).
Tightening torque:
4.9 ~ 6.8 N.m (0.5 ~ 0.7 kgf.m, 3.6 ~ 5.0 lb-ft)
Disconnect the radiator upper hose (B).

Disconnect the radiator lower hose (A).

Disconnect the engine wiring connector and haness clamp and then remove the cylinder head protector and wiring from engine.
Turbo charger solenoid valve connector
Exhuast OCV(Oil Control Valve) connector
Ignition connector # 1,2,3,4
FPCV(Fuel Pressure Control Valve) connector
Condenser connector
Exhuast CMPS(Cam position Sensor) connector
Intake CMPS(Cam Positoin Sensor) connector
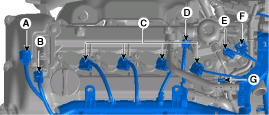
Injector Extension connector
PCSV(Purge Control Solenoid Valve) connector
Intake OCV(Oil Control Valve) connector
Alternator connector
A/C compressor switch connector
MAPS (Map Sensor) connector
Knock Sensor connector
Front connector
CKPS(Crank Shaft Position Sensor) connector
Vacuum Pump Extension connector
ETC(Electric Throttle Control) Module connector

WTS(Water Temperature Sensor) connector
Ground Cable
Front Oxygen Sensor connector
Rear Oxygen Sensor connector

Disconnect the heater hoses (A) and brake booster vacuum hose(B).

Remove the vaccum pipe assembly (A).

Remove the cylinder head cover.
(Refer to Cylinder Head Assembly - "Cylinder Head Cover")
Remove the timing chain cover.
(Refet to Timing System - "Timing Chain Cover")
Remove the timing chain.
(Refer to Timing System - "Timing Chain")
Remove the camshaft.
(Refer to Cylinder Head Assembly - "Camshaft")
Remove the intake manifold.
(Refer to Intake And Exhaust System - "Intake Manifold")
Remove the turbo manifold.
(Refer to Intake And Exhaust System - "Exhaust Manifold")
Remove the delivery pipe assembly.
(Refer to Engine Control / Fuel System - "Delivery Pipe")
Disconnect the bypass hose, and then remove the water temperature control assembly.
(Refer to Cooling System - "Water Temperature Control Assembly")
Remove the heater pipe.
(Refer to Cooling System - "Water Temperature Control Assembly")
Remove the intake OCV(Oil Control Valve).
(Refer to Engine Control / Fuel System - "CVVT Oil Control Valve")
Remove the rear hanger (A).

Remove the cylinder head cover heat protector (A).

Remove the cylinder head bolts, then remove the cylinder head.
Uniformly loosen and remove the 10 cylinder head bolts, in several passes, in the sequence shown.

Head warpage or cracking could result from removing bolts in an incorrect order.
Lift the cylinder head from the cylinder block and put the cylinder head on wooden blocks.
Be careful not to damage the contact surfaces of the cylinder head and cylinder block.
